Windows OS Hub
  • Windows
    • Windows 11
    • Windows Server 2022
    • Windows 10
    • Windows Server 2019
    • Windows Server 2016
  • Microsoft
    • Active Directory (AD DS)
    • Group Policies (GPOs)
    • Exchange Server
    • Azure and Microsoft 365
    • Microsoft Office
  • Virtualization
    • VMware
    • Hyper-V
  • PowerShell
  • Linux
  • Home
  • About

Windows OS Hub

  • Windows
    • Windows 11
    • Windows Server 2022
    • Windows 10
    • Windows Server 2019
    • Windows Server 2016
  • Microsoft
    • Active Directory (AD DS)
    • Group Policies (GPOs)
    • Exchange Server
    • Azure and Microsoft 365
    • Microsoft Office
  • Virtualization
    • VMware
    • Hyper-V
  • PowerShell
  • Linux

 Windows OS Hub / Windows 11 / Change BIOS from Legacy to UEFI without Reinstalling Windows

April 23, 2025 Windows 10Windows 11

Change BIOS from Legacy to UEFI without Reinstalling Windows

In this article, we’ll explain how to switch a Windows computer from BIOS (Legacy) boot mode to UEFI with Secure Boot without reinstalling the operating system or losing any data. Since systems in Legacy mode (including virtual machines) can only boot from disks with an MBR partition table, switching to UEFI boot mode requires the hard disk to be converted to GPT (GUID Partition Table) format.

The Windows 11 system requirements indicate the mandatory presence of a TPM 2.0 chip and UEFI+Secure Boot. There is a workaround to install Windows 11 without a TPM, UEFI, and Secure Boot, but it is not recommended for production use. Therefore, when upgrading from Windows 10 to Windows 11 on a computer with an MBR bootloader, it is recommended to enable UEFI mode or use an unofficial method to upgrade to Windows 11 on unsupported hardware.

Before you start converting Windows installed on a legacy BIOS device to UEFI mode, make sure that your environment meets the following requirements:

  • UEFI boot mode is supported by the firmware on your computer’s motherboard. Legacy BIOS (compatibility) mode is currently enabled (check the BIOS/UEFI settings on the device and the motherboard specification)
  • The computer is running an x64 version of Windows (at least Windows 10 1703 or Windows Server 2016)
  • Dual-boot mode is not used.
  • BitLocker encryption for the system partition is not enabled
  • The system drive is formatted with the MBR partition table (the number of partitions is not more than three)
  • There is enough free space on the hard disk to create an EFI system partition (default size is 100MB).

Open a PowerShell prompt and check that the computer is booting in BIOS (Legacy) mode:

$env:firmware_type

$env:firmware_type - Legacy

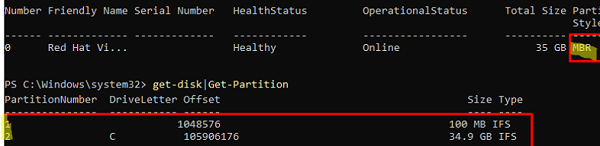
Use PowerShell to check the disk partition style. It should be an MBR with no more than 3 primary partitions:

Get-Disk
Get-Disk |Get-Partition

Get-Partition table: MBR

Starting with Windows 10 version 1703, Microsoft introduced the built-in mbr2gpt tool, which can convert a disk’s partition table from MBR to GPT without data loss.

First,  check if the  MBR partition table on a system drive can be safely converted to GPT:

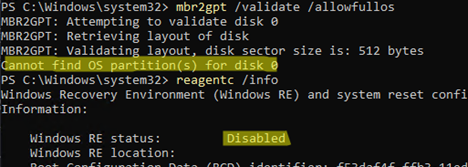
mbr2gpt /validate /allowfullos

If the MBR to GPT conversion is possible, the tool will return:

MBR2GPT: Validation completed successfully

mbr2gpt /validate

If an Disk layout validation failed for disk 0 error occurs:

  • Make sure that your MBR drive has no more than 3 primary partitions
  • There must be no extended, logical, or dynamic partitions
  • There is at least 500MB of free disk space to create system partitions and to store the primary and backup GUID partition tables

Another possible error, ‘Cannot find OS partition(s) for disk 0‘ indicates that the BCD bootloader configuration is missing an entry for booting to the Windows Recovery Environment. Check this out:

reagentc /info

Windows RE status: Disabled

mbr2gpt: Cannot find OS partition(s) for disk 0

The post at the link describes how to enable the WinRE recovery environment.

Once all the checks have been passed, start the online MBR to GPT conversion directly from running Windows:

MBR2GPT.EXE /convert /allowfullos

MBR2GPT.EXE /convert

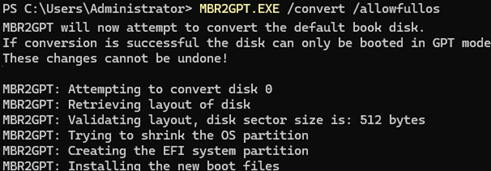
Confirm that the partition table has been successfully converted to GPT after the command has finished:

Get-Disk

check GPT partition style

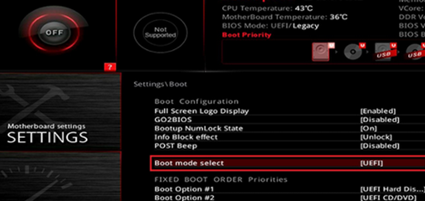
Then you need to restart the computer, enter the BIOS/UEFI Settings menu, disable Legacy BIOS mode, and change to UEFI+Secure Boot mode.

On a physical computer, to enter the UEFI settings, press the F2, Delete, or F1 key during boot-up. The name and location of the option that enables Legacy BIOS boot mode may vary depending on the motherboard’s firmware and version. This firmware option may appear under various names, such as Compatibility Support Mode, Legacy Mode, CSM Boot, Legacy OS, etc. Change it to UEFI.

Change boot mode in UEFI firmware

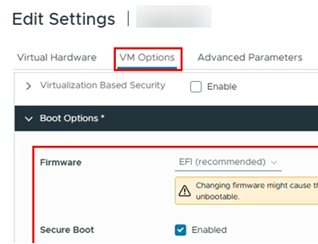
If this is a VMware virtual machine, go to the VM settings, change the boot options to EFI firmware mode, and enable the Secure Boot option.

VM - switch firmware to EFI

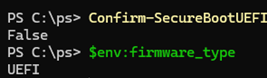
Once you have successfully booted Windows, check that UEFI+ Secure Boot mode is being used:

Confirm-SecureBootUEFI

If Secure Boot mode is disabled, use the command to check that UEFI boot mode is used:

$env:firmware_type

Confirm-SecureBootUEFI

On older computers with legacy BIOS that don’t support UEFI, you can boot Windows from an external USB flash drive using an MBR layout. In this case, it is possible to use the GPT partition table on the hard disk’s system partition. Please refer to the article How to boot Windows from a GPT disk on a BIOS computer (without UEFI).
0 comment
4
Facebook Twitter Google + Pinterest
previous post
Remove ‘Your License isn’t Genuine’ Banner in MS Office
next post
Cannot Install Network Adapter Drivers on Windows Server

Related Reading

How to Cancel Windows Update Pending Restart Loop

May 6, 2025

View Windows Update History with PowerShell (CMD)

April 30, 2025

Remove ‘Your License isn’t Genuine’ Banner in MS...

April 21, 2025

Uninstalling Windows Updates via CMD/PowerShell

April 18, 2025

Allowing Ping (ICMP Echo) Responses in Windows Firewall

April 15, 2025

Leave a Comment Cancel Reply

join us telegram channel https://t.me/woshub
Join WindowsHub Telegram channel to get the latest updates!

Categories

  • Active Directory
  • Group Policies
  • Exchange Server
  • Microsoft 365
  • Azure
  • Windows 11
  • Windows 10
  • Windows Server 2022
  • Windows Server 2019
  • Windows Server 2016
  • PowerShell
  • VMware
  • Hyper-V
  • Linux
  • MS Office

Recent Posts

  • Cannot Install Network Adapter Drivers on Windows Server

    April 29, 2025
  • Change BIOS from Legacy to UEFI without Reinstalling Windows

    April 21, 2025
  • How to Prefer IPv4 over IPv6 in Windows Networks

    April 9, 2025
  • Load Drivers from WinPE or Recovery CMD

    March 26, 2025
  • How to Block Common (Weak) Passwords in Active Directory

    March 25, 2025
  • Fix: The referenced assembly could not be found error (0x80073701) on Windows

    March 17, 2025
  • Exclude a Specific User or Computer from Group Policy

    March 12, 2025
  • AD Domain Join: Computer Account Re-use Blocked

    March 11, 2025
  • How to Write Logs to the Windows Event Viewer from PowerShell/CMD

    March 3, 2025
  • How to Hide (Block) a Specific Windows Update

    February 25, 2025

Follow us

  • Facebook
  • Twitter
  • Telegram
Popular Posts
  • Upgrading to Windows 11 on Unsupported Hardware
  • Create a Custom Windows Image with Pre-installed Apps
  • How to Assign (Passthrough) a Physical GPU to a Hyper-V Virtual Machine
  • How to Copy/Paste to MS Word without Losing Formatting
  • Fix: Windows Update Tab (Button) is Missing from Settings
  • Get Started with Docker on Windows (WSL2) without Docker Desktop
  • Fix: Your IT Administrator Has Limited Access to Virus & Threat Protection
Footer Logo

@2014 - 2024 - Windows OS Hub. All about operating systems for sysadmins


Back To Top