Windows OS Hub
  • Windows Server
    • Windows Server 2022
    • Windows Server 2019
    • Windows Server 2016
    • Windows Server 2012 R2
    • Windows Server 2012
    • Windows Server 2008 R2
    • SCCM
  • Active Directory
    • Active Directory Domain Services (AD DS)
    • Group Policies
  • Windows Clients
    • Windows 11
    • Windows 10
    • Windows 8
    • Windows 7
    • Windows XP
    • MS Office
    • Outlook
  • Virtualization
    • VMWare
    • Hyper-V
    • KVM
  • PowerShell
  • Exchange
  • Cloud
    • Azure
    • Microsoft 365
    • Office 365
  • Linux
    • CentOS
    • RHEL
    • Ubuntu
  • Home
  • About

Windows OS Hub

  • Windows Server
    • Windows Server 2022
    • Windows Server 2019
    • Windows Server 2016
    • Windows Server 2012 R2
    • Windows Server 2012
    • Windows Server 2008 R2
    • SCCM
  • Active Directory
    • Active Directory Domain Services (AD DS)
    • Group Policies
  • Windows Clients
    • Windows 11
    • Windows 10
    • Windows 8
    • Windows 7
    • Windows XP
    • MS Office
    • Outlook
  • Virtualization
    • VMWare
    • Hyper-V
    • KVM
  • PowerShell
  • Exchange
  • Cloud
    • Azure
    • Microsoft 365
    • Office 365
  • Linux
    • CentOS
    • RHEL
    • Ubuntu

 Windows OS Hub / Windows Server 2016 / How to Enable and Configure MPIO on Windows Server 2016/2012R2?

September 22, 2020 PowerShellWindows Server 2012 R2Windows Server 2016

How to Enable and Configure MPIO on Windows Server 2016/2012R2?

In this article we will consider how to install and configure MPIO on Windows Server 2016/2012 R2. MPIO (Multi—Path Input Output) is a technology that allows to build fault-tolerant transport to a data storage system (or a storage server) by using redundant paths. Additional paths between a server and a storage are created using redundant physical components (switches, cables, adapters or NICs). This redundancy type has a drawback: an operating system may see the same LUN at different paths and treat it as different drives.

If a server can access a logical disk (LUN) using multiple iSCSI initiator adapter or multiple Fibre Channel ports, the Device/Disk Manager without the MPIO module will show more LUNs than there actually are (= the number of paths to a LUN * the number of presented LUNs) if an MPIO module is not installed .

The following screenshot shows that Windows without MPIO sees 2 drives with different paths, which are in fact the same LUN (the list of presented disks may be displayed using the Get-Disk PowerShell cmdlet).

get-disk - lun displaying as 2 drives

If the OS supports MPIO, it will see each of the disks presented to it in one copy. If MPIO is enabled, a server may access data on a storage using multiple paths that makes access to a connected LUN faster and allows using multiple network or HBA adapters.
MPIO may use an alternative logical path if one or more components fail, thus making an operating system use another route to access a logical disk (LUN) maintaining data access consistency. So, MPIO is an important component of a fail-tolerant storage and data access system, and MPIO modules can distribute the load on the same LUN across different paths.

Tip. If an OS doesn’t support MPIO, leave only one path to a LUN to prevent data loss. Enable only one Fibre Channel port or one iSCSI initiator adapter on a server. Also, disable additional paths to the LUN on the data storage system and SAN/network switch levels.

Contents:
  • Installing MPIO Installation on Windows Server 2016/2012R2
  • Configuring MPIO on Windows Server 2016
  • SAN (Disk) Policy on Windows Server

Installing MPIO Installation on Windows Server 2016/2012R2

Windows Server supports multi-path input output (MPIO) starting from Windows Server 2008 R2. Microsoft MPIO provides high availability and load balancing using multiple connections to a storage, doesn’t depend on any protocols and supports disk array and storage connection using iSCSI, Fiber Channel and SAS.

By default, MPIO module is disabled on Windows Server. There are two ways to install it in Windows Server 2016:

  • From a graphical interface using Server Manager console;
  • From the PowerShell command line.

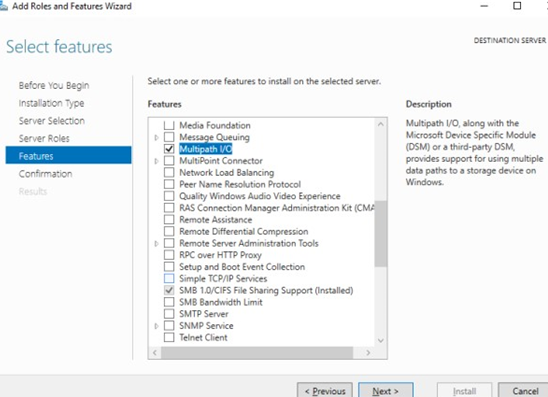
Enable MPIO Using Server Manager

  1. Open the Server Manager;
  2. Find and check the Multipath I/O in the Features list ;Install MPIO feature on WIndows Server via Server Manager
  3. Finish MPIO installation and restart the server.

Installing Multipath-IO Using PowerShell

Run the PowerShell console as an administrator and use the following command to install the Windows Server feature:

Add-WindowsFeature -Name 'Multipath-IO'

Add-WindowsFeature -Name 'Multipath-IO' - enabling mpio on Windows Server

To make sure that MPIO has been installed on your Windows Server, run this command:

Get-WindowsFeature -Name 'Multipath-IO'

windows server - get 'Multipath-IO' powershell

Note. To disable MPIO, enter the following command:

Remove-WindowsFeature -Name 'Multipath-IO'

Configuring MPIO on Windows Server 2016

After installing the MPIO module, you need to activate it for the LUNs that are available by multiple paths. By default, Windows sees each connection to a disk as different logical disks (LUNs).

Tip. Among MPIO components, there is a special module, MSDSM (Microsoft Device Service Module) that allows you to manage load balancing policies. By default, MPIO is installed together with the standard Microsoft DSM. However, in most cases it is recommended to install the DSM module provided by your storage manufacturer (IBM DSM, HP DSM MPIO, etc.). Typically, native DSM offers better performance and more features than Microsoft (since the manufacturer builds its DSM based on the operating conditions and characteristics of its hardware).

Allow the DSM module by Microsoft (MSDSM) to automatically merge SAN disks based on the connection type. MSDSM automatically detects LUNs that have multiple paths to a storage and supports most popular storage devices.

You can do it from the command prompt:

  • For SAS disks: Enable-MSDSMAutomaticClaim -BusType SAS
  • For iSCSI disks: Enable-MSDSMAutomaticClaim -BusType iSCSI
Note. You can do the same using the mpclaim tools (it appeared in Windows 2008 R2). The following command will scan all devices detected by a system, find those that have multiple paths and enable MPIO support for them:

mpclaim.exe -r -i -a ""

You can also enable DSM in the GUI. Open the Server Manager and select MPIO in the Tools menu (or run the command: mpiocpl).

Go to the Discover Multi—Paths tab, check Add support for SASdevices (or Add supportfor iSCSI devices if you are using iSCSI storage) and click Add. Then restart your server.

discover multi-paths: Add support for SAS and iSCSI devices

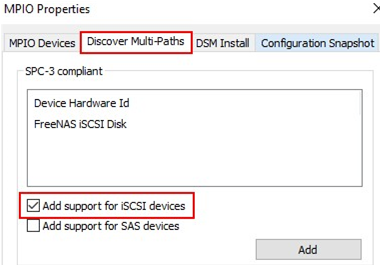
After the restart, open the Device Manager (or the Disk Manager) and make sure that the number of connected disks (LUNs) available to your server has reduced twice (if there are two paths to your storage device).

You can manage the list of devices with MPIO support enabled in the MPIO Devices tab (or using the Get-MSDSMSupportedHw command).

mpio devices

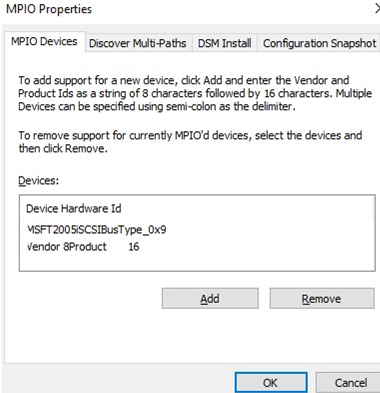
You can add new MPIO devices by clicking Add or from PowerShell:

New-MSDSMSupportedHw -VendorId <vend> -ProductId <product>

If you are deploying a cluster, configure MPIO on all nodes.

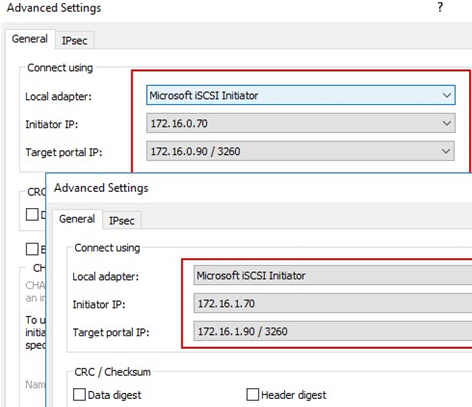
If you connect an iSCSI target via 2 paths and want to use MPIO for it, select iSCSI LUN when you connect a Target, click Connect and check the Enable multi—path option.

enable multipath for iscsi device on windows server 2016

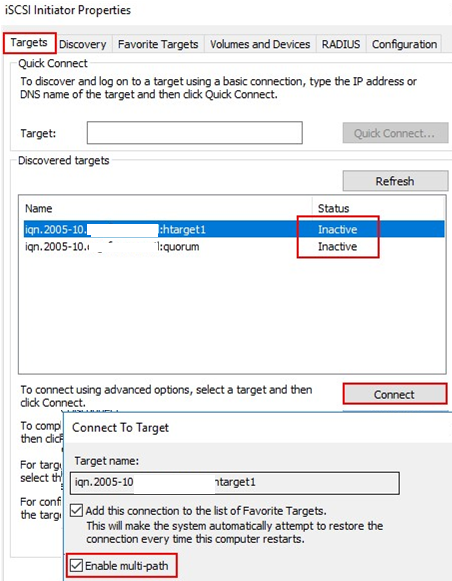
Then click Advanced and bind different initiator IP addresses to different target IP addresses.

Windows Server 2016 multipath iscsi - bind different target IP addresses to different initiators

You can get current MPIO settings using PowerShell:

Get-MPIOSetting

Get-MPIOSetting

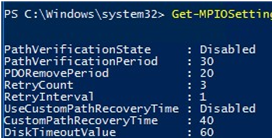
PathVerificationState     : Disabled
PathVerificationPeriod    : 30
PDORemovePeriod           : 20
RetryCount                : 3
RetryInterval             : 1
UseCustomPathRecoveryTime : Disabled
CustomPathRecoveryTime    : 40
DiskTimeoutValue          : 60

You can change MPIO timer settings as follows (for example, let’s enable recommended settings for the all-flash array):

Set-MPIOSetting -NewPathRecoveryInterval 20 -CustomPathRecovery Enabled -NewPDORemovePeriod 30 -NewDiskTimeout 60 -NewPathVerificationState Enabled

The following MPIO balancing policies are available:

  • FOO — Fail Over Only
  • RR — Round Robin
  • LQD — Least Queue Depth
  • LB — Least Blocks

To change a balancing policy:

Set-MSDSMGlobalLoadBalancePolicy -Policy RR

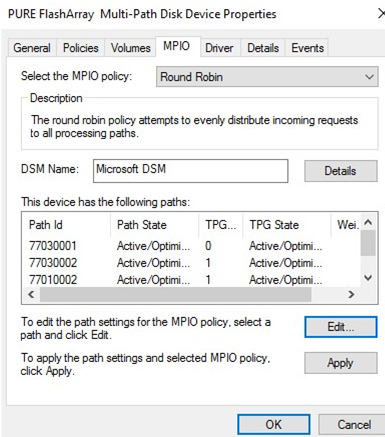
You can also select the balancing policy in the MPIO tab of the connected LUN properties. In this example, the Round Robin policy is selected for the array.

change MPIO load balancing policy on Windows Server 2016

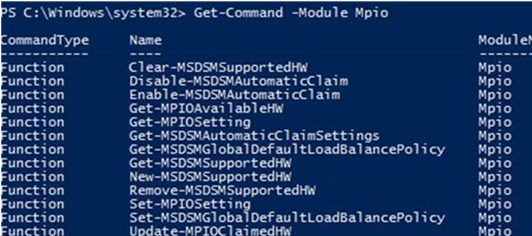
To view the full list of PowerShell commands available in the MPIO module, run this command:

Get-Command –Module Mpio

powershell mpio module

SAN (Disk) Policy on Windows Server

Windows has a special disk policy (SAN Policy) that determines whether disks must be mounted automatically when they are connected to a host.

You can get the current SAN Policy setting using diskpart. By default, Offline Shared policy for SAN is used:

diskpart
DISKPART>>san</code

Due to this SAN policy, external storage LUNs may be disabled after a restart. Check the article The Disk Is Offline Because of Policy Set by an Administrator.

To mount the drives automatically, change the SAN Policy value to OnlineAll.

DISKPART> san policy=OnlineAll

diskpart change san policy from offline shared to onlineall

Possible SAN Policy values:

OfflineAll All disks are offline by default
OfflineInternal All disks on internal buses are offline
OfflineShared All disks connected via iSCSI, FC or SAS are offline
OnlineAll All disks get online automatically (recommended)

0 comment
1
Facebook Twitter Google + Pinterest
previous post
Configuring L2TP/IPSec VPN Connection Behind a NAT, VPN Error Code 809
next post
How to Install Only Specific Apps in Office 2016/Office 365?

Related Reading

Using Previous Command History in PowerShell Console

January 31, 2023

How to Install the PowerShell Active Directory Module...

January 31, 2023

Finding Duplicate E-mail (SMTP) Addresses in Exchange

January 27, 2023

How to Disable or Uninstall Internet Explorer (IE)...

January 26, 2023

How to Delete Old User Profiles in Windows?

January 25, 2023

Leave a Comment Cancel Reply

Categories

  • Active Directory
  • Group Policies
  • Exchange Server
  • Microsoft 365
  • Azure
  • Windows 11
  • Windows 10
  • Windows Server 2022
  • Windows Server 2019
  • Windows Server 2016
  • PowerShell
  • VMWare
  • Hyper-V
  • Linux
  • MS Office

Recent Posts

  • Using Previous Command History in PowerShell Console

    January 31, 2023
  • How to Install the PowerShell Active Directory Module and Manage AD?

    January 31, 2023
  • Finding Duplicate E-mail (SMTP) Addresses in Exchange

    January 27, 2023
  • How to Delete Old User Profiles in Windows?

    January 25, 2023
  • How to Install Free VMware Hypervisor (ESXi)?

    January 24, 2023
  • How to Enable TLS 1.2 on Windows?

    January 18, 2023
  • Allow or Prevent Non-Admin Users from Reboot/Shutdown Windows

    January 17, 2023
  • Fix: Can’t Extend Volume in Windows

    January 12, 2023
  • Wi-Fi (Internet) Disconnects After Sleep or Hibernation on Windows 10/11

    January 11, 2023
  • Adding Trusted Root Certificates on Linux

    January 9, 2023

Follow us

woshub.com
  • Facebook
  • Twitter
  • RSS
Popular Posts
  • Installing RSAT Administration Tools on Windows 10 and 11
  • Get-ADUser: Find Active Directory User Info with PowerShell
  • How to Hide Installed Programs in Windows 10 and 11?
  • Managing Printers and Drivers with PowerShell in Windows 10 / Server 2016
  • How to Create a UEFI Bootable USB Drive to Install Windows 10 or 7?
  • PowerShell: Get Folder Sizes on Disk in Windows
  • Deploy PowerShell Active Directory Module without Installing RSAT
Footer Logo

@2014 - 2023 - Windows OS Hub. All about operating systems for sysadmins


Back To Top