In this guide, we’ll cover how to create a custom Windows 10/11 installation image with pre-installed apps, necessary files, and other environment and application settings. Currently, many admins prefer to deploy a clean Windows image and then install all the required programs and tools on the computer: deploy software via GPO, using the installation commands in AutoUnattend.xml or in the %WINDIR%\Setup\Scripts\SetupComplete.cmd script (allow to install software during OOBE), GPO logon scripts. or using other automation tools (SCCM, Intune, MDT, Ansible). However, in some cases, business specifics require that a pre-built Windows image with all the necessary programs be deployed to end-user computers.
The process of creating your custom Windows installation image with pre-installed software can include the following steps:
- Deploy a clean Windows instance on a reference computer (virtual machine);
- Boot Windows in audit mode, install the apps, configure the environment;
- Boot the device into the WinPE environment and capture the WIM image of the installed Windows using DISM;
- Replace the original install.wim on the installation USB flash drive (ISO image).
Building a Reference Windows Image with Pre-installed Software
The first step is to create a reference image of Windows with all the programs, files, and settings you need. Perform a clean Windows installation on a virtual machine or computer.
Download the original Windows 10/11 installation image as an ISO file or burn it directly to a bootable USB flash drive using the Media Creation Tool or Rufus.
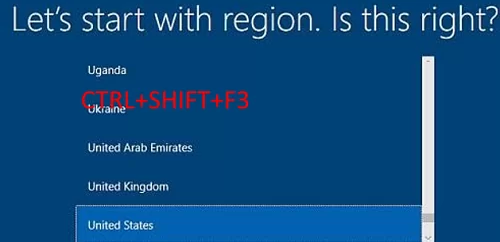
Perform a manual Windows installation and press CTRL+SHIFT+F3 at the OOBE stage (when prompted to select regional settings). This will put the computer into Audit Mode, and you will be automatically logged in as the built-in Administrator account.
When the desktop appears, minimize the Sysprep window (don’t close it!!). Then you can start installing programs and updates, and configuring the necessary Windows settings.
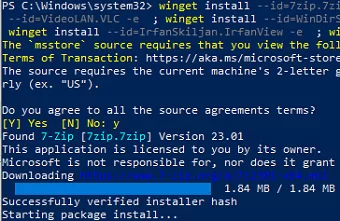
I will use the WinGet package manager to install various apps and tools on Windows:
winget install --id=7zip.7zip -e ; winget install --id=Notepad++.Notepad++ -e ; winget install --id=VideoLAN.VLC -e ; winget install --id=WinDirStat.WinDirStat -e ; winget install --id=dotPDNLLC.paintdotnet -e ; winget install --id=IrfanSkiljan.IrfanView -e ; winget install --id=Microsoft.PowerToys -e
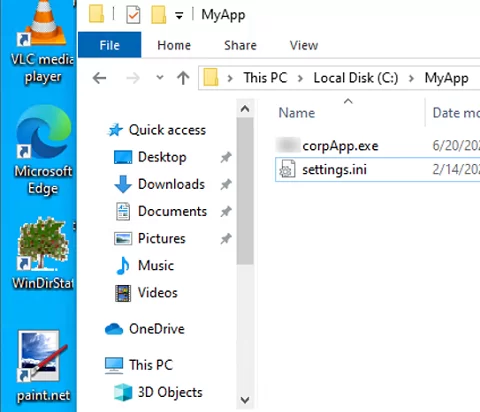
I also manually created directories and copied files for several business apps.
Customize desktop shortcuts, Start menu tiles, wallpapers, screensavers, color schemes, and more. Configure local Group Policy settings using the gpedit.msc editor. These settings will be applied to all computers that you deploy from this custom Windows image.
Once you have set up the operating system and applications, you must clean up Windows to reduce the final image size.
Delete existing shadow copies and restore points:
vssadmin delete shadows /All /Quiet
Clean up unused components and update files in the WinSxS folder:
Dism.exe /Online /Cleanup-Image /StartComponentCleanup /ResetBase
Remove the Windows Update cache files:
del %windir%\SoftwareDistribution\Download\*.* /f /s /q
You can use this PowerShell script to clean up the Temp, Downloads, and Cache folders in the user profile.
Perform a disk cleanup using the cleanmgr tool:
Cleanmgr /sagerun:1
for /F "tokens=*" %1 in ('wevtutil.exe el') DO wevtutil.exe cl "%1"
Empty the Recycle Bin in Windows:
Clear-RecycleBin -Force
To apply the current user’s settings to the Default user (used as a template when creating new Windows users), create an unattend.xml answer file in the C:\Windows\System32\Sysprep directory.
<?xml version="1.0" encoding="utf-8"?>
<unattend xmlns="urn:schemas-microsoft-com:unattend">
<settings pass="specialize">
<component name="Microsoft-Windows-Shell-Setup" processorArchitecture="amd64" publicKeyToken="31bf3856ad364e35" language="neutral" versionScope="nonSxS" xmlns:wcm="http://schemas.microsoft.com/WMIConfig/2002/State" xmlns:xsi="http://www.w3.org/2001/XMLSchema-instance">
<CopyProfile>true</CopyProfile>
</component>
</settings>
</unattend>
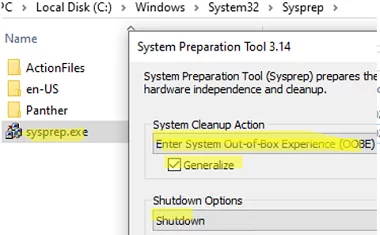
The final step is to prepare your custom Windows image for deployment with the sysprep.exe tool. Expand the Sysprep window and select the following options:
- Enter System Out-of-Box Experience (OOBE)
- Generalize
- Shutdown
When this process is complete, the computer will automatically shut down.
Capture a Custom Windows Image Using DISM
At this stage, you will need to capture an offline Windows image from a local drive, save it as a WIM file, and place it on a separate drive (we connected a separate 60GB empty drive to the computer).
Boot the computer with the referenced Windows image into the WinPE environment (WinRE). Using the Windows installation USB stick, boot the computer and press Shift+F10 to open the command prompt.
Identify the drive letters assigned to the Windows partition and the empty drive to which the WIM file will be copied. Run the command:
diskpart
 list disk
 exit
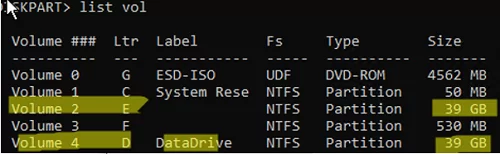
In this example, the drive containing Windows is assigned the letter E: and the empty drive is D:.
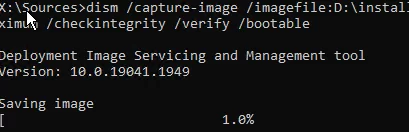
To capture an offline Windows image from the E drive and save the resulting WIM image to the D drive, run the command:
dism /capture-image /imagefile:D:\install.wim /capturedir:E:\ /ScratchDir:D:\ /name:"MyWinImage" /compress:maximum /checkintegrity /verify /bootable
It took about 30 minutes to capture the image in my case.
Replace the Original Install.wim Image File on the USB Flash Drive
Once you have captured your customized Windows image, you can replace the original install.wim or install.esd image file in the \sources folder on the installation USB flash drive (ESD is the maximum compression format used for WIM).
In my case, I renamed the old image file to install.esd_bak and copied the new install.wim image to the USB stick.
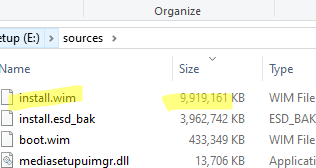
Note that the WIM image size with pre-installed software has increased significantly (from 4GB to 10GB).
If you have a FAT32 bootable USB key for installing Windows on UEFI computers, you cannot save a WIM file larger than 4GB on this file system. A large WIM image file must be split into several smaller SWM files in this case:
Dism /Split-Image /ImageFile:D:\sources\install.wim /SWMFile:c:\tmp\install.swm /FileSize:3500
In this case, DISM will create four files install.swm, install2.swm, install3.swm, and install4.swm. Copy these files to the \sources folder on the installation media. When Windows Setup installs the operating system, it merges the SWM files.
Now you can use your bootable USB flash drive to deploy the Windows image you created to any computer (you can also install Windows over the network using PXE boot).
Check that all preinstalled apps are available after Windows installation is complete:
Get-Package

The downside of this method of deploying a preconfigured Windows image is that you have to rebuild the image to update any of the apps it contains.
10 comments
Thanks for the awesome tutorial!
It has given me great insight on how to prep my custom ISO since I have not had great success with other methods.
I do have a few questions that I hope don’t mind answering. It could save me much time and aggravation.
I do not have a “reference computer” or any experience with virtual machines. Can Hyper-V Manager accomplish the task in the article?
If not, is there a free virtual machine service, like Oracle VM VirtualBox or VMware Workstation Player, that can do this and use the hardware drivers from the host machine?
Thanks again!
Thank you for tutorial!
I did everything from it.
Tried to install the image, get to the point I need to enter license key and after entering right key (from the label on the bottom of the laptop) I get an error message saying: “The product key entered does not match any of the windows images available for installation. Enter a different product key”
I’m using Win11 Pro OEM version
Tried to create PID.txt file with: [PID] Value=xxxxx-xxxxx-xxxxx-xxxxx-xxxxx, with license key itself – doesn’t work.
Tried to create ei.cfg file and write in it: [Channel] Retail
[VL] 0
doesn’t work.
Would appreciate help
i have the same issue if you had already solved it, please tell me the solution
thanks in advance
Is it mandatory to customize the image in audit mode? In other words, what isntead if I setup everything when the physical pc boots up the first time and then once finished I run the sysprep /oobe /generalize /shutdown ? Thanks.
In the audit mode, the default user profile settings are updated. These settings are then applied to all new users. Also, this allows to remove user-specific information from the user profile.
If audit mode is not used, the user setting in the profile will be lost during OS deployment.
Advice here:
*The best disk part command is “list volume”. For me anyway list disk does not show drive letters.
*I had to remove “client web experience” and “widgets platform runtime” to finish sysprep. Also had to remove notepad++ that I had installed from winget.
*i found one of the commands didn’t work: “ del %windir%\SoftwareDistribution\Download\*.* /f /s /q” i had to find an updated command for this but now i can’t remember what it was sorry!
Hi Woshub Team,
I used this tutorial twice,
In Windows 11 22H2, this method worked very well, but now in Windows 11 24H2 & 25H2 it states an error “Windows 11 Installation Failed” during Installation even everything is fine and if I use that captured ‘Install.wim’ in Windows 11 23H2’s ISO it just work fine without any issue.
Please help me out getting it fixed.
Thanks
Vincent Oliver
Hi Vincent,
Start troubleshooting your case by checking the Windows deployment logs on the device. This guide explains the relationship between common Windows deployment scenarios and phases and different log files.
https://learn.microsoft.com/en-us/windows-hardware/manufacture/desktop/deployment-troubleshooting-and-log-files?view=windows-11
Remove C:\Windows.old before running sysprep
Windows 11 installation failed after selecting the installation drive, can the administrator guide me to fix it specifically, I’m a newbie