In this article, we’ll show you how to centrally deploy software to computers in an Active Directory domain using Group Policy. We’ll cover both traditional Windows applications distributed as MSI packages and methods for deploying applications that are available only as EXE installers.
The Group Policy Software Installation (GPSI) extension, which is built into Windows, enables administrators to install, update, and remove applications on domain-joined computers using MSI packages. GPSI also supports deploying EXE applications that have been repackaged as ZAP files, although this method provides fewer features and has several limitations compared to native MSI deployment.
Extract an MSI Package from an EXE Setup File
Let’s see how to install the MSI software package on users’ computers via Windows Group Policies using the example of the Microsoft Teams client.
Download the MSI package with the Teams client (http://aka.ms/teams64bitmsi) and copy Teams_windows_x64.msi to the SYSVOL folder on the domain controller (or to any other shared folder on a file or DFS server). Check the permissions for this network folder. Domain users must have Read and Execute permissions, but not write permissions.

Not all program installers are provided in the form of MSI package files. Developers most often provide them as executable EXE installer files, which are not suitable for deployment via GPO. However, in some cases, you can extract the MSI package from the EXE installation file:
- Some EXE installers extract their files into the
%temp%directory during installation. So, after running the program installation, minimize the installation window, try to open this folder, and find the source of the installation MSI file in it. - Another way to extract an MSI file is to try to open the setup EXE file with 7-Zip. Start 7-Zip and select File -> 7ZIP –> Open Archive. 7-Zip will attempt to open an EXE file as an archive. In our case, we successfully extracted the MSI and MST files from the Acrobat Reader installation EXE file.

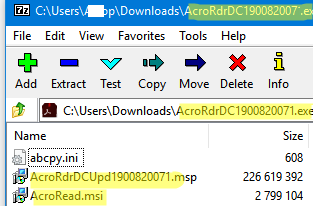
Deploying Software (MSI Packages) to Domain Computers via GPO
Then create a new domain Group Policy Object to install your software.
- Open the domain Group Policy Management console (
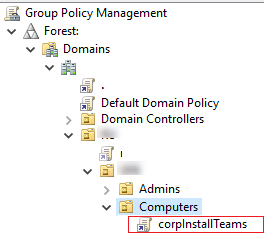
gpmc.msc). - Create a new policy (CorpInstallTeams) and link it to the OU containing the computers on which you want to install the app (Create a GPO in this domain, and link it here).
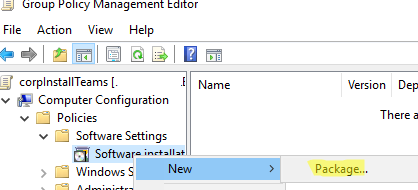
- Edit the GPO and go to Computer Configuration -> Policies -> Software Settings -> Software installation (the same section of the User Configuration can be used to install software on user accounts instead of computers).
- Select New -> Package.
- Select the MSI installer file stored in a shared folder or the SYSVOL directory (use the UNC path).
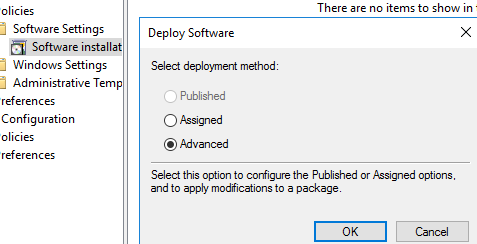
- Select Advanced and click OK.
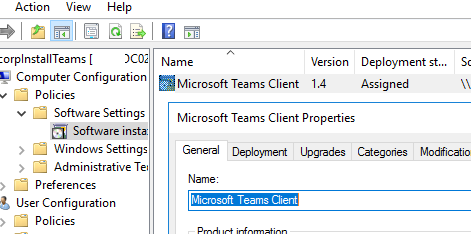
- Select the installation mode Assigned (the program is installed automatically when the computer starts or the user logs on) or Published (the program is not installed automatically, but the user can run its installation at any time from the Add/Remove Programs in the Control Panel).
- In the next window, you can set additional MSI package options. I will only change the displayed name from Teams Machine-Wide Installer to Microsoft Teams Client.
- In the Deployment tab, click Advanced and check Ignore language when deploying this package.
- Restart the client computer to update the GPO settings. The app will then be installed the next time the computer boots up. It will appear in the list of installed Windows apps. You can find the installation events in the System section of the Event Viewer (filter the event list by the
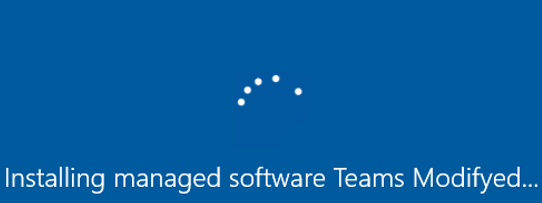
Application Management Groupsource).Windows 11 has a built-in Teams Chat feature, but it’s not a full-featured Microsoft Teams client. - You can display the detailed GPO processing status on the computer. To do it, enable the GPO option Display highly detailed status messages under Computer Configuration -> Policies -> Administrative Templates -> System. Now all background GPO processing tasks will be displayed when Windows starts. If any apps are installed using GPO, you will see the message:
Installing managed software AppName
Customize MSI Package Installation Options Before Deploying via GPO
The standard GPO software installation interface does not allow you to specify installation keys or custom parameters for MSI installation packages. For example, when installing an antivirus agent on a user’s computer, you must specify the management server address. Or, when you install Teams from the command prompt using msiexec, you can disable the MS Teams client automatic startup and hide it from the list of installed apps. In this case, the MSI package installation prompt with arguments can look like this:
msiexec /i Teams_windows_x64.msi OPTIONS="noAutoStart=true" ALLUSERS=0
How can you customize or add installation options to an MSI package? MST transformation files can be used in this case. This file type allows you to change the default MSI package settings according to your installation scenario.
To create an MST file for an MSI package, you can use the ORCA tool (it is a part of the Windows Installer SDK).
Open your MSI package using Orca.
Create a New Transformation and set your custom MSI package options in the Property section. I changed the following options for my Teams client deployment:
- noAutoStart =
True - ALLUSERS =
0
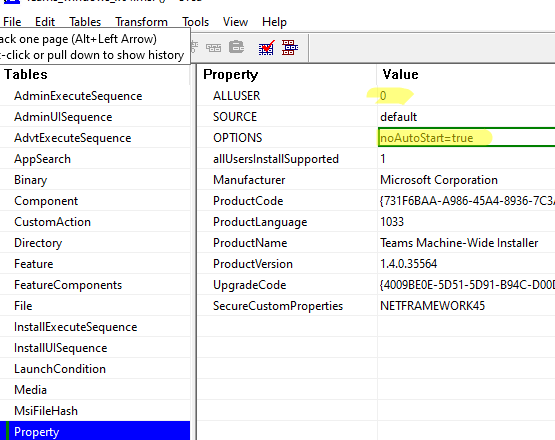
Select Transform -> GenerateTransform, and then save the changes as an MST file (teams_mod.mst). Copy the file to the shared folder (or SYSVOL) directory containing the software installers.
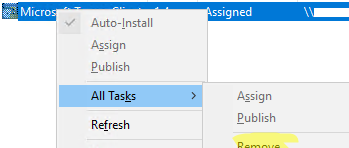
Then remove the previous rule to install the MSI package in the GPO, since you can only add an MST file with package modifications when creating an app installation rule.
Select All –> Task -> Remove.
Create a new software deployment rule, select the MSI file from the shared folder (or SYSVOL), and go to the Modification tab. Click Add. Select the MST file you created earlier.
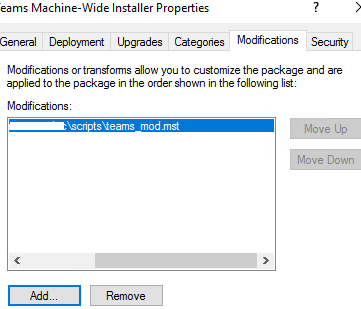
The MST file will now be automatically applied during the MSI installation via GPO, and the application will be installed with the necessary settings.
The main disadvantages of MSI software installation via GPO:
- Only MSI installers are supported.
- It is not possible to schedule the installation of the app at a specific time. Installing software simultaneously on multiple computers (usually when systems are powered on in the morning) can significantly increase the load on the network and domain controllers. In this case, it is better to use SCCM with maintenance windows or WOL (Wake On LAN) settings.
- It is not possible to change the order of software installation in a single GPO. W When a new installation package is added to a GPO, it is installed last.
- There are no centralized tools for receiving reports on whether program installations via GPO were successful or failed on client computers.
How to Publish an EXE App with a ZAP Package in GPO
Now, let’s look at another approach for deploying an application whose installer is provided only as an EXE file rather than an MSI package. Windows Group Policies support the ZAP (Zero Administration Package) format for installing software distributed in EXE format.
A ZAP file is a plain text file similar to an INI configuration file. It contains the path to the EXE file to be run, installation parameters, and other options. The Group Policy Software Installation extension can execute instructions from a ZAP file and run an installation from an EXE file.
Now, let’s look at an example of installing an EXE package with the Lightshot tool using a ZAP file in Group Policy.
If necessary, check which installation options the EXE software installer supports. To see available deployment options, it is usually enough to run with the argument /? or /help. In this example, the installer offers a wide range of options. To install the Lightshot tool automatically (silently), I will use the following options:
/SP- /VERYSILENT /SUPPRESSMSGBOXES /NORESTART
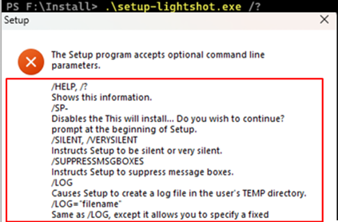
Next, copy the Lightshot installer file (lightshot.exe) to the network folder (it can be SYSVOL), from which the installation will be performed. Create a text file with a .ZAP extension in the same folder. In this file, specify the application name, installation command, and, optionally, the version and developer.
Here is an example of a simple ZAP file package.:
[Application]
FriendlyName = "Lightshot – tool for capturing screenshots"
SetupCommand = "\\mun-fs01\Install\lightshot.exe /SP- /VERYSILENT /SUPPRESSMSGBOXES /NORESTART"
DisplayVersion = 5.4
Publisher = "Skillbrains"
[Extensible] section, you can configure file associations for this application.- Next, create a GPO and assign it to the OU containing user accounts.
- In the GPO editor, navigate to User Configuration -> Policies -> Software Settings -> Software installation
- Add a new installation package (select in the file type filter,
ZAW Down-level application packages *.zap) and specify theUNCpath to the ZAP file. - Select the Published installation method. This is the only supported deployment method for ZAP files.

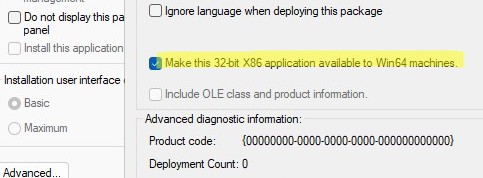
- To make the x86 app available for installation on Windows x64, enable the option Make this 32-bit x86 application available to Win64 machines.

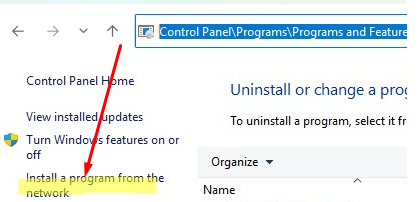
- After the GPO settings are updated on the client, a new program will be available for installation from the network via the Control Panel -> Programs -> Programs and Features -> Install a program from the network (Run this command to quickly navigate to this item:
control appwiz.cpl,,1)
- Now, users can run program installations at any time via the Control Panel.


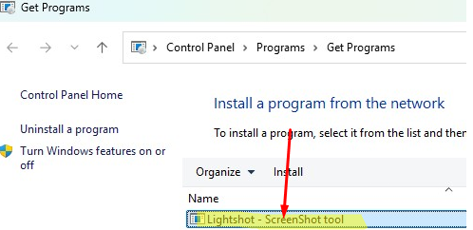
But here we encounter the key limitations of using the ZAP format to deploy applications with EXE installers, which are as follows:
- An application can be installed via GPO only on a per‑user basis (The software is published to users, but not assigned)
- Installation is performed with current user permissions. If an EXE-based app requires elevated privileges during installation, Windows will display a User Account Control (UAC) prompt. If the user does not have local administrator permissions, the installation will fail.

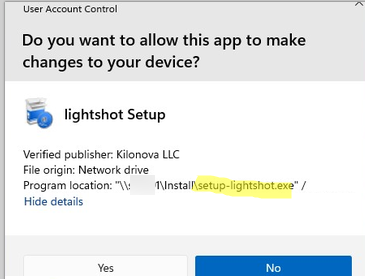
Therefore, the ZAP format is only suitable for installing EXE applications that are installed with non-admin user permissions (typically to the %AppData% folder) and don’t require administrator rights.
By analogy, you can create a ZAP file to install any Windows app from an EXE installer via GPO.
Install EXE Apps on Multiple Computers with PowerShell and GPO
A slightly more complex but much more flexible way of deploying EXE applications to users’ computers is to use BAT or PowerShell scripts assigned via Group Policy.
The idea is that an administrator creates a GPO that runs a PowerShell script when Windows boots up or a user logs on. This script then performs the following:
- Checks whether the application’s executable file already exists on the computer.
- Checks the version of the application file. If an older version is already installed, a newer version will be scheduled for installation (application update).
- In addition, the PowerShell script can either log all actions to a text file or write events directly to the Event Viewer log.
The following is an example of a PowerShell script for installing the 7-Zip app from an EXE installer (we described how to get options for silent/unattended installation of the program above).
$AppPath = "C:\Program Files\7-Zip\7zFM.exe"
 $TargetAppVersion = "26.02"
 $CurrentAppVersion = (Get-ItemProperty -Path $appPath).VersionInfo.FileVersion
 if (!(Test-Path $AppPath) -or $CurrentAppVersion -ne $targetAppVersion) {
 $AppSrc = "\\mun-fs01\Deployment\7z2602.exe"
 $process = Start-Process -FilePath $AppSrc -ArgumentList "/S" -Wait -PassThru
 if ($process.ExitCode -eq 0) {
 Write-EventLog -LogName Application -Source "Application" -EntryType Information -EventID 11 -Message "The installation of 7-Zip 26.02 was completed successfully."
 } else {
 Write-EventLog -LogName Application -Source "Application" -EntryType Error -EventID 12 -Message "The installation of 7-Zip 26.02 failed."
 }
 }
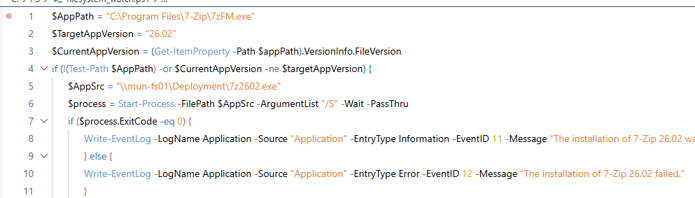
This PowerShell script can be deployed as a Group Policy startup script or executed via a Scheduled Task (such a task can also be deployed to client computers via GPO). Scheduled tasks are often more flexible than traditional logon scripts because they allow administrators to control when application installation or updates are performed. For example, software deployment can be scheduled to run at a specific time, outside of business hours, or regularly according to a defined schedule.
1 comment
Why is the Group policy path blurred out? not very helpful