In this article, we will look at how to deploy Windows 10 or 11 over the network without using local installation media (USB flash drive, DVD, ISO image) and without USB ports. We will use a small portable Tiny PXE Server to boot a computer over the network via PXE. This guide will help you to deploy Windows on devices both with UEFI and BIOS firmware.
We will need:
- An installation Windows 10 or 11 ISO image (it is easier to create it using Windows Media Creation Tool according to the post: https://woshub.com/how-to-create-uefi-bootable-usb-drive-to-install-windows-7/);
- A Windows PE image — you can use your own WinPE image, extract it from an MS DART recovery image, get an original WinPE using Windows Assessment and Deployment Kit (Windows ADK), or use a pre-built image like Hiren’s BootCD PE;
- A Tiny PXE Server (http://reboot.pro/files/file/303-tiny-pxe-server/).
Creating a Windows PE Boot Image Using ADK
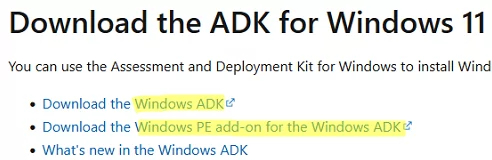
Download Windows ADK for Windows 11 and Windows PE add-on for the Windows ADK following the links at https://docs.microsoft.com/en-us/windows-hardware/get-started/adk-install.
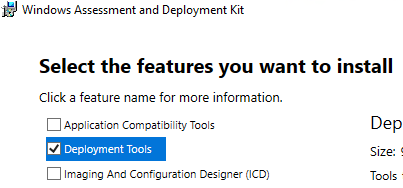
When installing the Windows AD, select the Deployment Tools only.
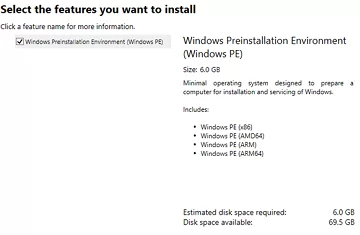
Then install the Windows PE add-on for Windows ADK in the same way.
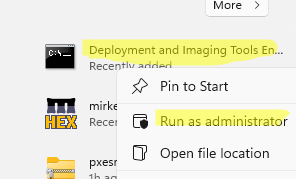
After the installation is over, run the Deployment and Imaging Tool from the Windows Start menu. Or use the command:
"C:\Program Files (x86)\Windows Kits\10\Assessment and Deployment Kit\Deployment Tools\DandISetEnv.bat"
Then copy files for WinPE to your target folder:
copype amd64 C:\tools\winpe
x86, arm, or arm64.
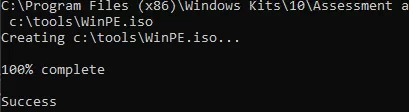
Then generate a bootable WinPE ISO image:
MakeWinPEMedia /ISO C:\tools\winpe c:\tools\WinPE.iso
How to Configure a TinyPXE Network Installation Server?
Then configure your PXE server:
- Extract pxesrv.zip to C:\tools\pxesrv;
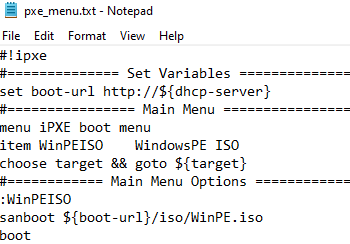
- Go to C:\tools\pxesrv and create a text file pxe_menu.txt with the following contents:
#!ipxe
set boot-url http://${dhcp-server}
#================ Main Menu =================
menu iPXE boot menu
item WinPEISO WindowsPE ISO
choose target && goto ${target}
#============ Main Menu Options =============
:WinPEISO
sanboot ${boot-url}/iso/WinPE.iso
boot
- Copy the WinPE.iso file you got earlier to C:\tools\pxesrv\files\iso;
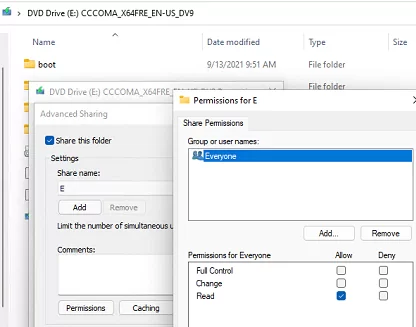
- Mount the Windows install ISO image to your virtual drive Windows and share it on the network (if you want, you may allow anonymous access to it, but it is optional);
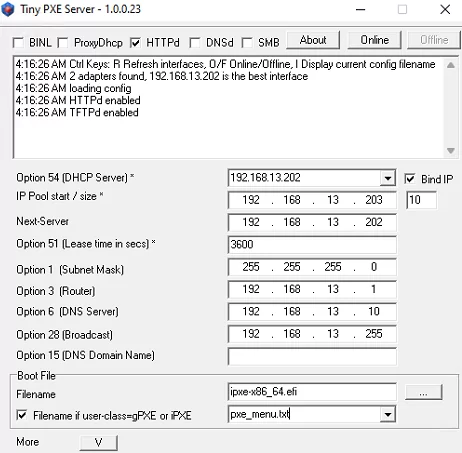
- Run pxesrv.exe as administrator;
- Enable the HTTPd option;
- If you want your computer to assign IP addresses on the local network via DHCP (Tiny PXE can do this), disable the ProxyDHCP option. Make sure that the IP address of your computer is specified in the
Option 54 DHCP ServerandNext-Serverfields. The IP Pool start field shows the beginning of the DHCP range, so make sure that the range is not busy in your network; - In the Boot File section, specify ipxe.pxe (for BIOS devices) or ipxe-x86_64.efi (for UEFI devices);
- In the Filename if user-class=gPXE or IPXE field, enter the name of the menu file you created earlier: pxe_menu.txt;
- Start your PXE server by clicking Online.
So, your PXE server is up and running. If a firewall is enabled in Windows, disable it or allow inbound traffic for pxesrv.exe over DHCP, PXE, HTTP, TFTPS, and SMB protocols.
Using PXE Server to Install Windows 10 or 11 Over the Network
Then you must boot the computer on which you want to install Windows from a PXE server. The computer must be in the same local network (VLAN) as the PXE server host.
Select PXE as a primary boot device in BIOS/UEFI settings of the computer.
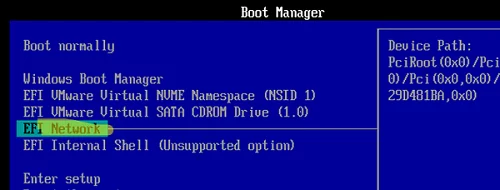
After running PXE, the computer will find the DHCP server in the network, get an IP address and available options in the iPXE menu.
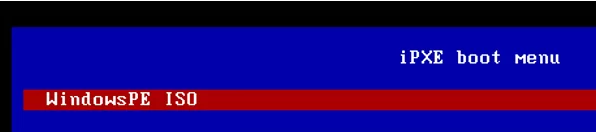
The computer will boot over the network in the WinPE environment.
Could not describe SAN devices: Operation not supported
Could not boot image: Operation not supported https://ipxe.org/err/3c2220
As it turned out, there was a bug in the virtual machine UEFI firmware on my VMware ESXi host:
This error indicates that your UEFI firmware has a bug that prevents the installation of the iSCSI boot firmware table (iBFT). Switch to booting in “legacy” BIOS mode rather than UEFI mode.
I had to switch the VM to BIOS mode and start the PXE server with the ipxe.pxe option. Then the Windows is normally deployed over the network.
Now you need to map a shared folder with your Windows 11 ISO image using the SMB protocol.
Initialize the environment using the wpeinit command and mount the shared folder with Windows installation files:
Net use E: \\192.168.103.202\E
(192.168.103.202 is the name of the computer the installation image is located on, and E is the name of the shared folder).
Enter the user credentials that are allowed to access the Windows host with the PXE server.
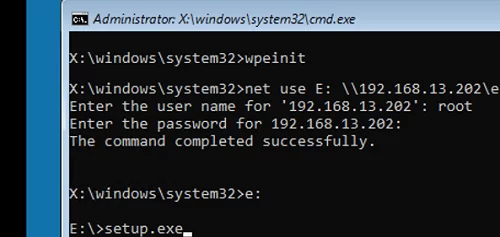
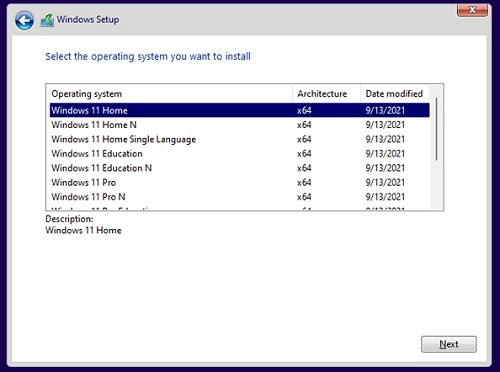
Run Windows Setup with the setup.exe command.
5 comments
Thanks for providing valuable information.
I have one query. above solution can work for secure boot enable.
How we sign image for Secure boot environment for windows 11.
Hi
where can I download pxesrv.zip? When I search for the zip file online, I get many different results. I would be happy if you could tell me where I can get the right one so that it works with your instructions.
Thank you very much!
You can download the Tiny PXE Server (pxesrv.zip) from this link: _http://reboot.pro/files/file/303-tiny-pxe-server/
not anymore
“A” is correct, the reboot.pro site seems to be down or rejecting connections. But the developer has a GitHub repository.
You can download Tiny PXE Server from GitHub here:
https://github.com/erwan2212/tinypxeserver/blob/main/pxesrv.zip
(once at the link, click the three dots toward the right side of the page and then click download)