Enter-PSSession cmdlet allows you to establish a persistent interactive PowerShell session with a remote computer. All commands you enter in your command prompt are executed on the remote computer. In this article, we’ll explain the main features of Enter-PSSession and how it can be used to remotely manage computers running Windows 10/11 and Windows Server 2022/2019/2016.
Enter-PSSession cmdlet is powered by the PowerShell Remoting stack. PSRemoting is based on Web Services for Management (WS-Management) and WinRM service (Windows Remote Management). Traffic between computers is encrypted at the protocol level (you can optionally enable the SSL encryption for PSRemoting WinRM traffic). You can use various authentication methods, including NTLM and Kerberos.In the simple case. to establish an interactive PowerShell session with a remote computer, you need to specify only the computer name to connect (the ComputerName option). To connect to a remote computer, just run the command:
Enter-PSSession hq-srv01.woshub.com
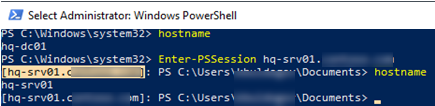
If the current user has permission to connect to a remote host, you will connect to an interactive shell on the remote computer.
You can prompt for user credentials before connecting:
Enter-PsSession –ComputerName hq-srv01.woshub.com –Credentials woshub\maxbak
Or:
$creds = Get-Credential
 Enter-PSSession -ComputerName hq-srv01 -Credential $creds
Note that the name of the remote computer is now shown in square brackets at the beginning of your PowerShell prompt ([hq-srv01.woshub.com]). This way you can find out if you are running in a local or remote shell session.
The output of all commands run remotely is displayed in your local console. You can run the hostname command and make sure that you running it on a remote computer.
You can run any command in this interactive command prompt (according to your privileges).
For example, let’s display the Windows network settings using PowerShell:
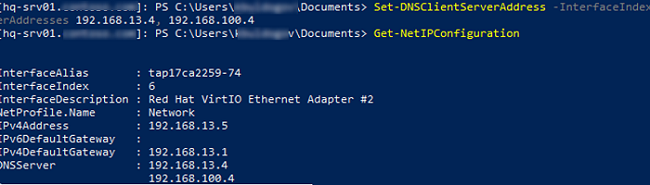
Get-NetIPConfiguration
You can change DNS settings on the remote computer:
Set-DNSClientServerAddress –InterfaceIndex 6 –ServerAddresses 192.168.13.4, 192.168.100.4
To exit an interactive remote shell session, run Exit-PSSession or exit. The PS prompt will become usual and you will get back to your local PowerShell console:

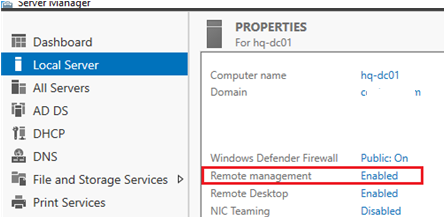
In Windows Server 2016/2019/2022, PowerShell Remoting is enabled by default (you can see it in Server Manager -> Local Server -> Remote Management = Enabled).
In desktop Windows versions (Win10, Win11), PSRemoting and WinRM are disabled.
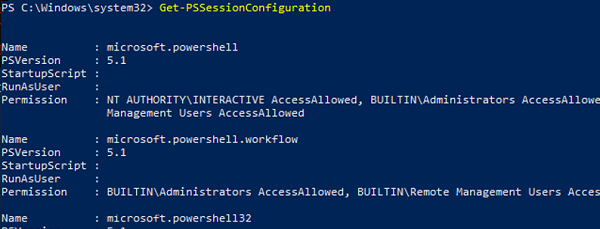
You can check if PSRemoting is enabled on your current computer using the command below:
Get-PSSessionConfiguration
This command also is used to get a list of users and groups allowed to connect over WinRM. To use the PSRemoting, a user account must be a member of the Administrators or Remote Management Users group. You can learn more about how to enable the WinRM PowerShell Remoting for non-admin users.
You can test if you can connect to your computer locally via PowerShell Remoting:
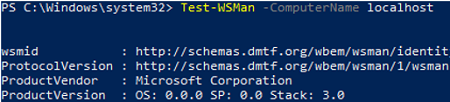
Test-WSMan -ComputerName localhost
If the command returns a WSMan schema version, remote connections to the computer using PS Remoting are allowed.
If PowerShell Remoting is disabled or not configured, the following error appears:
Test-WSMan : <f:WSManFaultxmlns:f="http://schemas.microsoft.com/wbem/wsman/1/wsmanfault" Code="2150858770" Machine="srv02"><f:Message>The client cannot connect to the destination specified in the request. Verify that the service on the destination is running and is accepting requests. Consult the logs and documentation for the WS-Management service running on the destination, most commonly IIS or WinRM. If the destination is the WinRM service, run the following command on the destination to analyze and configure the WinRM service: "winrm quickconfig".
To enable PowerShell Remoting, run this command:
Enable-PSRemoting -Force
This command:
- Enables WinRM service and set its startup type to Automatic;
- Creates a connection point on the default WinRM port (TCP/5985 for HTTP traffic);
- Adds exceptions for WS-Management to the Windows Firewall (if you’re configuring PSRemoting manually, add a firewall rule using PowerShell or with GPO)
- Allows remote PowerShell sessions
- Restarts the WinRM service
Make sure the WinRM service is running and set to start automatically:
Get-Service WinRM | Select MachineName,Name,Status, StartType

Enable-PSRemoting -SkipNetworkProfileCheck -Force
In an Active Directory domain, the easiest way to centrally configure Windows Remote Management (PSRemoting) on servers and computers is through Group Policy.
Modern PowerShell versions (v6 or v7) support Secure Shell protocol (SSH) to connect to a remote computer over PowerShell Remoting. An SSH connection point must be available on a remote computer (How to enable built-in OpenSSH Server on Windows 10?). You can start an interactive PSRemoting session over SSH using this command:
Enter-PSSession -HostName maxbak@hq-srv01.woshub.com
Or authenticate over SSH using an RSA key:
Enter-PSSession -HostName maxbak@hq-srv01.woshub.com:22 -KeyFilePath c:\PS\max_rsa_key
You can use Enter-PSSession together with New-PSSession:
$s = New-PSSession -ComputerName hq-srv01.woshub.com
 Enter-PSSession -Session $s
Enter-PSSession supports several authentication methods. You can set the one you want using -Authentication parameter. Basic, Digest, Kerberos, CredSSP, NegotiateWithImplicitCredential, Negotiate Challenge authentication methods are supported.
In the example above, we showed how to create an interactive Enter-PSSession connection between computers in the same Windows domain (it is enough to specify an FQDN or a short name for the connection, Kerberos authentication is used). If you try to connect to a remote computer using its IP address or CNAME, you will not be authenticated:
Enter-PSSession : Connecting to remote server 192.168.31.12 failed with the following error message: The WinRM client cannot process the request. Default authentication may be used with an IP address under the following conditions: the transport is HTTPS or the destination is in the TrustedHosts list, and explicit credentials are provided. Use winrm.cmd to configure TrustedHosts. Note that computers in the TrustedHosts list might not be authenticated.

To connect to a remote computer using its IP address, you can add the host to the list of trusted hosts (Trusted Hosts) or use SSL for WinRM(it is more secure).
To add an IP address to trusted hosts, run this command:
Set-Item WSMan:\localhost\Client\TrustedHosts -Value 192.168.13.5
You can add a trusted host using a wildcard mask:
Set-Item WSMan:\localhost\Client\TrustedHosts -Value *.woshub.com
To display the list of trusted hosts:
Get-Item WSMan:\localhost\Client\TrustedHosts
In the same way, you can add your host to the list of trusted hosts on a remote computer.
Restart the service:
Restart-Service WinRM
To connect to a remote computer using its IP address, run the command below:
Enter-PSSession -ComputerName 192.168.13.5 -Credential (Get-Credential -UserName woshub\maxbak)
The Enter-PSSession and New-PSSession cmdlets create a persistent one-to-one remote session and are used mostly in interactive scenarios. If you want to run scripts or jobs automatically or do something on multiple remote computers simultaneously, use the Invoke-Command command.
1 comment
Use the following command to connect to a remote computer via powershellremoting under the Microsoft account:
Enter-PSSession -ComputerName Server1 -Credential MicrosoftAccount\email@domain.tld