You can use Windows Group Policy (GPO) to centrally install a specific certificate on all computers in a domain by adding it to each computer’s Trusted Root Certificate store. This may be necessary if you are deploying your own Certification Authority (CA) and need to add the root certificate as a trusted one on all user computers; add a specific site’s SSL/TLS certificate to the trusted list; install an HTTPS certificate to inspect user traffic at the Internet gateway; distribute a self-signed driver or application certificate.
How to Export an SSL/TLS Certificate to a File on Windows
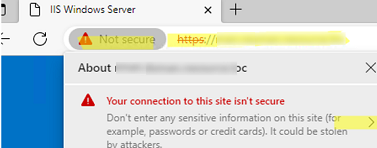
In this example, we are going to deploy a self-signed SSL certificate to domain computers that is bound to the HTTPS site running on the IIS web server. By default, the browser and other applications will warn you that the site’s certificate is untrusted and it is not safe to use the service. To remove this warning, you must add the site certificate to the trusted root certificate store on the user’s computer.
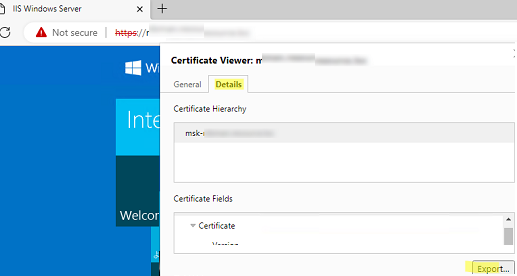
First, export the certificate public key to a CER, CRT, or PEM file. You can export the certificate directly from the browser. If you are using Microsoft Edge, click in the address bar: Not Secure -> Show Certificate -> Details -> Export. Save the certificate as a file in BASE64 format with a CRT or PEM extension.
$webRequest = [Net.WebRequest]::Create("https://exchange_cas/owa")
 try { $webRequest.GetResponse() } catch {}
 $getcert = $webRequest.ServicePoint.Certificate
 $bytes = $getcert.Export([Security.Cryptography.X509Certificates.X509ContentType]::Cert)
 set-content -value $bytes -encoding byte -path "c:\ps\your_exchange_cert.cer"
You can also manually export the installed certificate from the local cert store on the user’s computer. In this example, the certificate is a simple self-signed certificate created using PowerShell:
- Open the snap-in
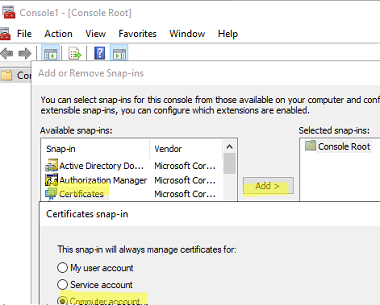
mmc.exe-> File -> Add/Remove Snap-in -> add the Certificates snap-in -> Computer account (if the certificate is installed in the user cert store, select My User Account) -> Local computer;
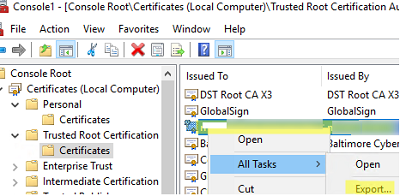
- Expand the store where the certificate is installed (in this case, the Trusted Root Certification store) and locate it;
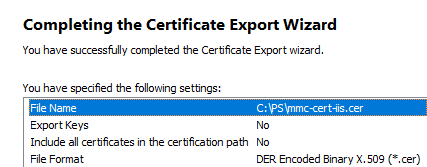
- Right-click the certificate -> All Tasks -> Export;
- Select the DER encoded binary X.509 (.CER) format and specify the path to the certificate file (you should not export a private key for a certificate if it exists).
Install Certificates on Windows Devices by Using Group Policy
The next step is to create a domain GPO that will install the certificate on the computers.
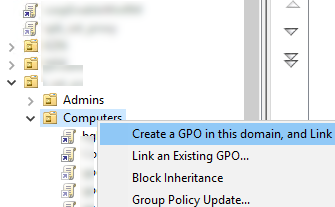
- Open the domain GPO management console (
gpmc.msc), Select the OU that contains the computers on which you want to deploy the certificate, and select Create a GPO in this domain and Link it here; - Specify the name of the policy and switch to Edit mode;
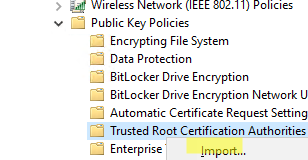
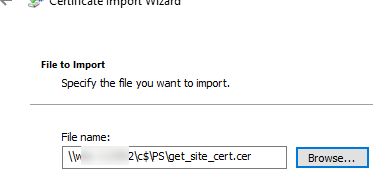
- In the GPO editor, go to the Computer Configuration –> Policies –> Windows Settings –> Security Settings –> Public Key Policies –> Trusted Root Certification Authorities. Right-click and select Import;
- Specify the path to the certificate file you exported earlier;
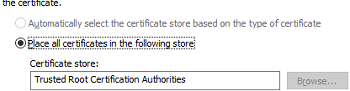
- Select to place the certificate in the Trusted Root Certification Authorities store;
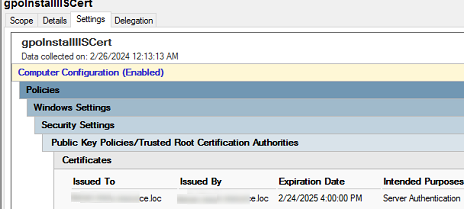
- A single GPO allows you to install multiple certificates at once. The following summary certificate fields are displayed in the GPMC console on the Settings tab:
Issued To,Issued By,Expiration Date, andIntended Purposes;You can use GPO security filtering or WMI GPO filtering to deploy a certificate only to computers that are added to a specific AD group. [alert]- Update Group Policy settings on the client computer (run the command
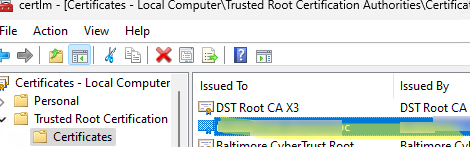
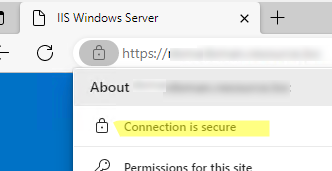
gpupdate /force), Open the computer Certificate Management console (certlm.msc). Check that the computer has automatically downloaded, installed, and added the certificate to the trusted root store.Check that the client browser no longer displays an untrusted certificate warning when accessing an HTTPS site.
Removing Trusted Certificates using GPO
If a trusted certificate has expired, is compromised, or needs to be replaced, you can use the GPO to remove it from all computers automatically.
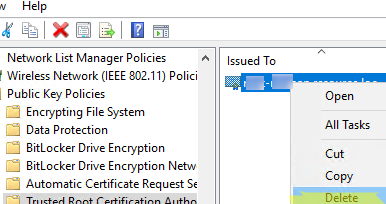
[alert] Use theSigchecktool to scan the Windows trusted certificate store for third-party, suspicious, and revoked certificates.- Open the certificate deployment GPO settings, select the certificate, and delete it without linking the GPO from the target AD container;
- All devices affected by this policy will automatically delete the certificate.
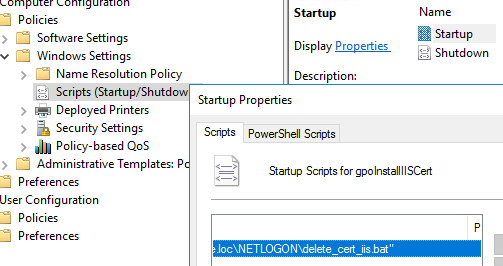
If you want to remove a certificate that was previously manually installed on all computers, you can use a GPO logon script
First, obtain the thumbprint of the certificate you want to delete. List certificates with their thumbprints in the root cert store:
Get-ChildItem -Path Cert:\LocalMachine\RootIn the Netlogon directory on the AD domain controller, create the file delete_cert_iis.bat (
\\woshub.loc\NETLOGON\).certutil –delstore Root CB19F3F57A4EDB004059DEE436A1989D04275196Configure this batch file to run automatically on Windows startup (read more about using logon scripts in GPO).
Remind you to update trusted root certificates on Windows computers regularly. By default, Windows machines automatically download and install trusted Microsoft certificates. But this may not work in an isolated environment. - Update Group Policy settings on the client computer (run the command
1 comment
If you remove Authenticated Users from the scope to add a User AD group, you must delegate read to the computer part. This article is incorrect/misleading, it doesn’t talk about the 2016 change to security filtering https://support.microsoft.com/en-us/help/3163622/ms16-072-security-update-for-group-policy-june-14-2016