Windows automatically assigns a drive letter to any connected HDD/SSD disk, USB flash drive, SD card if it recognizes the file system on its partitions. But sometimes it doesn’t work. For example, when connecting a drive, a message appears indicating that a new device is being installed, the disk appears in Device Manager, but is not displayed in File Explorer. How to manually assign a drive letter on Windows 10 and 11, or enable the automatic assignment of a drive letter to new drives?
How to Manually Assign a Permanent Drive Letter in Windows
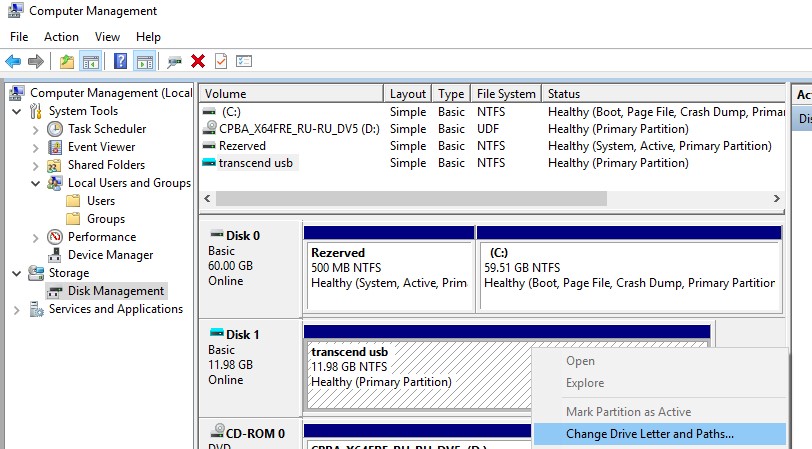
If the drive doesn’t appear in Windows Explorer, it will have to manually assign a drive letter through the Disk Management snap-in (diskmgmt.msc). To do this, open the Computer Management console (via the Win + X menu) and go to the Storage section -> Disk management. In the list of drives, locate the connected removable USB drive. As you can see, the disk is online, it has one healthy partition with the NTFS, but it is not assigned a drive letter. To assign a drive letter to it, right-click on the partition and select “Change Drive Letter and Path“.
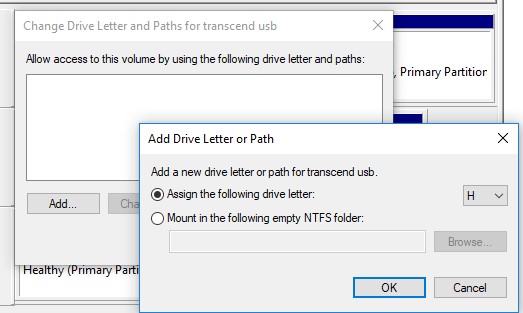
In the window that appears, click the “Add” button, select “Assign the following drive letter”, select the letter you want to assign to the drive (for example, H: ) in the drop-down list, and click OK.
Make sure that Windows detects the partition (s) on the connected USB drive and the partition is formatted with the NTFS, FAT32, or exFAT file system. If the file system is detected as RAW, or the disk is not partitioned, most likely the USB flash drive is just a new one, or the partition table is damaged and you have to repair the file system first.
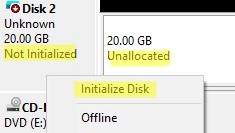
If the disk is new and no partitions have been created on it, it appears in the console as Not initialized with an Unallocated area. To initialize such a disk:
- Right-click on it and select Initialize Disk;
- Select the partition table for your disk: MBR or GPT;
- It remains to click on the unallocated space and create a partition (New Simple Volume) on it, select the file system, format, and assign a drive letter.
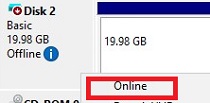
If the disk is offline, right-click on it and select Online.
Changing Drive Letter via CMD or PowerShell
You can assign or change a drive letter from the command prompt using the Diskpart tool or using PowerShell.
Open the elevated command prompt and run the command:
Diskpart
List the volumes on the disks:
List vol
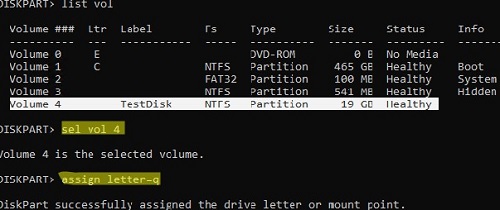
In this example, the TestDisk volume is not assigned a drive letter (empty in the Ltr column)
Select this volume (Volume 4 in our example):
Sel vol 4
Assign a drive letter Q: to this volume:
Assign letter=Q
DiskPart successfully assigned the drive letter or mount point.
End the diskpart session:
Exit
You can also change or assign a drive letter using the PowerShell cmdlets from the built-in Disk Management module.
List drives:
Get-Disk
List partitions on the specified disk:
get-disk 1|Get-Partition
Assign the letter Q: to partition 2 on disk 1:
Get-Partition -DiskNumber 1 -PartitionNumber 2 | Set-Partition -NewDriveLetter Q
After that, the connected USB disk appears in File Explorer with the assigned drive letter.
Windows Doesn’t Save an Assigned Drive Letter for Connected USB Drives
Sometimes after disconnecting a USB device or restarting the computer, a drive letter is not automatically assigned to it. I have to assign the letter again manually through Disk Management, and that becomes annoying.
It seems that some features of automatic detection and mounting of new partitions on the external storage devices is not working in Windows. How to solve this problem?
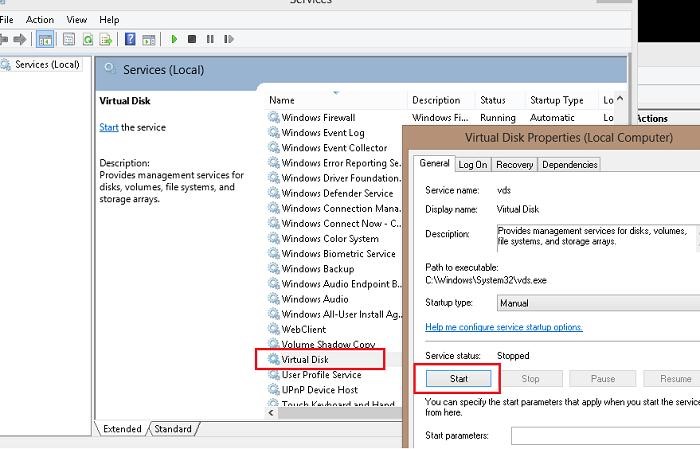
First of all, make sure that the Virtual Disk service is running. You can check the status of this service in the services management console (services.msc).
In case of the error “Unable to connect to Virtual Disk Service” or “Disk Management could not start Virtual Disk Service (VDS)“, change the service startup type from Manual to Auto.
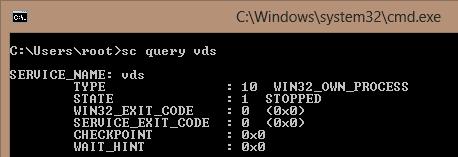
Also, you can check the service from the command prompt:
sc query vds
SERVICE_NAME: vds
TYPE               : 10  WIN32_OWN_PROCESS
STATE              : 1  STOPPED
WIN32_EXIT_CODE    : 0  (0x0)
SERVICE_EXIT_CODE  : 0  (0x0)
CHECKPOINT         : 0x0
WAIT_HINT          : 0x0
Or check the service state using PowerShell:
get-service vds
If the service is stopped, start it from the graphical snap-in (Start button) or using the command:
net start vds
Unable to connect to the Virtual Disk service” error).Check if the problem persists. If it does, make sure that the automatic mounting of new volumes is enabled.
Open the command prompt as administrator and run the following commands:
diskpart
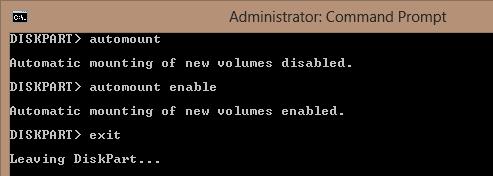
Within diskpart, make sure that the automatic mounting of new volumes is enabled:
DISKPART> automount
Automatic mounting of new volumes disabled.
As you can see, the auto-mounting is disabled. Let’s enable it:
DISKPART> automount enable
Automatic mounting of new volumes enabled.
Exit diskpart
DISKPART> exit
You can also enable automatic mounting of new partitions using the command:
MOUNTVOL /E
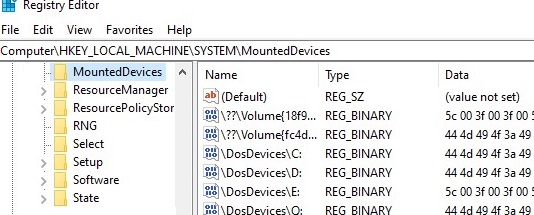
Make sure the NoAutoMount DWORD parameter (with a value of 1) is not created under the reg key HKLM\SYSTEM\CurrentControlSet\Services\mountmgr. If this registry parameter is created, Windows doesn’t assign drive letters to newly connected devices.
To clear the saved associations of partitions with drive letters, use the command DISKPART>automount scrub or mountvol /r.
Restart your computer and verify if the drive letters are assigned to the external USB devices.
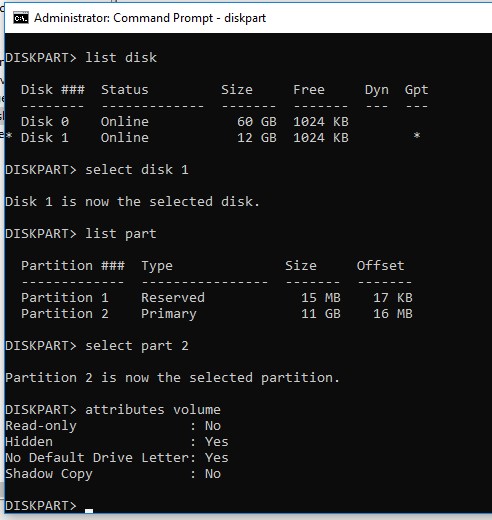
If not, check if the “hidden” and “do not assign a drive letter” attributes are set for the partition on the USB drive. Run the Diskpart command prompt and enter the following commands:
- List the disks:
list disk - Find the disk number assigned to your USB flash drive (in this example 1) and select it:
select disk 1 - List the partitions on the disk:
list part - Select the desired partition:
select partition 2 - Check the partition attributes:
attributes volume - As you can see, the “Hidden” and “No Default Drive Letter” attributes are enabled for this volume;
- Disable these attributes with commands:
attributes volume clear NoDefaultDriveLetter
attributes volume clear hidden
Volume attributes cleared successfully - End the diskpart session by typing:
exit
After that, this partition on the USB flash drive should be automatically assigned a drive letter on any computer.
Please note that the old Windows versions only see the first partition on USB sticks with multiple partitions. The ability to create multiple partitions on removable USB drives appeared only starting from Windows 10 build 1703. Previously, in order to make second and subsequent partitions on the USB flash drive were accessible in Windows, you had to use a trick to make Windows detect removable USB flash drive as an HDD.
If your USB flash drive doesn’t appear in the Disk Management console, try using a different USB port or cable. Try to connect the USB flash drive directly to the computer (without the USB hub), check whether the power is on and whether it is detected on other computers.





26 comments
Thanks, this worked great!
Finnally something that worked. 4 of my 9 USB keys no longer mount on my computer but worked on my wife’s so I knew it was a Windows problem. Gave up a year ago trying to solve the problem because none of the solutions on the web worked – and there are tons of them. So after loading Win 10 thought I would see if my keys worked they still didn’t so I did a google and this solution pooped up.
This fix worked like charm. Thanks for posting friend.
Great help! Thank a lot!
Very helpful! Thank you very much!
You rock!!!! Been fighting this on a SBS 2011 server. Enabling automount did the trick.
Thanks SO much!!
Well done – automount worked like a dream in Windows10 Anniversary edition (on my laptop). Many thanks.
Good Job. Thank you verry much.
Virtual Disk service is running
aoutomount is anabled already
disk drive is showing in device manger
but drives still not shown in my computer
win 7 ultimate service pack 1 fully updated
plz help
Thank you!
I had exact problem and this solution helped me.
Thanks a lot!
It solved my problem!
every thing checked and correct but nothing is working for me
windows 10 64 bit pro
and USB flash drive is 16 GB Sandisk 3.0
And USB Drive is showing in Disk Management with its full capacity.
After reinstalling Windows my Data disk for some reason became hidden.. I couldnt figure out why it wouldnt auto mount but this solved it. Literally the only page on the internet that had the solution thanks fellas 🙂
Thank you, mine was fixed in diskpart
Thank you very much! I resolved my issue by setting the attribute of my disk. Thanks!!!
Thanks for the post, the part about the hidden drive attribute helped. No idea how it got set to Yes but I cleared it and it mounts fine again.
Thank you very much!. I was also able to resolve this by changing attributes of the external SSD.
Thank you very much. It solved my issues with the windows media creation tool
Excelent way of dealing with this issue!, Thank you very much!
Thanks, It’s working! It solved my problem!
Widows is the stupidest OS I have ever used. (For some reason I have to use it sometimes.) I formatted a brand new SSD on Windows (NTFS). Then I used this SSD on my Linux Mint without any problem for weeks. My colleague copied some data from it to his MAC. There were no problems. And now I plugged in again to that Windows shit, and it sees RAW fs. Why anybody pays a dollar for this OS, I really do not understand.
Great article! But all the measures above were fine and not the problem with my USB, a S$47 SanDisk 64GB stick (bought in Singapore but no warranty as I don’t live in Singapore and can’t get there at the moment….) My problem was that it just wouldn’t assign a drive letter. I was about to throw it in the bin. It said Healthy in Disk Management, you just couldn’t browse it. I assigned a drive letter and then the stick immediately opened in File Explorer. I restarted the computer, plugged in the stick and it again automatically recognised!
This solution does not work when i connect my tablet (Samsung Galaxy, model SM-T580, Android 7).
Windows 10 sees it, I can transfer files between tablet and pc but only manually. If I want to use XCOPY in a .bat file, to copy hundreds of pictures every week, I can’t because there isn’t any Drive letter assigned to tablet.
Any thoughts???
Worked fine for Seagate External 1 gb drive accidently formatted.
Thanks for the awesom tips. It worked. My external Hard disk’s volume was “hidden”!!!!