In this guide we’ll show how to remove Microsoft Store provisioned apps, features (capabilities), and unused Windows editions from a Windows 10 installation image (install.wim file). Let’s do it manually using DISM or PowerShell (but all actions can be automated using some scripts). Finally, we’ll get a clean Windows 10 install image without any programs or components we don’t need. This image will contain only core Microsoft Store apps and features.
This article explains how to clean and optimize the Windows 10 install image to deploy it on corporate computers in case of a clean install or build upgrade. After upgrading the build on users’ computers using SCCM (from Windows 10 1803 to Windows 10 1909) via setup.exe /auto upgrade, we found that some built-in UWP (Microsoft Store) apps uninstalled earlier appeared on these computers again.
When you install Windows 10 on a computer, the Windows image \sources\install.wim (or install.esd) is actually deployed. If your Windows 10 install image is stored as an ISO file, mount it to a virtual CD drive and copy the E:\sources\install.wim (or install.esd) file to your local disk. You can also copy the entire directory, but we need only the .wim file.
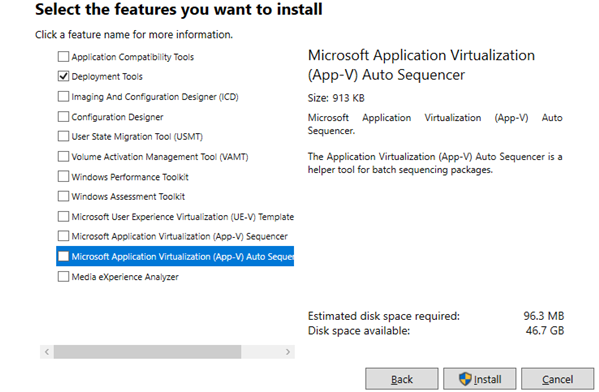
The DISM command is used to modify a .WIM file. If you are using an older Windows image that you are making an image for, make sure that you are using the latest DISM version. To work with Windows 10 install.wim files in other OS versions, you need to install the Windows ADK (Windows Assessment and Deployment Kit). You can download the ADK here: https://msdn.microsoft.com/en-us/windows/hardware/dn913721.aspx. Scroll down the page and click “Download the Windows ADK for Windows 10”. Currently, the latest version is ADK for Windows 10, version 2004. You should only install the Deployment Tools instead of the whole ADK toolkit.
It is recommended to use the full path to DISM.exe when running image modification commands (for example, ‘C:\Program Files (x86)\Windows Kits\10\Assessment and Deployment Kit\Deployment Tools\amd64\DISM\dism.exe’). Earlier DISM versions may not work with newer versions of .wim files.
How to Remove Additional OS Editions from a Windows 10 Install.WIM File?
By default, the Windows 10 installation image generated by the Windows 10 Media Creation Tool contains all available Windows editions. If you are using only one Windows 10 edition (Professional or Enterprise, as a rule), you can remove all additional Windows editions from your install image.
Get the list of available Windows 10 editions in the install.wim file:
Dism /Get-WimInfo /WimFile:"e:\sources\install.esd"
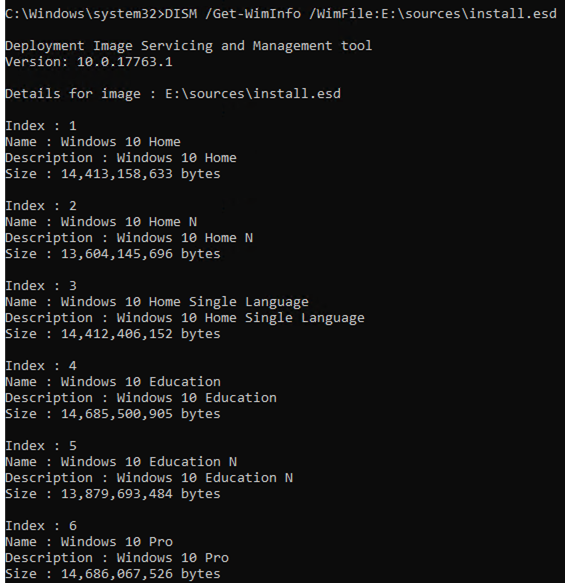
In our example, there are 9 editions in the image: Windows 10 Home, Windows 10 Home Single Language, Windows 10 Education, Windows 10 Enterprise, Windows 10 Pro, etc., with indices from 1 to 9.
You can export an installation image of a specific Windows 10 edition from an ESD file to a WIM image using the following command:
Dism /export-image /SourceImageFile:c:\sources\install.esd /SourceIndex:6 /DestinationImageFile:c:\iso\install.wim /Compress:max /CheckIntegrity

This command will create a new install.wim file containing one edition only — Windows 10 Pro. Its index in the image will change to 1.
Let’s get a detailed information about the remaining image left in the WIM file:
dism /get-wiminfo /wimfile:c:\iso\install.wim /index:1
Index : 4
Name : Windows 10 Pro
Description : Windows 10 Pro
Size : 14,754,777,474 bytes
WIM Bootable : No
Architecture : x64
Hal : <undefined>
Version : 10.0.18363
ServicePack Build : 418
ServicePack Level : 0
Edition : Professional
Installation : Client
ProductType : WinNT
ProductSuite : Terminal Server
System Root : WINDOWS
Directories : 22541
Files : 96467
Created : 10/7/2019 - 4:05:55 AM
Modified : 11/15/2019 - 8:46:50 AM
Languages :
en-US (Default)
If you want to keep multiple Windows editions in install.wim, you can remove the editions you do not need using the /delete-image parameter of the DISM tool.
For example, you want to remove the Home and Home Single Language editions with the indices 1 and 3:
Dism /Delete-Image /ImageFile:c:\sources\install.wim /Index:1 /CheckIntegrity
 Dism /Delete-Image /ImageFile:c:\sources\install.wim /Index:3 /CheckIntegrity
The /CheckIntegrity parameter allows you to undo the operations of your WIM file modification if DISM detects any structural damage in the image.
Or you can delete the editions by their names:
Dism /Delete-Image /ImageFile:c:\sources\install.wim /Name:"Windows 10 Education" /CheckIntegrity
Also, you can remove the editions you don’t need from your Windows 10 install image using PowerShell:
Remove-WindowsImage -ImagePath "c:\sources\install.wim" -Index 2 –CheckIntegrity
Removing Built-in UWP Apps from Windows 10 Install Image
You can remove all provisioned UWP (Microsoft Store) apps from your Windows 10 installation image. It is useful to install Windows faster and save space on your disk. You will also get rid of unwanted widgets, and it will be easier for your users to get insight into the operating system.
We will show you how to remove built-in UWP apps from install.wim using DISM or PowerShell.
Create a folder on your drive: C:\mount. Mount the Windows installation image (WIM) to this folder:
dism.exe /mount-wim /wimfile:c:\iso\install.wim /mountdir:c:\mount /index:1
Note that I used /index:1, since I had removed Windows editions I didn’t need from the image as described above. You can specify the index of the image you need.

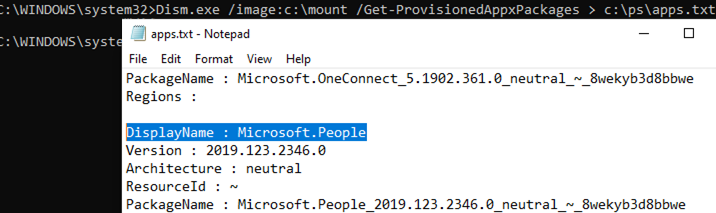
After you have mounted your WIM file, you can display the list of provisioned Microsoft Store app packages. I have used a more convenient text file format to view the command output:
Dism.exe /image:c:\mount /Get-ProvisionedAppxPackages > c:\ps\apps.txt
The information about each app will look like this:
DisplayName : Microsoft.BingWeather
Version : 4.25.20211.0
Architecture : neutral
ResourceId : ~
PackageName : Microsoft.BingWeather_4.25.20211.0_neutral_~_8wekyb3d8bbwe
Now it’s time for the most interesting things: we will remove all apps we don’t need. Unfortunately, apps like Edge, Cortana, Contact Support, and some others cannot be removed (but you can disable them using GPO). I also recommend to leave the calculator (Microsoft.WindowsCalculator), photo viewer (Microsoft.Windows.Photos), Microsoft.VP9VideoExtensions, since new builds of Windows 10 don’t have classic (desktop) versions of these apps. Also, don’t remove the Microsoft.WindowsStore, because it is hard to restore it if you need it one day.
You can remove apps one by one or all at once. To remove a modern app from the mounted image, specify its name (PackageName). Let’s remove the BingWeather app:
dism.exe /image:c:\mount /Remove-ProvisionedAppxPackage /PackageName:Microsoft.BingWeather_4.25.20211.0_neutral_~_8wekyb3d8bbwe

In the same way, remove all built-in apps you do not need.
When you are done, unmount the image and save the changes (see below how to do it).
Also, you can remove preinstalled apps from the Windows 10 installation image using a ready-made PowerShell script from the TechNet Gallery: https://gallery.technet.microsoft.com/Removing-Built-in-apps-65dc387b.
An advantage of this method is that you don’t need to mount the wim file manually. All you have to do is specify a path to the .wim file and run the PowerShell script. However, if something goes wrong, it will be harder to find an error no matter whether it is related to DISM or the script itself.
Open PowerShell as an administrator and run the following command:
.\removeapps.ps1 -pathtowim c:\Windows10\sources\install.wim -selectapps $true
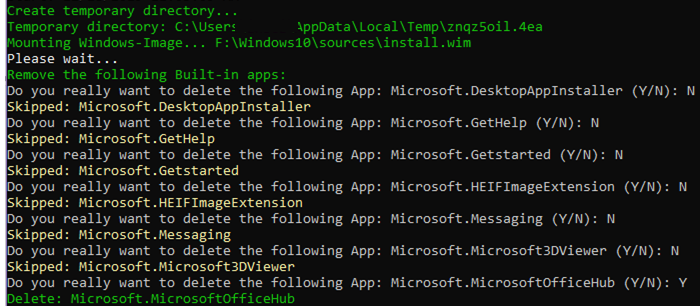
You will see each app in a separate line and you can select whether to remove (Y) or leave (N) it.
After you select an action for all of the apps, the script will remove those you don’t need. Unlike DISM, you don’t need to save changes to the .wim file — they will be saved by the script.
If you want to remove all apps, remove the parameter selectapps $true at the end of the command. This will remove all applications that can be removed.
When working with PowerShell, you might get an error because the current execution policy settings don’t allow PowerShell scripts to run. 
To fix it, run this PowerShell command and change the Execution policy settings:
Set-ExecutionPolicy -ExecutionPolicy Unrestricted
This will allow PS1 scripts to run on.
Disable or Remove Capabilities & Features from a Windows 10 Install Image
You can use DISM to remove (or install) certain features from your Windows 10 installation image.
Get the list of preinstalled components in the mounted Windows 10 installation image using DISM:
Dism.exe /image:c:\mount /Get-Capabilities
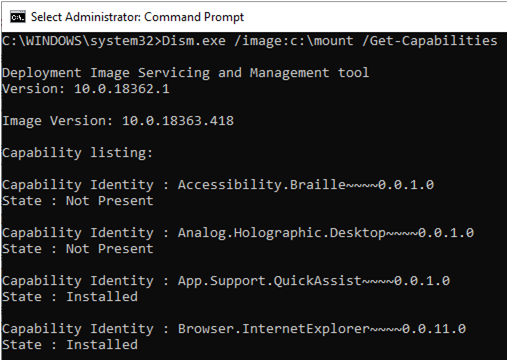
A component may be installed or disabled (Not Present).
You can also display a list of all Windows components in the image using PowerShell (in this example, we will display only the installed Windows components):
Get-WindowsCapability -Path c:\mount|?{$_.State -eq "Installed"}
Windows 10 1909 has the following components preinstalled:
App.Support.QuickAssist~~~~0.0.1.0
Browser.InternetExplorer~~~~0.0.11.0
Hello.Face.18330~~~~0.0.1.0
Hello.Face.Migration.18330~~~~0.0.1.0
Language.Basic~~~en-US~0.0.1.0
Language.Handwriting~~~en-US~0.0.1.0
Language.OCR~~~en-US~0.0.1.0
MathRecognizer~~~~0.0.1.0
Media.WindowsMediaPlayer~~~~0.0.12.0
OneCoreUAP.OneSync~~~~0.0.1.0
OpenSSH.Client~~~~0.0.1.0
You can remove an installed component by its name. Let’s remove a face recognition component Hello.Face:
Dism.exe /image:c:\mount /Remove-Capability /CapabilityName:Hello.Face.18330~~~~0.0.1.0
Also, you can enable some of the capabilities in the image. For example, to install all RSAT administrative tools:
Get-WindowsCapability -Path c:\mount |? {$_.Name -like "*RSAT*" -and $_.State -eq "NotPresent"} | Add-WindowsCapability -Path c:\mount
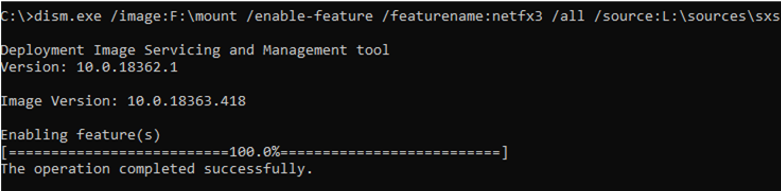
In the same way, you can enable/disable other components. For example, let’s enable .NET 3.5 and disable SMB1:
dism.exe /image:C:\mount /enable-feature /featurename:netfx3 /all /source:E:\sources\sxs
 dism.exe /image:C:\mount /disable-feature /featurename:smb1protocol
In the same way, you can integrate drivers or the latest security updates to your Windows 10 install image.
Optimizing the Windows 10 WIM Installation Image
After you have made changes to your Windows 10 install image, optimize and clean it using the /cleanup-image parameter.
Remove previous component versions using the /ResetBase option:
Dism /Image:C:\Mount /cleanup-image /StartComponentCleanup /ResetBase
Check the image for errors using Dism /ScanHealth.
DISM /Image:C:\Mount /Cleanup-Image /ScanHealth
It remains to unmount the image and save the changes to the WIM file:
dism.exe /unmount-wim /mountdir:c:\mount /commit
If you have changed your mind, use the /discard parameter instead of /commit to discard changes.
To save space, you can additionally compress install.wim to install.esd using the command:
Dism /Export-Image /SourceImageFile:c:\iso\install.wim /SourceIndex:1 /DestinationImageFile:c:\iso\install.esd /Compress:recovery
Then copy your install.wim (install.esd) to your Windows install media. You should only copy the .wim file and not update any other files.
To create an ISO image from your install files, you may use a free portable program Folder2ISO, or other similar programs.
7 comments
for the command “.\removeapps.ps1 -pathtowim c:\Windows10\sources\install.wim -selectapps $true” how do you unmount the image when removal job are done…???
dism.exe /unmount-wim /mountdir:c:\mount /commitGreat Job.
Do we follow the similar steps for Windows 11?
Awesome! Finally someone that explains, with common sense, how to remove the junk from windows!
Thank You,
Star_1_Man
Dism.exe /image:c:\mount/Remove-Capability /CapabilityName:Hello.Face.18330~~~~0.0.1.0 just syntax error there should be a space between mount and /remove…
Fixed, thanks!
enable feature .netfx3 .. always having access denied.. even im having an elevated permission