NTLM (NT LAN Manager) is a legacy Microsoft authentication protocol that dates back to Windows NT. Although Microsoft introduced the more secure Kerberos authentication protocol back in Windows 2000, NTLM (mostly NTLMv2) is still widely used for authentication on Windows domain networks. In this article, we will look at how to disable the NTLMv1 and NTLMv2 protocols and switch to Kerberos in an Active Directory domain.
The key NTLMv1 problems:
- weak encryption;
- storing password hash in the memory of the LSA service, which can be extracted from Windows memory in plain text using various tools (such as Mimikatz) and used for further attacks using pass-the-has scripts;
- the lack of mutual authentication between a server and a client, leading to data interception and unauthorized access to resources (some tools such as Responder can capture NTLM data sent over the network and use them to access the network resources);
- and other vulnerabilities.
Some of these have been in the next version NTLMv2 which uses more secure encryption algorithms and allows to prevent of common NTLM attacks. NTLMv1 and LM authentication protocols are disabled by default starting with Windows 7 and Windows Server 2008 R2.
How to Enable NTLM Authentication Audit Logging?
Before completely disabling NTLM in a domain and switching to Kerberos, it is a good idea to ensure that there are no applications in the domain that require and use NTLM auth. There may be legacy devices or services on your network that still use NTLMv1 authentication instead of NTLMv2 (or Kerberos).
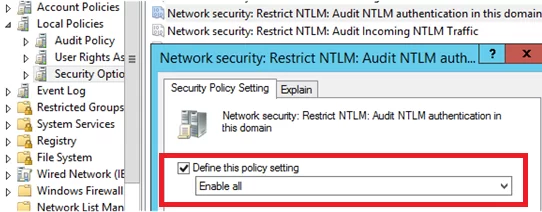
To track accounts or apps that use NTLM authentication, you can enable audit logging policies on all computers using GPO. Open the Default Domain Controller Policy, navigate to the Computer Configuration -> Windows Settings -> Security Settings -> Local Policies -> Security Options section, find and enable the Network Security: Restrict NTLM: Audit NTLM authentication in this domain policy and set its value to Enable all.
In the same way, enable the following policies in the Default Domain Policy:
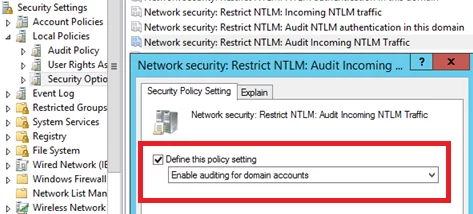
- Network Security: Restrict NTLM: Audit Incoming NTLM Traffic – set its value to Enable auditing for domain accounts
- Network security: Restrict NTLM: Outgoing NTLM traffic to remote servers: set Audit all
Once these policies are enabled, events related to the use of NTLM authentication will appear in the Application and Services Logs-> Microsoft -> Windows -> NTLM section of the Event Viewer.
You can analyze the events on each server or collect them from the central Windows Event Log Collector.
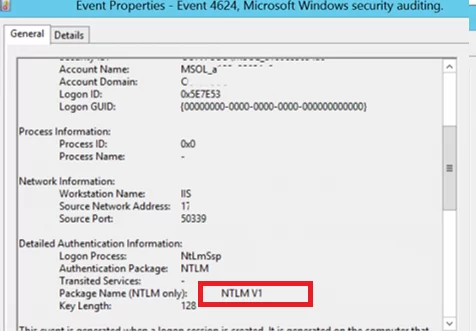
You need to search for the events from the source Microsoft-Windows-Security-Auditing with the Event ID 4624 – “An Account was successfully logged on“. Note the information in the “Detailed Authentication Information” section. If there is NTLM in the Authentication Package value, then the NTLM protocol was used to authenticate this user.
Look at the value of Package Name (NTLM only). This line shows which protocol (LM, NTLMv1, or NTLMv2) was used for authentication. So you need to identify any servers/applications that are using the legacy protocol.
Also, if NTLM is used for authentication instead of Kerberos, Event ID 4776 will appear in the log:
The computer attempted to validate the credentials for an account
Authentication Package: MICROSOFT_AUTHENTICATION_PACKAGE_V1_0
For example, to search for all NTLMv1 authentication events on all domain controllers, you can use the following PowerShell script:
$ADDCs = Get-ADDomainController -filter
 $Now = Get-Date
 $Yesterday = $Now.AddDays(-1)
 $NewOutputFile = "c:\Events\$($Yesterday.ToString('yyyyddMM'))_AD_NTLMv1_events.log"
 function GetEvents($DC){
 Write-Host "Searching log on " $DC.HostName
 $Events = Get-EventLog "Security" -After $Yesterday.Date -Before $Now.Date -ComputerName $DC.HostName -Message "*NTLM V1*" -instanceid 4624
 foreach($Event in $Events){
 Write-Host $DC.HostName $Event.EventID $Event.TimeGenerated
 Out-File -FilePath $NewOutputFile -InputObject "$($Event.EventID), $($Event.MachineName), $($Event.TimeGenerated), $($Event.ReplacementStrings),($Event.message)" -Append
 }
 }
 foreach($DC in $ADDCs){GetEvents($DC)}
Once you have identified the users and applications that use NTLM in your domain, try switching them to use Kerberos (possibly using SPN). To use Kerberos authentication, some applications need to be slightly reconfigured (Kerberos Authentication in IIS, Configure different browsers for Kerberos authentication, Create a Keytab File Using Kerberos Auth). From my own experience, I see that even large commercial products are still using NTLM instead of Kerberos, some products require updates or configuration changes. The idea is to identify which applications use NTLM authentication, and now you have a way to identify that software and devices.
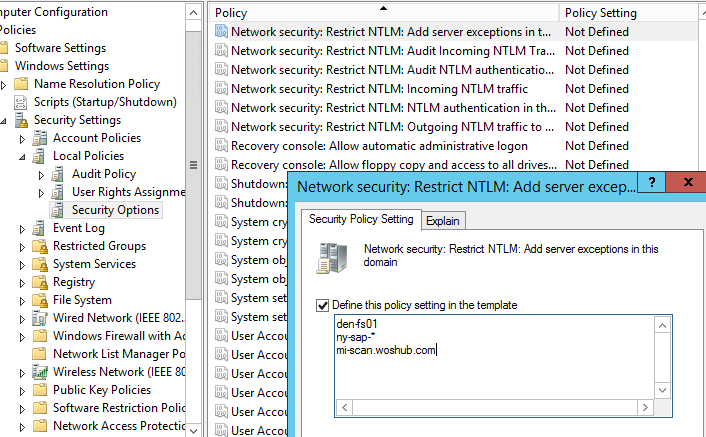
Those apps that cannot use Kerberos can be added to the exceptions. This allows them to use NTLM authentication even if it is disabled at the domain level. To do it, the Network security: Restrict NTLM: Add server exceptions for NTLM authentication in this domain policy is used. Add the names of the servers (NetBIOS names, IP addresses, or FQDN), on which NTLM authentication can be used, to the list of exceptions as well. Ideally, this exception list should be empty. You can use the wildcard character *.
Configuring Active Directory to Force NTLMv2 via GPO
Before completely disabling NTLM in an AD domain, it is recommended that you first disable its more vulnerable version, NTLMv1. The domain administrator needs to make sure that their network does not allow the use of NTLM or LM for authentication, as in some cases an attacker can use special requests to get a response to an NTLM/LM request.
You can set the preferred authentication type using the domain GPO. Open the Group Policy Management Editor (gpmc.msc) and edit the Default Domain Controllers Policy. Go to the GPO section Computer Configurations -> Policies -> Windows Settings -> Security Settings -> Local Policies -> Security Options and find the policy Network Security: LAN Manager authentication level.
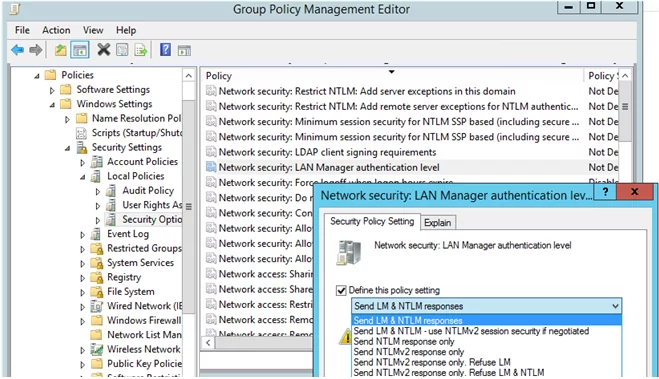
There are 6 options to choose from in the policy settings::
- Send LM & NTLM responses;
- Send LM & NTLM responses – use NTLMv2 session security if negotiated;
- Send NTLM response only;
- Send NTLMv2 response only;
- Send NTLMv2 response only. Refuse LM;
- Send NTLMv2 response only. Refuse LM& NTLM.
The NTLM authentication options are listed in the order of their security improvement. By default, Windows 7 and later operating systems use the option Send NTLMv2 response only. If this option is enabled, client computers use NTLMv2 authentication, but AD domain controllers accept LM, NTLM, and NTLMv2 requests.
You can change the policy value to the most secure option 6 : “Send NTLMv2 response only. Refuse LM & NTLM”. This policy causes domain controllers to reject LM and NTLM requests as well.
You can also disable NTLMv1 through the registry. To do this, create a DWORD parameter with the name LmCompatibilityLevel with a value between 0 and 5 under the registry key HKEY_LOCAL_MACHINE\SYSTEM\CurrentControlSet\Control\Lsa. Value 5 corresponds to the policy option “Send NTLMv2 response only. Refuse LM NTLM”.

Once you have ensured that you are not using NTLMv1, you can go further and try to disable NTLMv2. NTLMv2 is a more secure authentication protocol but loses significantly to Kerberos in terms of security (although there are fewer vulnerabilities in NTLMv2 than in the NTLMv1, but there is still a chance of capturing and reusing data, as well as it doesn’t support mutual authentication).
The main risk of disabling NTLM is the potential use of legacy or misconfigured applications that may still be using NTLM authentication. If this is the case, they will need to be updated or specially configured to switch to Kerberos.
REG add "HKLM\Software\Microsoft\Windows NT\CurrentVersion\TerminalServerGateway\Config\Core" /v EnforceChannelBinding /t REG_DWORD /d 1 /f
Restrict NTLM Completely and Use Kerberos Authentication in an AD
To check how authentication works in different applications in a domain without using NTLM, you can add the accounts of the required users to the Protected Users domain group (it has been available since the Windows Server 2012 R2 release). Members of this security group can only authenticate using Kerberos (NTLM, Digest Authentication, or CredSSP are not allowed). This allows you to verify that Kerberos user authentication is working correctly in different apps.
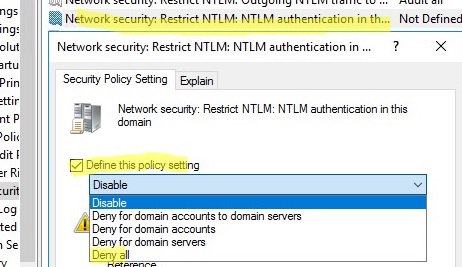
Then you can completely disable NTLM on the Active Directory domain using the Network Security: Restrict NTLM: NTLM authentication in this domain policy.
The policy has 5 options:
- Disable: the policy is disabled (NTLM authentication is allowed in the domain);
- Deny for domain accounts to domain servers: the domain controllers reject NTLM authentication attempts for all servers under the domain accounts, and the “NTLM is blocked” error message is displayed;
- Deny for domain accounts: the domain controllers are preventing NTLM authentication attempts for all domain accounts, and the “NTLM is blocked” error appears;
- Deny for domain servers: NTLM authentication requests are denied for all servers unless the server name is on the exception list in the “Network security: Restrict NTLM: Add server exceptions for NTLM authentication in this domain” policy;
- Deny all: the domain controllers block all NTLM requests for all domain servers and accounts.
Although NTLM is now disabled on the domain, it is still used to process local logins to computers (NTLM is always used for local user logons).
You can also disable incoming and outgoing NTLM traffic on domain computers using separate Default Domain Policy options:
- Network security: Restrict NTLM: Incoming NTLM traffic = Deny all accounts
- Network security: Restrict NTLM: Outgoing NTLM traffic to remote servers = Deny all
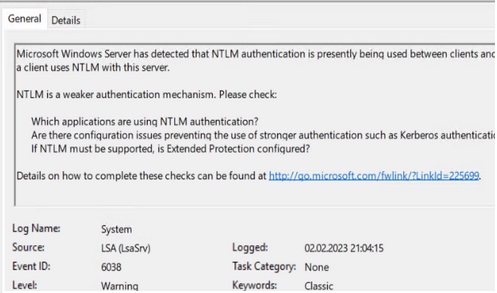
After enabling auditing, Event Viewer will also display EventID 6038 from the LsaSRV source when using NTLM for authentication:
Microsoft Windows Server has detected that NTLM authentication is presently being used between clients and this server. This event occurs once per boot of the server on the first time a client uses NTLM with this server.
NTLM is a weaker authentication mechanism. Please check:
Which applications are using NTLM authentication?
Are there configuration issues preventing the use of stronger authentication such as Kerberos authentication?
If NTLM must be supported, is Extended Protection configured?
You can check that Kerberos is used for user authentication with the command:
klist sessions

This command shows that all users are Kerberos-authenticated (except the built-in local Administrator, who is always authenticated using NTLM).
Kerberos pre-authentication failed). Check the Failure Code in the error description. This will indicate the reason and source of the lock.To further improve Active Directory security, I recommend reading these articles:
- Securing administrator accounts in Active Directory
- How to Disable LLMNR and NetBIOS over TCP/IP?
14 comments
[…] Event 4624 with data fields like “Authentication Package” and “Package name (NTLM only)” needs to be filtered. If you see something like NTLMV1 at Package Name. It shows you that there is an application still using NTLMv1. Disabling NTLM immediately can have broken an application. Make sure this is tested properly. […]
i still counfuse to force workstation to use ntlmv2 or use kerberos, my office has been pentest and found backdoor from ntlmv1
I think the last picture shows a wrong setting based on where it is placed, isn’t it?
You are right completely! There musnt be word “Audi” in header on the last screenshot .
Thanks for tips guys!
The correct registry key for “LMCompatibilityLevel” entry in Secpol.msc is:
HKEY_LOCAL_MACHINE\SYSTEM\CurrentControlSet\Control\Lsa
Thanks for your clarification! I corrected the registry key in the article
I am confused . Which policy should I modify Default Domain or Default Domain Controller ?
Use the Default Domain Controllers Policy in order to restrict ntlm usage on DCs.
I would like to suggest some different code to run against your domain to get the events around NTLM:
# must be run from a DC for the domain controllers you want to collect with the same credentials
# example enpro domain iad0dc05.enproindustries.com enproadmin10
# example login domain iad0dc06.login.enproindustries.com jl-admin
$ADDCs = Get-ADDomainController -filter *
$desktop = [Environment]::GetFolderPath(“Desktop”)
$Now = Get-Date
$Yesterday = $Now.AddDays(-1)
# 6 hours
$Query = @’
*[System[(EventID=4776 or EventID=4624) and TimeCreated[timediff(@SystemTime) <= 21600000]]]
‘@
$NewOutputFile = “$desktop\$($Yesterday.ToString(‘yyyyddMM’))_AD_NTLMv1_events.log”
function GetEvents($DC){
Write-Host “Searching log on ” $DC.HostName
#$Events = Get-EventLog “Security” -After $Yesterday.Date -Before $Now.Date -ComputerName $DC.HostName -Message “*V1*” -instanceid 4624
$Events2 = Get-WinEvent -ComputerName $DC.HostName -FilterXML $Query | Where {$_.Message -like “*V1*”}| Select TimeCreated, Id, MachineName,userID,message
foreach($Event in $Events2){
Write-Host $DC.HostName $Event.ID $Event.TimeCreated
# Out-File -FilePath $NewOutputFile -InputObject “$($Event.EventID), $($Event.MachineName), $($Event.TimeGenerated), $($Event.ReplacementStrings),($Event.message)” -Append
Out-File -FilePath $NewOutputFile -InputObject “$($Event.ID), $($Event.MachineName), $($Event.Timecreated), ($Event.message)” -Append
}
}
foreach($DC in $ADDCs){GetEvents($DC)}
In the Query I just added but have not tested yet this portion: EventID=4776 or
Of course I left in some comments which should have probably not been included. Please remove these if you have the ability.
EventId 8002 en 8004 are probably a better choice to search the NTLM audit events. They have an own event box in eventviewer Microsoft > windows > NTLM
Kerberos is typically enabled by default in Windows AD environment and is the preferred authentication protocol.
Best practice is to not edit the default policies. Instead create a new policy with the settings you want to change and in the OU, set the link order so the new policy is higher number than Default.
You are right, it is better to make the changes through a separate GPO rather than through the Default Policy.