In this article, we’ll look at how to configure Kerberos authentication for different browsers in a Windows domain to enable transparent and secure authentication on web servers without the need to re-enter a user’s password in a corporate network. Most modern browsers (IE, Chrome, Firefox) support Kerberos, however, you have to perform some extra steps to make it work.
To allow a browser to authenticate on a web server, the following conditions have to be fulfilled:
- Kerberos support must be enabled on the web server side (an example of Setting up Kerberos Authentication for IIS Website );
- A user must have access to the webserver;
- A user must be authenticated on his computer joined to the Active Directory using Kerberos (must have a valid TGT — Kerberos Ticket Granting Ticket).
For example, you want to allow Kerberos clients to authenticate using a browser on any web servers of the woshub.com domain (DNS or FQDN name must be used instead of the IP address of the web server).
Enabling Kerberos Authentication in Internet Explorer
Let’s consider how to enable Kerberos authentication in Internet Explorer 11.
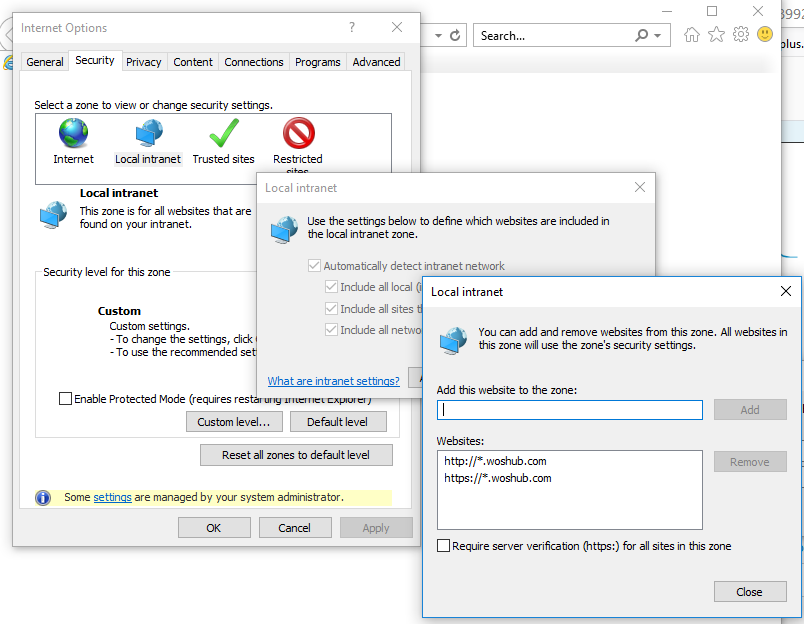
Go to Internet Options -> Security -> Local intranet, and click Sites -> Advanced. Add the following entries to the zone:
https://*.woshub.comhttp://*.woshub.com
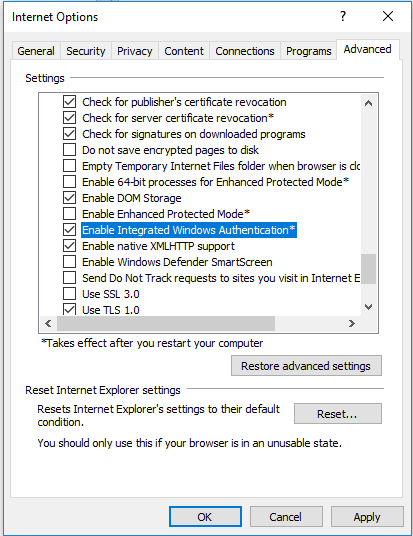
Then go to the Advanced tab and in the Security section, make sure that Enable Integrated Windows Authentication option is checked.
How to Enable Kerberos Authentication in Google Chrome
To make SSO work in Google Chrome, configure Internet Explorer using the method described above (Chrome uses IE setting). In addition, it should be noted that all new versions of Chrome automatically detect Kerberos support on the website. If you are using one of the earlier Chrome (Chromium) versions, run it with the following parameters to make Kerberos authentication on your web servers work correctly:
--auth-server-whitelist="*.woshub.com"
 --auth-negotiate-delegate-whitelist="*.woshub.com"
For example:
"C:\Program Files (x86)\Google\Chrome\Application\chrome.exe” --auth-server-whitelist="*.woshub.com " --auth-negotiate-delegate-whitelist="*.woshub.com"
You can configure these setting using GPO for Chrome (AuthServerWhitelist policy) or using the registry parameter AuthNegotiateDelegateWhitelist located in registry key HKLM\SOFTWARE\Policies\Google\Chrome (How to deploy a registry keys using GPO).
In order the changes to come into effect, restart your browser and reset Ketberos tickets using klist purge command (see the article).
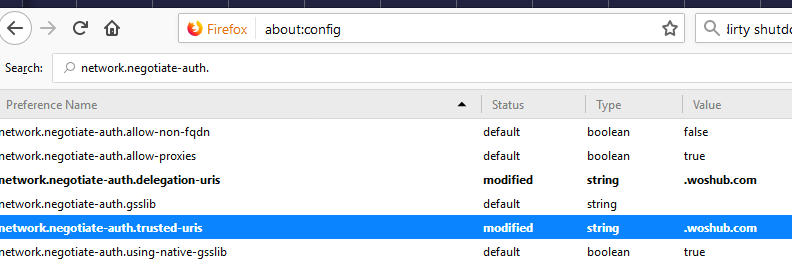
Configure Firefox to Authenticate using Kerberos
By default, Kerberos support in Firefox is disabled. To enable it, open the browser configuration window (go to about:config in the address bar). Then in the following parameters specify the addresses of the web servers, for which you are going to use Kerberos authentication.
network.negotiate-auth.trusted-urisnetwork.automatic-ntlm-auth.trusted-uris
You can make sure that your browser has passed Kerberos authentication on the server using Fiddler or klist tickets command.