When connecting to a new network, Windows prompts you to select its network profile type (network location): Public or Private. Windows network profiles are part of Windows Defender Firewall with Advanced Security and allow you to apply different firewall rules depending on the type of network your computer is connected to. Depending on the profile used for your network connection, other computers may or may not see your computer on the network, use shared network folders and printers (network discovery settings).
In this article, we will look at how to change the Network profile type from “Public” to “Private” and vice versa in Windows (and Windows Server) using Windows Settings, PowerShell, Registry, and Security Policies.
- What is the Network Location (Profile) in Windows?
- How to Change the Network Profile (Location) from Public to Private on Windows?
- Change Network Location to Public or Private with PowerShell
- How to Set Network Location via Windows Registry?
- Change Network Type Using Local Security Policy
- Private Network Instead of Domain on Windows Server
What is the Network Location (Profile) in Windows?
A network connection in Windows (whether Ethernet or Wi-Fi) can be assigned one of three network profiles.
- Private or Home network – a profile for a trusted network (home or office network). In such a network, the computer will be available for discovery by other devices and you can share your files and printers;
- Public network (Guest/Open) – a profile for untrusted networks (public Wi-Fi network in the subway, cafe, or airport). You don’t trust other devices on such a network, your computer will be hidden from other network devices, and no one will be able to access shared folders and printers on your computer;
- Domain network – a profile for computers joined to an Active Directory domain. Applies automatically after joining the Windows device to the AD domain. You can apply domain firewall policies for this profile.
Depending on the type of network, different Windows Firewall rules apply to the network interface.
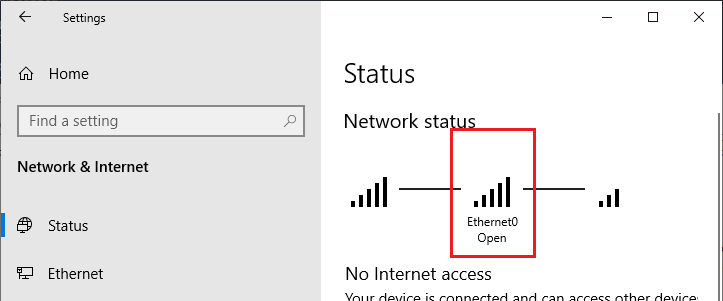
On Windows 10 and 11, you can see the current profile (location) assigned to the network connection in Settings -> Network and Internet -> Status (quick access command ms-settings:network ). The Ethernet0 network interface in my example is assigned the Public (Open) profile.
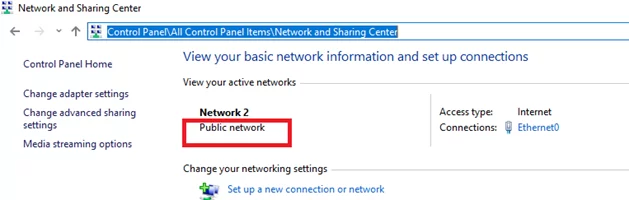
You can check the network type for active network connections in Windows 10 using the classic Control Panel (All Control Panel Items\Network and Sharing Center).
The network profile in Windows 10 is selected by the user when the device is connected to the new network for the first time. A prompt appears:
Network 2
Do you want to allow your PC to be discoverable by other PCs and devices on this network?
We recommend allowing this on your home and work networks, but not public ones.
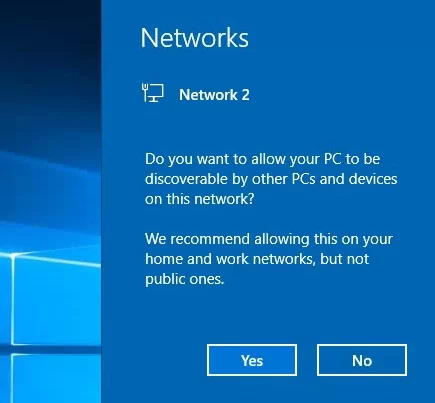
If you select “Yes”, the Private profile will be assigned to the network, or the Public profile if you select “No”. The next time you connect to the same LAN or WiFi network, the previously selected profile is automatically assigned.
reg add "HKLM\SYSTEM\CurrentControlSet\Control\Network\NewNetworkWindowOff" /f
You can reset all settings and profiles for all saved network connections in Windows by selecting Settings -> Network & Internet -> Status -> Network Reset. Then reboot the computer.
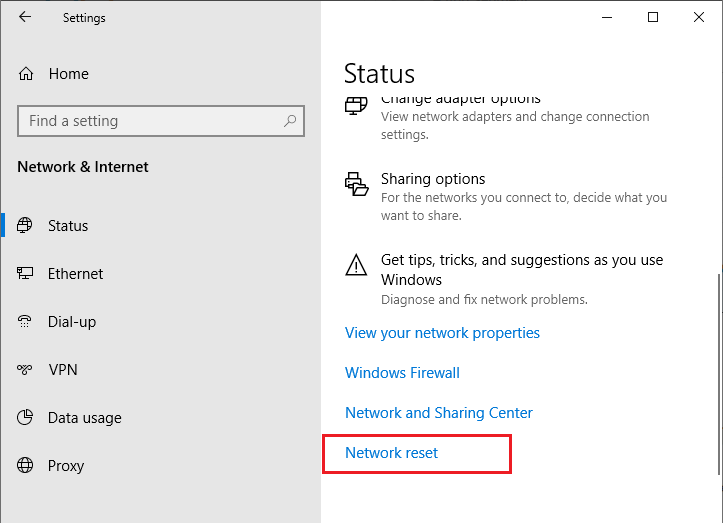
Now when you connect to the network, a network discovery request appears again.
How to Change the Network Profile (Location) from Public to Private on Windows?
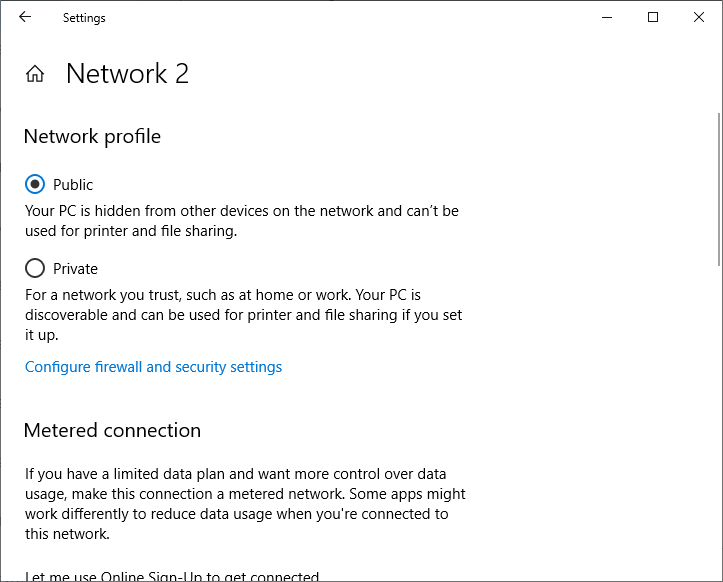
You can change the network profile type on Windows 10/11 using the modern Settings app. Go to “Network & Internet” -> “Status” and open your network connection settings.
Here you can switch the network location profile from Public to Private and vice versa.
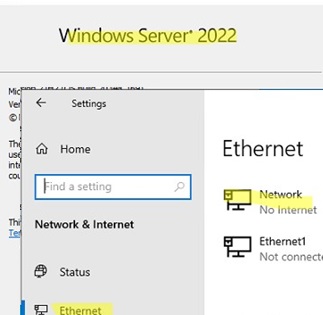
In Windows Server 2022/2019, the Properties option is missing from the Status tab. Therefore, select the Ethernet section in the Network and Internet section (or the Wi-Fi section if wireless networking is enabled in Windows Server). Select your network connection.
If a server or a computer is joined to the AD domain, you cannot change the network type for a domain network connection. After the reboot, it will automatically change back to the Domain Network profile.
Change Network Location to Public or Private with PowerShell
On Windows 10/11 and Windows Server 2022/2019/2016, you can manage network connection locations from PowerShell. Open the elevated PowerShell console. List Windows network interfaces and the network profiles applied to them:
Get-NetConnectionProfile
In my example, there is only one physical network adapter (Ethernet0) on a computer with a Public network location (in the NetworkCategory value, you can see the following types of network profiles: Public, Private or DomainAuthenticated).
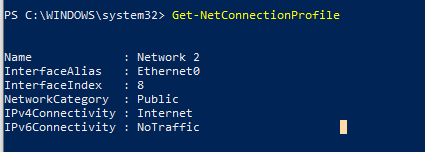
Let’s try to change the assigned network profile for the NIC. You need to get the index assigned to this network adapter. In this example, InterfaceIndex = 8.
Name : Network 2
InterfaceAlias : Ethernet0
InterfaceIndex : 8
NetworkCategory : Public
IPv4Connectivity : Internet
IPv6Connectivity : NoTraffic
To change the network for the network adapter with index 8 to Private, run the command:
Set-NetConnectionProfile -InterfaceIndex 8 -NetworkCategory Private
Check that the network profile has changed:
Get-NetConnectionProfile -InterfaceIndex 8

Windows Defender Firewall will automatically apply firewall rules to the network connection according to the assigned network profile without rebooting.
Similarly, you can change the location of the network to Public:
Set-NetConnectionProfile -InterfaceIndex 8 -NetworkCategory Public
Or domain:
Set-NetConnectionProfile -InterfaceIndex 8 -NetworkCategory DomainAuthenticated
You can also change the network profile for all network adapters of the computer at once:
Get-NetConnectionProfile | Set-NetConnectionProfile -NetworkCategory Private
You won’t be able to change the network connection profile from domain to private or public on a domain-joined computer. Make sure your computer is joined to an AD domain:
Get-CimInstance -ClassName Win32_ComputerSystem).PartOfDomain
Try changing the network location:
Set-NetConnectionProfile -InterfaceIndex 8 -NetworkCategory Public –Verbose
An error will appear:
Set-NetConnectionProfile : Unable to set the NetworkCategory due to one of the following possible reasons: not running PowerShell elevated; the NetworkCategory cannot be changed from 'DomainAuthenticated'; user initiated changes to NetworkCategory are being prevented due to the Group Policy setting 'Network List Manager Policies'.

How to Set Network Location via Windows Registry?
You can change the network location using the Registry Editor. Open the regedit.exe and go to the HKEY_LOCAL_MACHINE\SOFTWARE\Microsoft\Windows NT\CurrentVersion\NetworkList\Profiles. This registry section contains a list of all network connections on your computer. There is a separate registry key for each network connection with a name in GUID format ({xxxxxx-xxxxx-……..}).
To find the network you need, look through all the registry keys and find the key that contains the parameter ProfileName with the network you need from the Network and Sharing Center (or the Name value from the Get-NetConnectionProfile command). In our case, the computer is connected to Network 4.
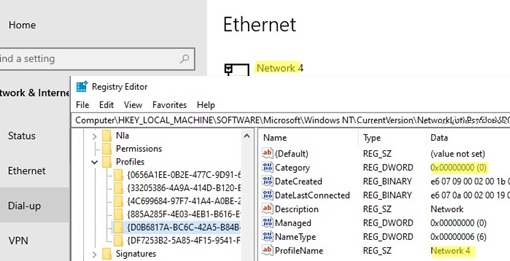
Check your network name in the ProfileName registry string value. The network type is specified in the Category parameter. The following values are available:
- 0 — Public Network
- 1 — Private Network
- 2 — Domain Network
In order to change the network type, set the parameter value to the one you need and restart your computer.
Change Network Type Using Local Security Policy
Another way to change the network connection type is to use the Local Security Policy Editor.
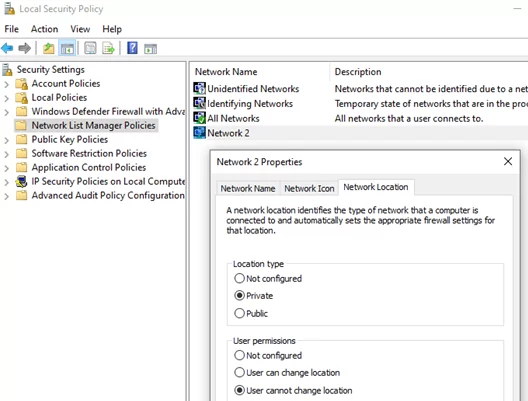
Run the secpol.msc snap-in and go to the section Network List Manager Policies. On the right, find your network by its name as it is displayed in the Network and Sharing Center. Open the network properties and go to the Network Location tab, then change the network type from Not configured to Private and save the changes. To prevent users from changing the network location profile, check the option “User cannot change location”.
Private Network Instead of Domain on Windows Server
In the new versions of Windows Server 2022/2019, I have seen several times a bug where the domain server (or even a domain controller or RODC) itself changes the network type from domain to private.
To solve the problem, just restart the Network Location Awareness service (from the services.msc console) or with the PowerShell command:
Get-Service NlaSvc| Restart-Service -Force (run as SYSTEM account)
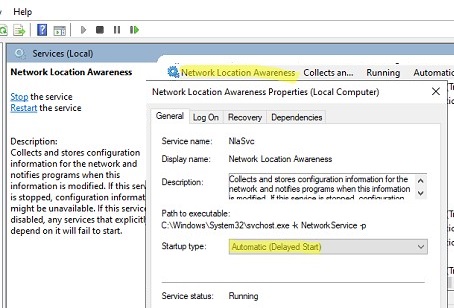
To fix this problem on Windows Server, you need to configure the delayed start type for the Network Location Awareness service. To do this, select the Automatic (Delayed Start) option in the service properties and save the changes.
Make sure that after a reboot, the network type in Windows Server is now always defined as domain (not private).
If the problem occurs on an Active Directory domain controller, you need to change the dependencies of the NlaSvc service so that it starts after the DNS Server service:
sc config nlasvc depend=DNS
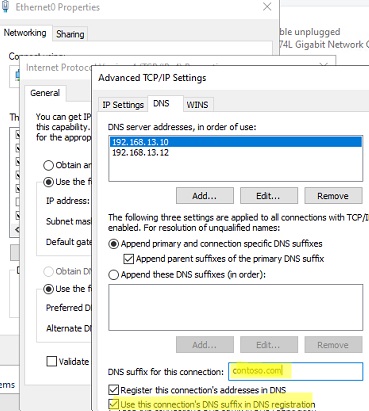
Also, in some cases, it can help to force set the DNS suffix of your domain in the network adapter settings (network adapter -> TCP / IPv4 -> Advanced -> DNS, specify your domain name in the “DNS suffix for this connection”, and check the option “Use the suffix of this connection in the DNS registration”.
11 comments
FINALLY, a recommendation that ACTUALLY WORKS.
Thanks
best is Reset he network —> Settings —>Network & Internet —>Status —> Network Reset
Last option on them middle screen on he bottom.
That’s work for me at the end noting work before that.
hanks for the comprehensive article
Powershell worked like a charm! thanks!!
on a 2012R2 server i got it finally working again without a reboot with the registry setting, thanks a lot
Thank you! You saved me!
Awesome guide, thank you! PS commands did the trick for me
> “Network & Internet” -> “Status” -> “Change connection properties”
Clicking there does nothing. Nothing opens.
Server 2019
Nothing in this post works on server 2019. I wish you wouldn’t advertise “windows 10 and server 20xx” and then only give instructions for windows 10, which do not work on the servers. I wasted hours reading through and trying multiple articles that boast the same thing and NONE work on the servers. I’ve lost all faith in articles that mention windows 10 “and server…”. None seem to know what they are talking about when they include “and server…”!
The powershell stuff worked perfectly on Server 2019. Thank you.
If you set DNS as dependency, you delete default dependencies.
Here’s how to add DNS dependency without deleting existing dependencies:
((Get-Service nlasvc | select *).RequiredServices).Name | ForEach-Object {
$RequiredSvc += $_ + “/”
}
$RequiredSvc += “DNS”
sc.exe config nlasvc depend=$RequiredSvc
sc.exe config nlasvc start=delayed-auto
W2K19 with powershell , works fine !!!