IPerf is an open-source command line tool designed to test network throughput between two network hosts. The iPerf allows to generate TCP and UDP traffic (load) between two hosts. You can use iPerf to quickly measure the maximum network bandwidth (throughput) between a server and a client, and conduct stress testing of the ISP link, router, network gateway (firewall), your Ethernet, or Wi-Fi network performance.
In this article, we will show you how to install and use the iPerf tool to test the network speed (throughput) on Windows. Linux and VMware ESXi (there are iPerf versions for Android, macOS, RouterOS from MikroTik, and other platforms).
IPerf is a cross-platform tool and doesn’t require installation in Windows. Just download the executable and run it on two devices, the network throughput between which needs to be tested. IPerf works in a client-server mode. On the first device, the iPerf starts in server mode (it is waiting for traffic from the iPerf client). On the second computer, the iPerf starts in client mode, generates TCP or UDP traffic, and measures the maximum data transfer rate.
In most cases, the iPerf3 version is used now (it supports high-speed UDP testing, port 5201 TCP/UDP is used by default).
How to Install and Use iPerf on Windows?
You can download iPerf 3.1.3 for Windows by the following link https://iperf.fr/iperf-download.php. If you want to use iPerf 2.0, you can get it here. You don’t need to install the iPerf on Windows, it is enough to download the iPerf archive and extract it to a local directory on the drive. There are only two files in the archive: cygwin1.dll and iperf3.exe.

$iPerfZip = "https://iperf.fr/download/windows/iperf-3.1.3-win64.zip"
 $TargetFolder = Join-Path $env:TEMP "iperf.zip"$iPerfPath = Join-Path $env:TEMP "iperf"
 if (!(Test-Path $iPerfPath))
 { Invoke-WebRequest -Uri $iPerfZip -OutFile $TargetFolder
 Expand-Archive -Path $TargetFolder -DestinationPath $iPerfPath
 }
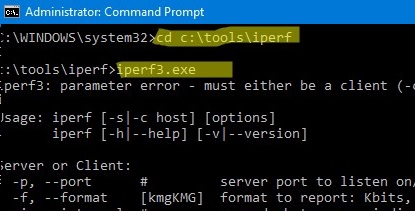
Iperf is a console tool and you need to run it in the command line. Open a command prompt (cmd.exe) and go to the directory with the utility. For example:
cd c:\tools\iperf
If you run the iperf3.exe program without parameters, it will list the available options.
The iPerf utility can run in server mode (-s option) or client mode (-c). If you are running an iPerf server on Windows, you need to open inbound port 5201 for TCP and UDP protocols. You can open ports using the Windows Defender Firewall GUI or with PowerShell commands. Create and enable firewall rules like this:
New-NetFirewallRule -DisplayName 'iPerf-Server-Inbound-TCP' -Direction Inbound -Protocol TCP -LocalPort 5201 -Action Allow | Enable-NetFirewallRule
 New-NetFirewallRule -DisplayName 'iPerf-Server-Inbound-UDP' -Direction Inbound -Protocol UDP -LocalPort 5201 -Action Allow | Enable-NetFirewallRule
![]()
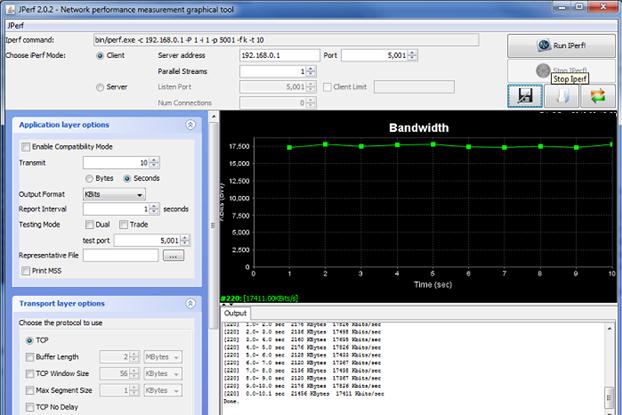
There are several iPerf GUI implementations for Windows. For example, Iperf3-Cygwin-GUI or jperf.
The jperf is written on Java (in order to run jperf, the Java VM must be installed on the computer). In addition to graphical form for the CLI interface, Jperf can build real-time graph bandwidth charts of the communication channel load. To use it, just specify the iPerf server address and start the network throughput test.
Install-Module -Name iPerfAutomate
Installing iPerf on Linux
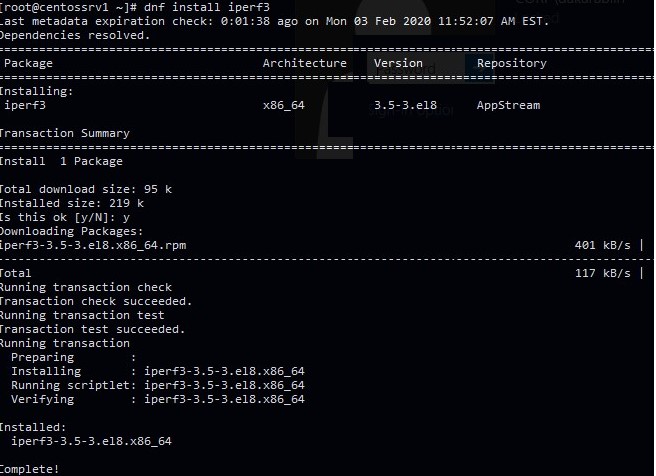
On CentOS/RHEL/Fedora/Rocky Linux/Oracle Linux 8, the iperf3 package is available in the base AppStream repository (in CentOS 7 you can find iperf3 in the EPEL repo).
You can install it with the dnf (yum) command:
# dnf install iperf3
On Debian/Ubuntu/Mint distros you can install the iperf3 with the command:
$ sudo apt install iperf3
If you want to use your Linux host as the iperf3 server, you need to open the TCP/UDP ports 5201 in firewalld (or iptables):
# firewall-cmd --permanent --add-port=5201/udp
 # firewall-cmd --permanent --add-port=5201/tcp
 # firewall-cmd --reload
Using iPerf on VMware ESXi
VMware removed the iPerf tool in ESXi 6.7 but brought it back in 6.7U1. Make sure you have iPerf installed on your ESXi host. Connect to the ESXi console via SSH, go to the /usr/lib/vmware/vsan/bin directory and check if it contains the iperf or iperf3 binary file.
If iPerf is not installed, you can manually download the iperf offline bundle here (http://vibsdepot.v-front.de/depot/bundles/iperf-2.0.5-1-offline_bundle.zip). Copy it to the ESXi host and install with the command:
# esxcli software vib install -d /iperf-2.0.5-1-offline_bundle.zip –no-sig-check
The tool will be installed to the /opt/iperf/bin directory. Use the following command to run iPerf on VMware ESXi:
# /opt/iperf/bin/iperf3
If you are running an iPerf server on an ESXi host, you need to open port 5201. This port is disabled by default in the ESXi firewall. To open them, you can temporarily disable the ESXi firewall:
# esxcli network firewall get
 # esxcli network firewall set --enabled=false
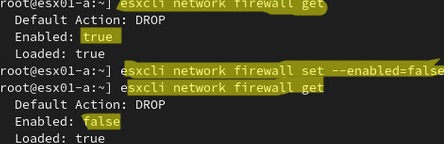
# esxcli network firewall set --enabled true
When running iPerf on ESXi, it must be bound to the vmkernel interface:
# esxcli network ip interface ipv4 get
# vmkping IP_address
Run iPerf on the vmkernel IP address:
# iperf -s -B 192.168.31.50
Use iPerf Tool to Test Network Speed/Bandwidth
Let’s now look at some examples of using iPerf to test network throughput. In this example, we will use a Linux host as the iperf server. Let’s run the iperf in server mode:
# iperf3 –s
The iPerf server is running, it is waiting for connections on the 5201 TCP port.
Server listening on 5201.

# iperf3 -s -w 32768 –p 5200
- -w 32768 – change the TCP windows size to 32 kB (by default it is about 8 kB);
- –p 5200 – the port on which iPerf is waiting for connections (note that iperf2 listens on port 5001 by default and iperf3 listens on port 5201).
You can run the iPerf server as a Windows Service using the -D argument.
I am using a computer with Windows 10 as an iPerf client. Open the command prompt and change to the directory with the iPerf executable:
cd c:\tools\iperf
In order to run a network bandwidth test from the client, specify the iPerf server address (or DNS name):
iperf3.exe -c 192.168.1.200
The client will start generating network traffic, test the connection for 10 seconds, and display the following table of results.
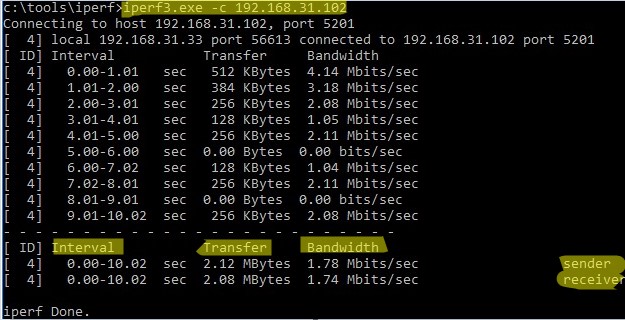
- Interval – testing interval (in sec.);
- Transfer – the size of the transferred data;
- Bandwidth – average data transfer rate.
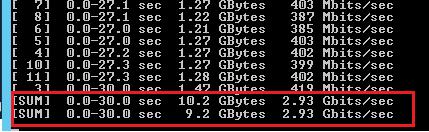
If you started the iPerf server with an increased TCP window size, you can use the following command to get the maximum network load:
iperf3.exe -c 192.168.1.200 -P 8 -t 30 -w 32768 -i 5 -f g
- -c 192.168.1.200 – IP address of the iPerf server;
- -w 32768 – increase the TCP window size;
- -t 30 – test duration in seconds (10 seconds by default);
- -P 8 – is the number of parallel threads to get the maximum channel load;
- -i 5 – display iPerf statistics every 5 seconds. The parameter is convenient to use for long tests (several minutes, hours);
- -f m — display results in Mbps. Here you can use the kmgKMG values (kilobits, megabits, megabytes, gigabits, etc.).
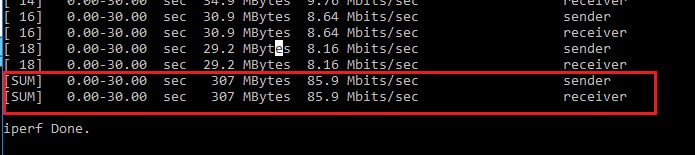
In my example, the test lasted 30 seconds. In the final report, we are interested in the values of the Bandwidth column listed in the last [SUM] line. This shows the average speed of sending and receiving data over the network. In our case, the average network bandwidth between two hosts is 85.9 Mbit/s. 307 MB of data has been transferred (Transfer column) with the symmetric speed (sender=receiver).
You can run iPerf in reverse mode (the server sends data, and the client receives it). Use the -R option on the client for this.
By default, the iPerf generates TCP traffic, if you need to check your network bandwidth for UDP packets, you must use the –u option. In this case, you should start the iPerf server with the command: iperf3 -s –u).
If you need to test your Internet service provider bandwidth, you can use one of the public iPerf servers (the iPerf public host list is available here):
iperf3 -c iperf.scottlinux.com
If you need to measure the maximum network speed in both directions (in a duplex mode), use the –d option on the client:
iperf3.exe -c IP -P 8 -t 30 -w 32768 –d
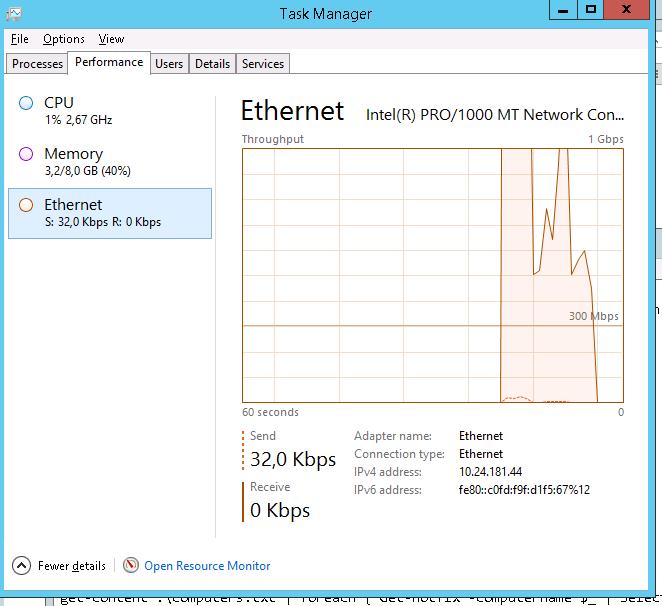
While running a network test using iPerf, you can monitor your network connection throughput chart through the Task Manager.
You can display the full list of the options as follows:
iperf3 –help
Iperf is an easy-to-use and handy network tool that helps you to measure network connection performance and maximum data transfer speed between two devices.
6 comments
Дякую
Thanks!
The major feature differences between iperf 2 vs iperf 3 is that iperf 2 supports latency related tests, video traffic profiles and multicast including source specific multicast while iperf 3 supports sctp tests and json output. The client’s and server’s clocks have to be synchronized to for the latency tests to work. Latency measurements consist of packet latencies, video frame latencies, and and tcp write tor read latencies. Iperf 2 also has a few new metrics per latency which include network power and end/end queue depth (per Little’s law)
I don’t know that iperf 3 is better with UDP. I’ll need to check into that as both tools should provide very similar performance measurements as the tools should be designed to provide accurate metrics.
is the default test using the server or client side hard disks or just memory?
It doens’t test disk
on iperf3 -d is for debug output. –bidir adds bidirectional/duplex testing (added in iperf 3.7)
-d, –debug emit debugging output
-R, –reverse run in reverse mode (server sends, client receives)
–bidir run in bidirectional mode.