Microsoft Hyper-V Server is a free version of Windows Hypervisor that can be used to run virtual machines. In this guide, we’ll look at how to install and configure Microsoft Hyper-V Server 2019 (this guide also applies to Hyper-V Server 2016).
Hyper-V Server 2019 is suitable for those who don’t want to pay for a hardware virtualization operating system. The Hyper-V has no restrictions and is completely free. Key benefits of Microsoft Hyper-V Server:
- Support of all popular OSs. There are no compatibility problems. All Windows and modern Linux and FreeBSD operating systems support Hyper-V;
- A lot of different ways to backup virtual machines: simple scripts, open-source software, free and commercial versions of popular backup programs;
- Although Hyper-V Server doesn’t have a Windows Server GUI (graphical management interface), you can manage it remotely using a standard Hyper-V Manager console or Windows Admin Center web interface;
- Hyper-V Server is based on a popular Windows Server platform, familiar and easy to work with;
- You can install Hyper-V on a pseudoRAID, for example, Inter RAID controller, or Windows software RAID;
- You do not need to license your hypervisor, it is suitable for VDI or Linux VMs;
- Low hardware requirements. Your processor must support software virtualization (Intel-VT or VMX by Intel, AMD-V/ SVM by AMD) and second-level address translation (SLAT) (Intel EPT or AMD RV). These processor options must be enabled in BIOS/UEFI/nested host. You can find full system requirements on the Microsoft website;
- It is recommended to install Hyper-V on hosts with at least 4 GB RAM.
It is worth noting that if you are using a free hypervisor, you are still responsible for licensing your virtual machines. You can run any number of VMs running any open-source OS, like Linux, but you have to license your Windows virtual machines. If you are using Windows Server as a guest OS, you must license it by the number of physical cores on your Hyper-V host. See more details on Windows Server licensing in a virtual environment.
What’s New in Microsoft Hyper-V Server 2019?
Let’s consider the new Hyper-V Server 2019 features in brief:
- Added support for Shielded Virtual Machines for Linux;
- VM configuration version 9.0 (with hibernation support);
- ReFS deduplication support;
- Core App Compatibility: the ability to run additional graphic management panels in the Hyper-V server console;
- Support for 2-node Hyper-V cluster and cross-domain cluster migration
How to Install Hyper-V Server 2019/2016?
You can download the Hyper-V Server 2019 ISO install image here: https://www.microsoft.com/en-us/evalcenter/evaluate-hyper-v-server-2019.
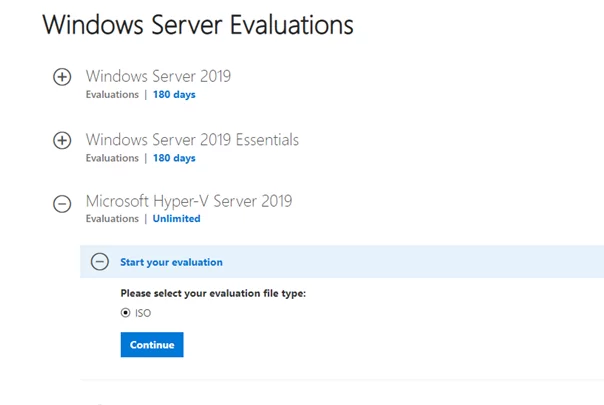
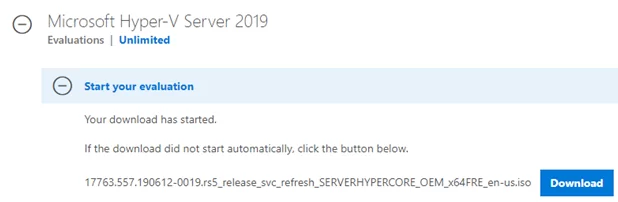
After clicking on the “Continue” button, a short registration form will appear. Fill in your data and select the language of the OS to be installed. Wait till the Hyper-V image download is over. The .iso file size is about 3 GB.
Installing Microsoft Hyper-V Server is identical to installing Windows 10/11 on a desktop computer. Just boot your server (computer) from the bootable USB flash drive with the Microsoft Hyper-V Server installation image (the easiest way to burn the ISO image to a USB drive is to use the Rufus tool). Then follow the instructions of the Windows setup wizard.

Manage Hyper-V Server Basic Settings Using Sconfig
After the installation, the system will prompt you to change the administrator password. Change it, and you will get to the hypervisor console.

Please note that Hyper-V Server does not have a familiar Windows GUI. You will have to configure most settings through the command line.
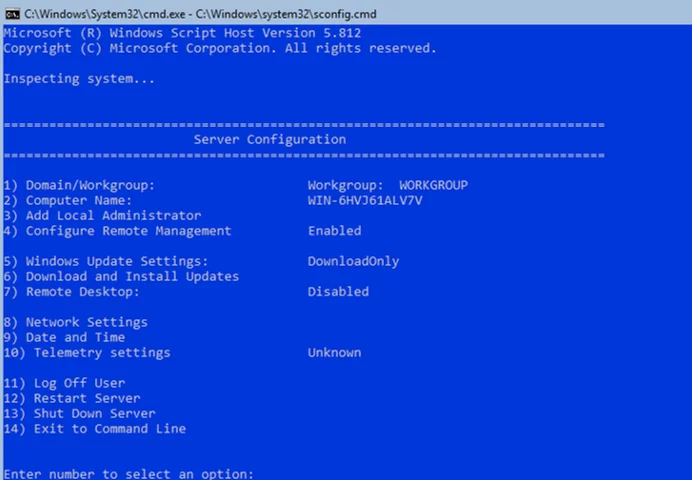
There are two windows on the desktop — the standard command prompt and the sconfig.cmd script window. You can use this script to perform the initial configuration of your Hyper-V server. Enter the number of the menu item you are going to work with in the “Enter number to select an option:” line.
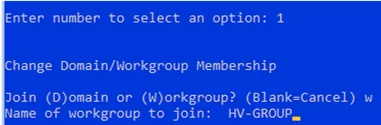
- The first menu item allows you to join your server to an AD domain or a workgroup;

- Set a hostname for your Hyper-V Server;
- Create a local administrator user (another account, besides the built-in administrator account). I’d like to note that when you enter the local administrator password, the cursor stays in the same place. However, the password and its confirmation are successfully entered;
- Enable remote access to your server. Thus, you will be able to manage it using Server Manager, MMC consoles, and PowerShell, connect via RDP, and check its availability using ping or tracert;
- Configure Windows Update. Select one of the three modes:
- Automatic (automatic update download and installation)
- DownloadOnly (only download without installation)
- Manual (the administrator decides whether to download or install the updates)
- Download and install the latest Windows security updates.
- Enable RDP access with/without NLA.
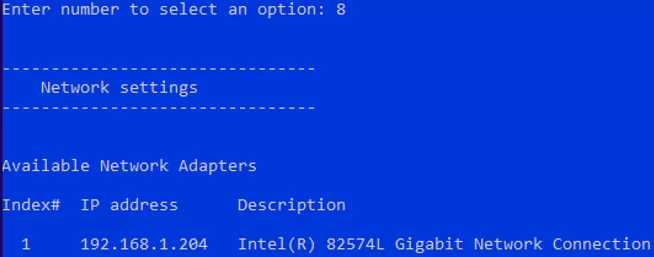
- Configure your network adapter settings. By default, your server receives the IP address from the DHCP server. It is better to configure the static IP address here;
- Set the date and time of your system.
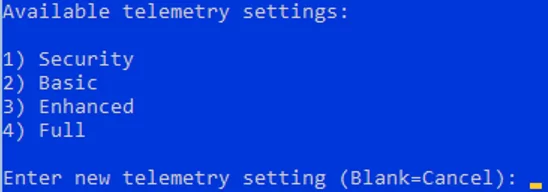
- Configure the telemetry. The Hyper-V won’t allow you to disable it completely. Select the mode you want.
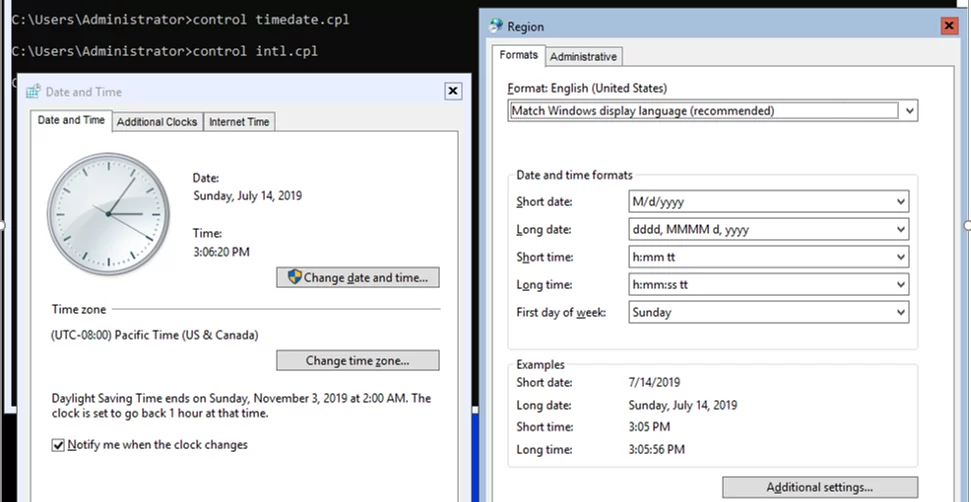
You can also configure the date, time, and time zone using the following command:
control timedate.cpl
Regional settings:
control intl.cpl
These commands will open standard Windows consoles.
Ctrl+Shift+Esc to start the Task Manager (this keyboard shortcut works in an RDP session as well). You can use Task Manager to start the command prompt or the Hyper-V configuration tool (click File -> Run Task -> cmd.exe or sconfig.cmd).How to Remotely Manage Hyper-V Server 2019
To conveniently manage Free Hyper-V Server 2019 from the graphic interface, you can use:
- Windows Admin Center – a web-based console;
- Hyper-V Manager — can be installed both on Windows Server and Windows 10/11 desktop computers.
To manage the Hyper-V Server 2016/2019, you will need a computer running x64 Windows 10/11 Pro or Enterprise Edition.
Remotely Manage a Non-Domain Hyper-V Server with Hyper-V Manager
Let’s look at how to remotely connect to a Hyper-V Server host from another Windows computer using the Hyper-V Manager console. In this article, we assume that you have a Hyper-V Server and a Windows 10 computer in the same workgroup.
First, make settings on the Hyper-V Server. Start the PowerShell console (powershell.exe) and run the following commands:
Enable-PSRemoting
 Enable-WSManCredSSP -Role server
Answer YES to all questions. Thus you will configure the automatic startup of the WinRM service and enable remote management rules in your firewall.

Now let’s move on to setting up the Windows 10 or 11 client computer that you will use to manage your Hyper-V Server host.
The Hyper-V server must be accessible by its hostname. In the domain network, it must correspond to the A-record on the DNS server. In a workgroup environment, you will have to create the A record manually on your local DNS or add it to the hosts file (C:\Windows\System32\drivers\etc\hosts) on a client computer. In our case, it looks like this:
192.168.13.55 HV19
You can add an entry to the hosts file using PowerShell:
Add-Content -Path "C:\Windows\System32\drivers\etc\hosts" -Value "192.168.13.55 hv19"
Add your Hyper-V server to the trusted host list:
Set-Item WSMan:\localhost\Client\TrustedHosts -Value "hv19"
If the account you are using on a client computer differs from the Hyper-V administrator account (and it should be so), you will have to explicitly save your credentials used to connect to the Hyper-V server to the Windows Credential Manager. To do it, run this command:
cmdkey /add:hv19 /user:Administrator /pass:HV1Pa$$w0drd
Check the network profile you are using on the Windows 10 client. If the network type is Public, you need to change the location to Private:
Get-NetConnectionProfile|select InterfaceAlias,NetworkCategory
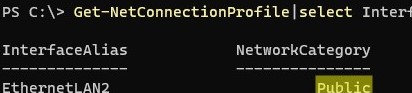
Set-NetConnectionProfile -InterfaceAlias "EthernetLAN2" -NetworkCategory Private
Run the command:
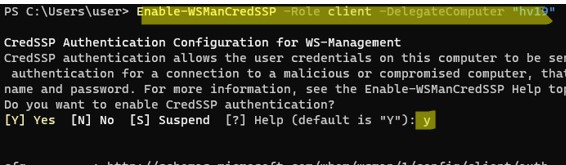
Enable-WSManCredSSP -Role client -DelegateComputer "hv19"
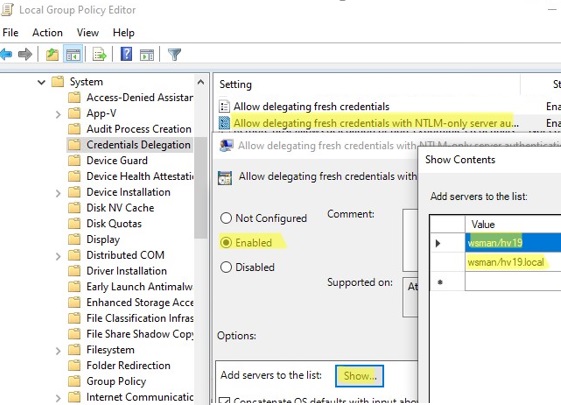
Now run the gpedit.msc command to open the Local Group Policy Editor.
- Navigate to Local Computer Policy -> Computer Configuration -> Administrative Templates -> System -> Credentials Delegation;
- Enable the parameter Allow Delegating Fresh Credentials with NTLM-only Server Authentication;
- Click the Show button and add two string values:
wsman/hv19andwsman/hv19.local - Close the GPO editor console and update your local group policy settings using the command
gpupdate /force
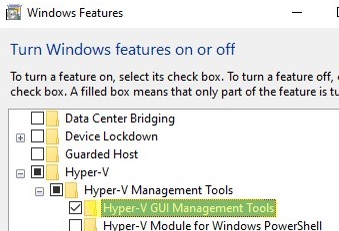
Now you need to install the Hyper-V Manager console in Windows. Open the Programs and Features snap-in and go to Turn Windows Features on or off. In the next window, find Hyper-V, and check Hyper-V GUI Management Tools to install it.
Also, you can install the Hyper-V Manager snap-in on Windows 10/11 using PowerShell:
Enable-WindowsOptionalFeature -Online –FeatureName Microsoft-Hyper-V-Management-Clients
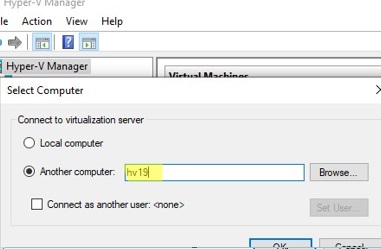
Run the Hyper-V Manager snap-in (virtmgmt.msc), right-click Hyper-V Manager and select Connect to Server. Specify the name of your Hyper-V Server.
Now you can manage Hyper-V Server settings, and create and manage virtual machines from the graphical console.
Managing Hyper-V Server with Windows Admin Center
You can use the Windows Admin Center (WAC) to remotely manage a Hyper-V Server host. WAC is a web-based console and dashboard to manage Windows Server, Server Core, and Hyper-V Server hosts.
Enable the rules to allow SMB connections in Windows Defender Firewall on the Hyper-V Server:
Set-NetFirewallRule -DisplayGroup "File and Printer Sharing" -Enabled true -PassThru
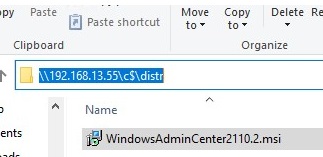
Now you need to download (https://aka.ms/WACDownload) and install the Windows Admin Center agent on your Hyper-V host. Download WindowsAdminCenter2110.2.msi on any Windows computer. You can copy the installation MSI file to the Hyper-V Server using a remote SMB connection to the administrative share C$. Run the following command on your Windows client device:
Win+R -> \\192.168.13.55\C$ and enter the Hyper-V administrator password. Create a folder and copy the MSI file to the Hyper-V Server host.
Now run the WAC installation from the Hyper-V console:
c:\distr\WindowsAdminCenter2110.2.msi
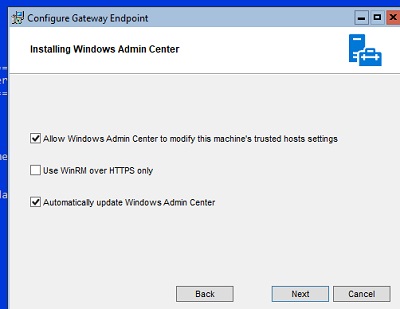
Install WAC with default settings.
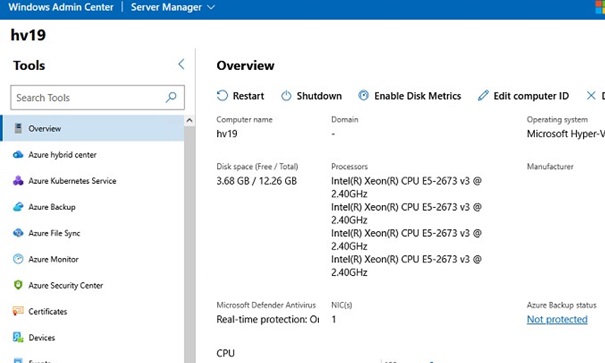
After the installation is complete, you can connect to your Hyper-V Server from a browser, just go to the URL https:\\192.168.13.55:443
You will see the dashboard of your Hyper-V Server host. Here you can check basic information about the server, resources used, etc.
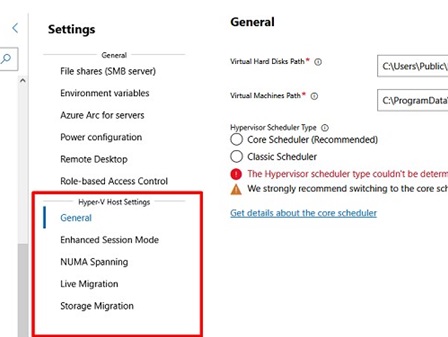
Hyper-V host settings can be configured under WAC -> Settings -> Hyper-V Host Settings. The following sections are available:
- General
- Enhanced Session Mode
- NUMA Spanning
- Live Migration
- Storage Migration
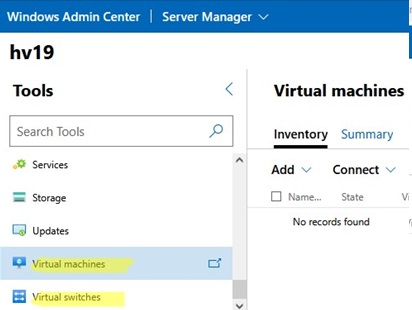
You will primarily use two sections in the WAC console to manage Hyper-V:
- Virtual Switches – you need to create at least one virtual switch to provide network access for the VM;
- Virtual Machines – here you can create, configure, start/stop, enable automatic startup, and import/export Hyper-V virtual machines.
Next, I will look at some ways to manage Hyper-V Server settings using PowerShell
Configuring Hyper-V Server 2019 Host with PowerShell
You can configure Hyper-V Server settings using PowerShell. There are over 238 cmdlets available in the Hyper-V module for managing Hyper-V hosts and VMs.
Get-Command –Module Hyper-V | Measure-Object
Configure the automatic start of the PowerShell console (instead of cmd.exe) after logon.
New-ItemProperty -path HKLM:\SOFTWARE\Microsoft\Windows\CurrentVersion\run -Name PowerShell -Value "cmd /c start /max C:\Windows\system32\WindowsPowerShell\v1.0\powershell.exe -noExit" -Type string

Now, when you log into the server, a PowerShell prompt will appear.
How to Configure Hyper-V Server 2019 Network Settings with PowerShell?
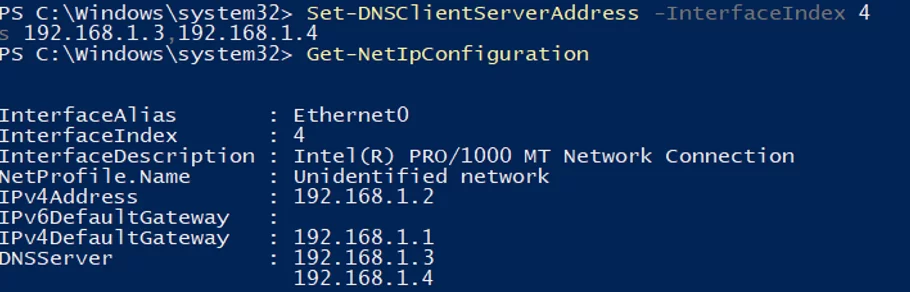
If you have not set the network settings using sconfig.cmd, you configure them through PowerShell. Using Get-NetIPConfiguration cmdlet, you can view the current IP configuration of network interfaces.
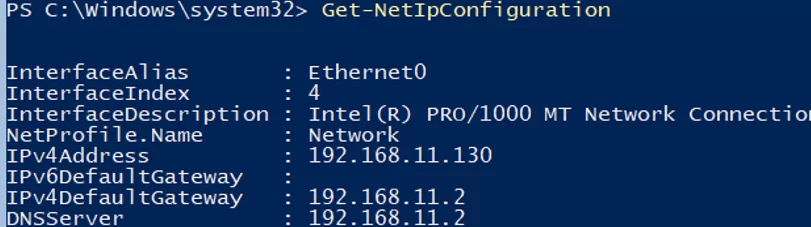
Use PowerShell to assign a static IP address, netmask, default gateway, and DNS server addresses. You can get the network adapter index (InterfaceIndex) from the output of the previous cmdlet.
New-NetIPAddress -InterfaceIndex 4 -IPAddress 192.168.1.2 -DefaultGateway 192.168.1.1 -PrefixLength 24
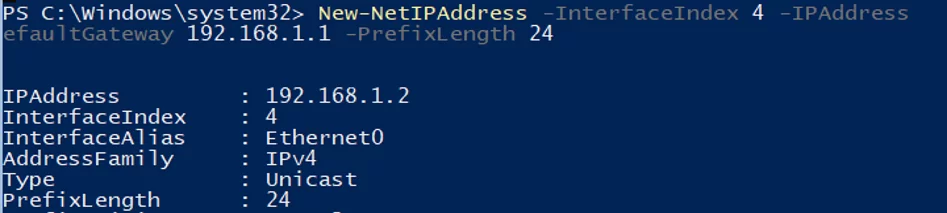
Set-DnsClientServerAddress -InterfaceIndex 4 -ServerAddresses 192.168.1.3,192.168.1.4
To configure IPv6, get the interface name using the Get-NetAdapter cmdlet from the PowerShell NetTCPIP module.

Check the current IPv6 setting using the following command:
Get-NetAdapterBinding -InterfaceDescription "Intel(R) PRO/1000 MT Network Connection" | Where-Object -Property DisplayName -Match IPv6 | Format-Table –AutoSize

You can disable IPv6 as follows:
Disable-NetAdapterBinding -InterfaceDescription "Intel(R) PRO/1000 MT Network Connection " -ComponentID ms_tcpip6
Enable Hyper-V Remote Management Firewall Rules
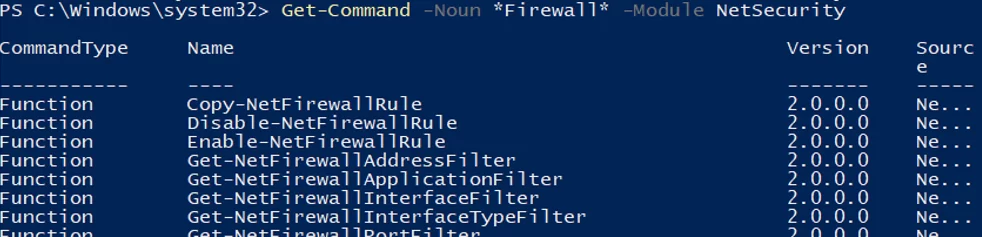
You can view the list of cmdlets to manage Windows Firewall using Get-Command:
Get-Command -Noun *Firewall* -Module NetSecurity
To allow full remote management of your server, run the following commands one by one to enable Windows Firewall rules using PowerShell:
Enable-NetFireWallRule -DisplayName "Windows Management Instrumentation (DCOM-In)"
 Enable-NetFireWallRule -DisplayGroup "Remote Event Log Management"
 Enable-NetFireWallRule -DisplayGroup "Remote Service Management"
 Enable-NetFireWallRule -DisplayGroup "Remote Volume Management"
 Enable-NetFireWallRule -DisplayGroup "Windows Defender Firewall Remote Management"
 Enable-NetFireWallRule -DisplayGroup "Remote Scheduled Tasks Management"
Configuring Hyper-V Storage for Virtual Machines
We will use a separate partition on a physical disk to store Hyper-V files (virtual machine files and iso files). View the list of physical disks on your server.
Get-Disk

Create a new partition of the largest possible size on the drive and assign the drive letter D: to it. Use the DiskNumber from Get-Disk results.
New-Partition -DiskNumber 0 -DriveLetter D –UseMaximumSize
Then format the partition to NTFS and specify its label:
Format-Volume -DriveLetter D -FileSystem NTFS -NewFileSystemLabel "VMStorage"
Create a directory where you will store virtual machine settings and VHDX files using the New-Item cmdlet:
New-Item -Path "D:\HyperV\VHD" -Type Directory
Create D:\ISO folder to store OS installation ISO images (distros):
New-Item -Path D:\ISO -ItemType Directory
To create a shared network folder, use the New-SmbShare cmdlet. Grant full access permissions to the local server administrators group:
New-SmbShare -Path D:\ISO -Name ISO -Description "OS Distributives" -FullAccess "BUILTIN\Administrators"
Configure Hyper-V Server Host Settings with PowerShell
List current Hyper-V Server host settings using this command:
Get-VMHost | Format-List

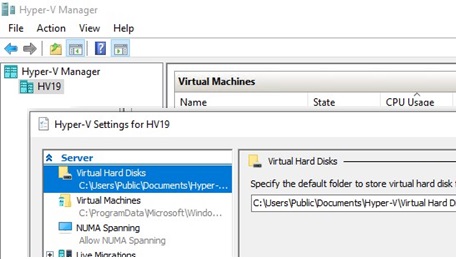
By default, Hyper-V stores virtual machine configuration files and virtual disks on the same partition where your operating system is installed. It is recommended to store VM files on a separate drive (partition). You can change the default VM folder path with this command:
Set-VMHost -VirtualMachinePath D:\Hyper-V -VirtualHardDiskPath 'D:\HyperV\VHD'
Creating a Virtual Switch for Hyper-V VMs
Create an external switch connected to the physical NIC of the Hyper-V server. Your virtual machines will access the physical network through this network adapter.
Check the SR-IOV (Single-Root Input/Output (I/O) Virtualization) support:
Get-NetAdapterSriov
Get the list of connected network adapters:
Get-NetAdapter | where {$_.status -eq "up"}
Bind your virtual switch to the network adapter and enable SR-IOV support if it is available.
New-VMSwitch -Name "Extenal_network" -NetAdapterName "Ethernet 2" -EnableIov 1
Use these cmdlets to check your virtual switch settings:
Get-VMSwitch
 Get-NetIPConfiguration –Detailed
This completes the initial setup of Microsoft Hyper-V Server 2016/2019. You can move on to creating and configuring your virtual machines.
12 comments
This is a fantastic guide, thank you. I have one question however. I have done everything listed and I can connect to my bare metal server. However, when I do not use the machine for awhile it appears to shut down or hibernate. The server is in a remote location so I have to drive here to turn it back on. Is there anything can do to keep it “live”?
Wow! I love this article!
Thanks for the step by step guideline. When we installing the Hyper server 2019 on my Laptop will my current running operating system window 10 Pro deleted ? or it will still be there after reboot? Or I have to reinstall window 10 pro after the Hyper server 2019 installation done?
This rule has to be changed on Hyper-V Server 2019
FROM:
Enable-NetFireWallRule -DisplayGroup “Windows Firewall Defender Remote Management”
TO:
Enable-NetFireWallRule -DisplayGroup “Windows Defender Firewall Remote Management”
This is awesome!
Great guide. Helpful screenshots and was easy to follow. Thanks!
Olá. Instalei o HyperV 2019 em um PC Lenovo i5 e ao iniciar pós instalação, ele fala que não localizou a placa LAN. Como resolver esse erro? Pelo o que entendi, eu preciso instalar os drivers para ele reconhecer a placa de rede do PC.
Hello. I installed HyperV 2019 on a Lenovo i5 PC and when starting post installation, it says that it did not find the LAN card. How to resolve this error? From what I understand, I need to install the drivers for it to recognize the PC's network card.Find and download LAN drivers for your device Extract and copy the drivers to the USB stick. Connect the usb media to Hyper-V host.
Install all the drivers from the INF files recursively:
pnputil /add-driver F:\*.inf /subdirsIs it possible to install failover cluster with the free version of hyper-v?
I haven’t tried this configuration. But I think it should work.
_https://learn.microsoft.com/en-us/troubleshoot/windows-server/high-availability/microsoft-support-policy-failover-clusters
I have tried this but cannot login to the Hyper-V Server from the client. I get this error:Enter-PSSession : Connecting to remote server 192.168.1.67 failed with the following error message : The WinRM client cannot process the request. The authentication mechanism requested by the client is not supported by the server or unencrypted traffic is disabled in the service configuration. Verify the unencrypted traffic setting in the service configuration or specify one of the authentication mechanisms supported by the server. To use Kerberos, specify the computer name as the remote destination. Also verify that the client computer and the destination computer are joined to a domain. To use Basic, specify the computer name as the remote destination, specify Basic authentication and provide user name and password. Possible authentication mechanisms reported by server: Negotiate For more information, see the about_Remote_Troubleshooting Help topic.
This could be because the Hyper-V host you are trying to connect to is not trusted in your PowerShell remoting (WinRM) configuration on a client.
Try adding the Hyper-V host to the TrustedHosts list on a client computer:
Add-Content -Path "C:\Windows\System32\drivers\etc\hosts" -Value "192.168.13.55 hv19"Set-Item WSMan:\localhost\Client\TrustedHosts -Value "hv19"