In this article, we will look at how to create iSCSI storage based on virtual disks on a Windows Server 2025 host and how to connect this storage (iSCSI LUN) to another Windows host over the network (the iSCSI configuration is identical for Windows Server 2022, 2019, and 2016).
The iSCSI (Internet Small Computer System) protocol provides access to remote storage devices via IP networks. The iSCSI protocol allows remote storage devices to connect over a standard TCP/IP network, eliminating the need for Fiber Channel infrastructure and additional equipment like storage bus controllers. The main components of iSCSI are:
- iSCSI Target Server – it is the server component of iSCSI, which provides clients with access to block storage devices (in Windows, these are virtual VHDX disks).
- iSCSI Initiator – The client part of the iSCSI protocol establishes a connection with the target, allowing access to the remote disk as as though it were connected locally.
- IQN (iSCSI Qualified Name) – this is a unique identifier for the iSCSI device, which is used to identify both the targets and the initiators.
Install and Configure an iSCSI Target on Windows Server
A Windows Server host can act as an iSCSI target by sharing virtual disks and making them accessible to other servers (iSCSI initiators).
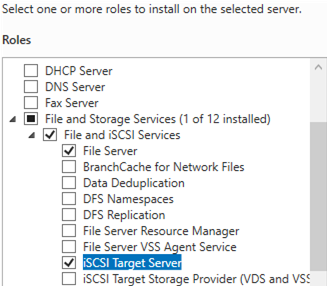
In order to enable an iSCSI target on a Windows Server host, which would provide access to its storage, the iSCSI Target Server role must be installed. It can be added via Server Manager -> File and Storage Services -> File and iSCSI Services.
You can install the Windows Server role from PowerShell:
Install-WindowsFeature -Name FS-iSCSITarget-Server
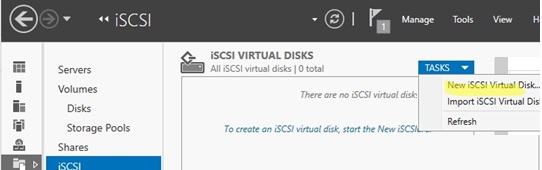
Then create a virtual disk on your iSCSI target server. To do it, go to Server Manager -> File and Storage Services -> iSCSI and click New iSCSI Virtual Disk.
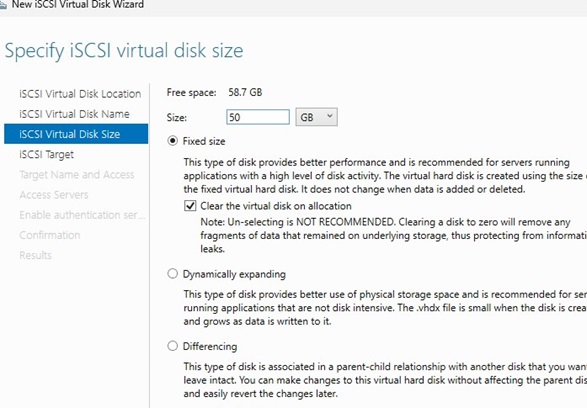
Specify the local drive (or directory) where the virtual iSCSI disk file will be stored, and give it a name. When creating a new iSCSI disk, specify its size and type.
- Fixed Size – a fixed-size disk that takes up all the allocated space immediately upon creation. This disk format provides better performance and is suitable for production environments with high disk activity and increased IOPS requirements.
- Dynamically expanding – this disk initially occupies minimal space, expanding as more data is written to it. Although this type of disk saves storage space, it performs more slowly than fixed disks due to the overhead of constant extending.
- Differencing – a differential disk is based on a parent disk and contains only the changes relative to that parent (is used rarely, typically in base image/VDI virtualization scenarios).
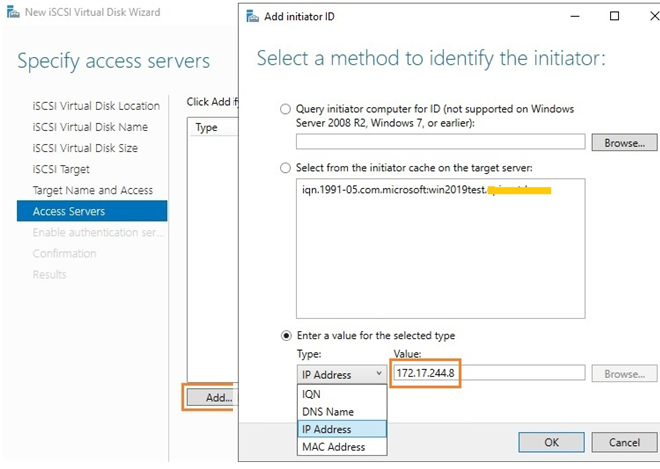
At the Access Servers step, specify which servers (iSCSI initiators) that will be able to connect to the iSCSI target by selecting one of the following connection options:
- IQN (you will have to enable the iSCSI initiator on your server first and copy its IQN)
- DNS Name
- IP Address
- MAC Address
Let’s use the IP address option.
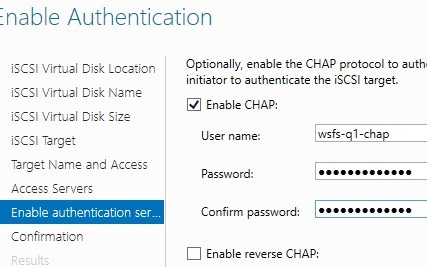
At the next step, you can enable CHAP authentication to secure access to the iSCSI target. This will ensure that initiators can only connect to the iSCSI target after they have been authenticated using a username and password.
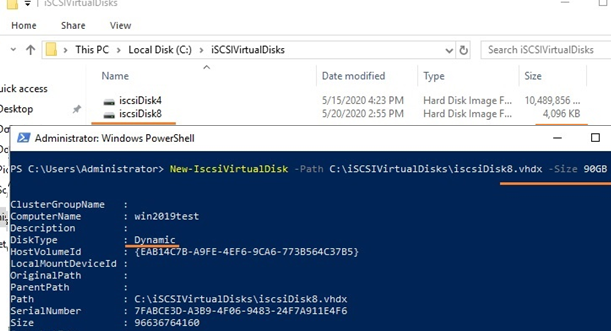
Check that the iscsiDisk2.vhdx virtual disk file has been created in the D:\iSCSIVirtualDisks directory (the default location).
You can create an iSCSI disk using PowerShell. Let’s create a 200 GB virtual disk:
New-IscsiVirtualDisk -Path D:\iSCSIVirtualDisks\iscsiDisk2.vhdx -Size 200GB
A 4,096 KB dynamic disk is created by default, regardless of the specified size. To create a fixed-size disk, add the -UseFixed option:
New-IscsiVirtualDisk -Path D:\iSCSIVirtualDisks\iscsiDisk2.vhdx -Size 200GB –UseFixed
Next, assign a name to the target and grant access to the initiator server’s IP address:
New-IscsiServerTarget -TargetName iscsiTarget33 -InitiatorIds "IQN:1991-05.com.microsoft:win2019test.ddd.com"
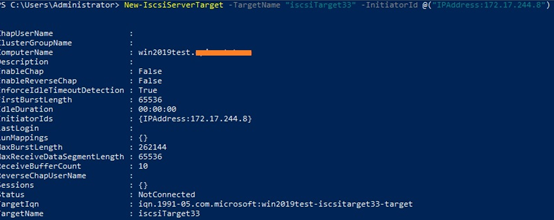
Rather than using an IP address, you can use an IQN to identify the iSCSI initiator.
New-IscsiServerTarget -TargetName iscsiTarget33 -InitiatorIds "IQN:1991-05.com.microsoft:win2019test.ddd.com"
(Get-InitiatorPort).NodeAddress
![]()
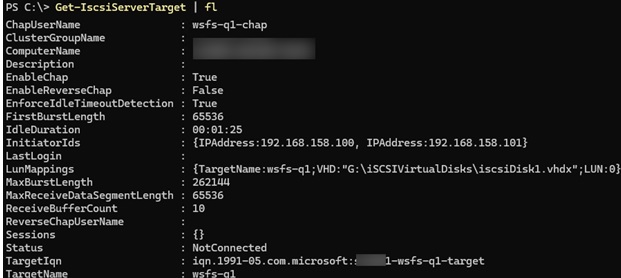
List the current iSCSI target settings.
Get-IscsiServerTarget | fl
List the iSCSI disks that are mapped to the target:
Get-IscsiServerTarget | Format-List TargetName, LunMappings
Use the Get-IscsiTarget cmdlet to find the full name of the target, and then connect it.
Connect-IscsiTarget -NodeAddress iqn.1991-05.com.microsoft:win2019test-iscsitarget33-target

Configure the iSCSI Initiator on Windows Server
The next step is to connect to the created iSCSI disk from the initiator server. Go to Control Panel and start the iSCSI initiator applet (or run iscsicpl.execommand).
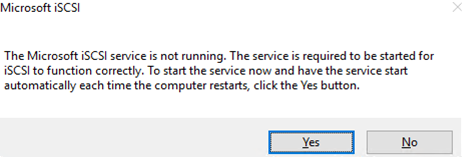
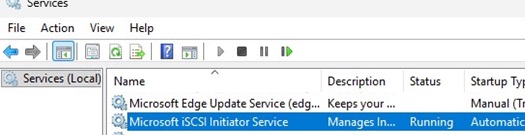
When you first launch the iSCSI Initiator control panel, you will be prompted to start and configure the Microsoft iSCSI Initiator Service to run automatically.
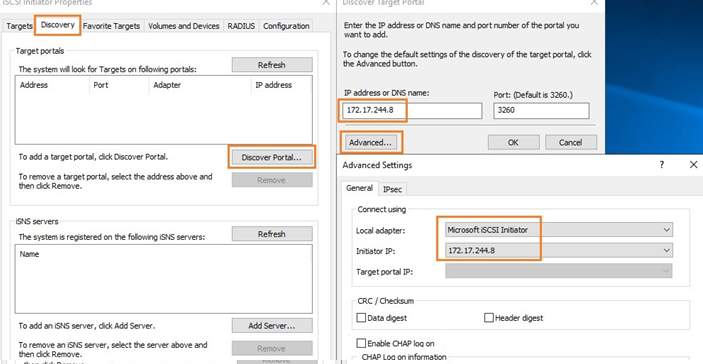
Go to the Discovery tab, click Discover Portal and enter the IP address of the iSCSI target host. By default, iSCSI uses all the available IP addresses to access the target. To ensure that only a specific network adapter is used for iSCSI traffic (it is recommended to dedicate a separate NIC for iSCSI traffic), click the Advanced button and change the default values in the drop-down lists accordingly: Local Adapter –> Microsoft iSCSI Initiator, Initiator IP –> 172.17.244.8.
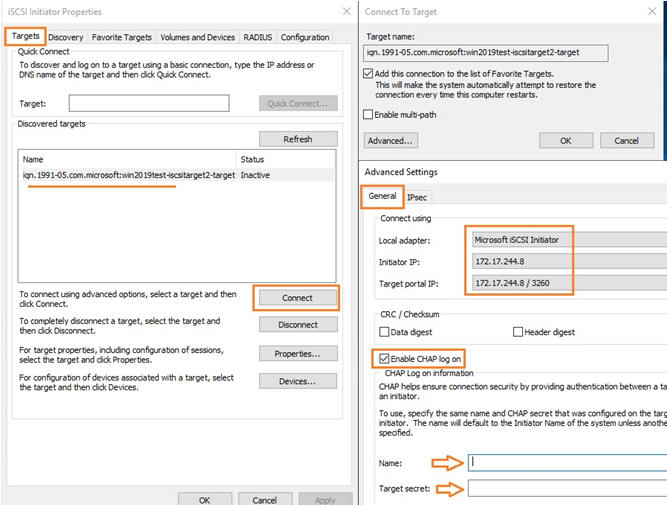
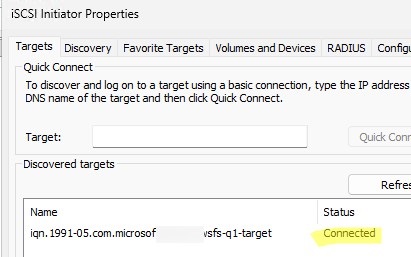
Switch to the first Targets tab, where you will see a new connection. To enable it, click Connect -> Advanced, select values from the drop-down lists, check the Enable CHAP log on option, and enter the username and password (which was set on the target). Make sure the Add the connection to the list of Favorite Targets option is enabled (enables automatic connection to the iSCSI target after reboot).
The connection status should change to Connected.
Then initialize the iSCSI disk, which is initially in the Offline state. To do this, open the Disk Management console (diskmgmt.msc) on the initiator server and select Online -> Initialize Disk from the context menu of the new disk. Create one or more partitions on the new disk, then assign drive letters and labels to them. Format the volumes to NTFS.
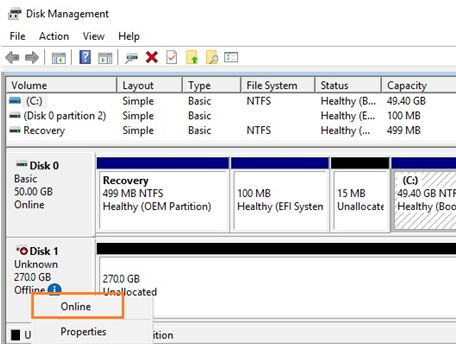
This virtual disk, connected from a remote storage server via the iSCSI protocol, can now be used just like a locally attached drive.
You can also use PowerShell to connect an iSCSI disk from the target to the initiator host.
Run the Microsoft iSCSI Initiator Service:
Start-Service -Name MSiSCSI
Set-Service -Name MSiSCSI -StartupType Automatic
Add an iSCSI target.
New-IscsiTargetPortal -TargetPortalAddress "192.168.15.10"
List the available iSCSI targets.
Get-IscsiTarget
Connect the required LUN from the target (using its NodeAddress) and enter the data for CHAP authentication (if used):
Connect-IscsiTarget -NodeAddress iqn.1991-05.com.microsoft:s-ms01-wsds-q1-target -AuthenticationType ONEWAYCHAP -ChapUsername "user1" -ChapSecret "Passw0rd1" -IsPersistent $true -IsMultipathEnabled $true

You can use the following PowerShell one-liner to quickly initialize and format your new disk (see an example in the article on disk and partition management with PowerShell):
Get-Disk |Where-Object PartitionStyle -eq 'RAW' |Initialize-Disk -PartitionStyle MBR -PassThru |New-Partition -AssignDriveLetter -UseMaximumSize |Format-Volume -FileSystem NTFS -Confirm:$false
Enable Multipathing (MPIO) with the iSCSI Initiator on Windows Server
To provide high availability and load balancing for connected iSCSI storage, you can use redundant network components, like network adapters and switches, in combination with an MPIO module. For example, both the storage device and the initiator have multiple network adapters that can be used as separate connection paths. Having multiple paths between the iSCSI target and initiator improves reliability by providing redundancy and balancing the load across the available connections.
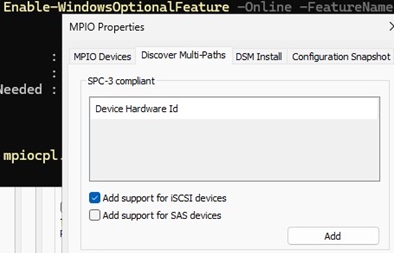
The Multipath I/O (MPIO) feature must be installed on Windows Server to enable multipathing capabilities.
Enable-WindowsOptionalFeature -Online -FeatureName MultiPathIO
Open the MPIO management console:
mpiocpl.exe
Go to the Discover Multi-Paths tab, enable the Add support for iSCSI devices option, and click Add.
Restart the server.
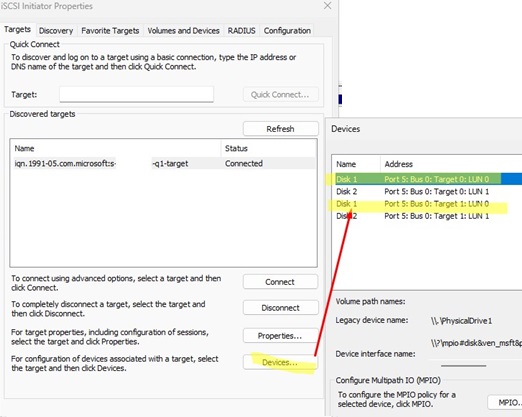
After enabling MPIO, add a SCSI target for the second (or subsequent) path (for example, using the second IP address of the iSCSI server) with the Enable multi-path option selected.
If you now click on the Device button on the Target tab, you will see that the same LUN is accessible via two (or more) different paths.
Click the MPIO button to configure the path selection policy. The following options are available for the Load balance policy:
- Round Robin – all possible paths are used in turn to balance the load (used by default)
- Fail over only – only one (active) path is used, the others are in standby.
- Round Robin with Subset – allows selecting several main paths (as in Round Robin) and several additional ones
- Least Queue Depth – use the path with the lowest I/O queue depth.
- Weighted Paths – a weight (priority) is assigned to each path. The path with the lowest weight is used.
- Least Blocks – the path with the fewest data blocks transmitted is selected (distribute and balance load across all available paths)
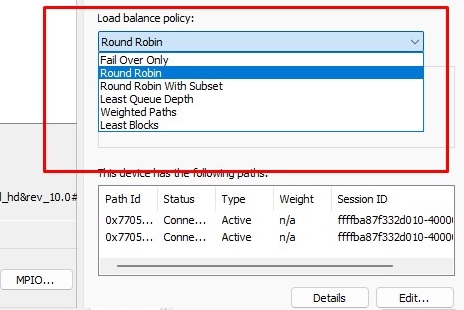
Choose the MPIO path selection and load-balancing policy that is required by your environment.
iSCSI storage can be used to provide servers with additional disk space in a flexible way, and to build failover clusters when multiple servers require shared storage.