When displaying icons, shortcuts, and various file types in File Explorer, Windows attempts to retrieve their thumbnails from icon cache files. Thanks to this, Windows Explorer draws objects faster because the system does not need to access, load, and render the original app icon files each time. However, icons may display incorrectly in some locations, such as the Desktop, Start menu, or taskbar. For example, blank white icons or default Windows icons may be displayed instead of app icons.
Fix Blank White Shortcut Icons in Windows
After an unexpected power outage, some application shortcut icons on my Windows 11 desktop started displaying as blank white icons.
This can be resolved by opening the shortcut’s properties and specifying the path to the file containing the application icon manually. This updates the app shortcut icon in the cache, causing it to start displaying correctly. However, changing the icon for each shortcut manually is a time-consuming task.
![]()
How to Refresh the Icon Cache in Windows
Windows includes a built-in tool, ie4uinit.exe (IE Per-User Initialization Utility), that can softly refresh and reset the icon cache database.
- On Windows 11 or 10:
ie4uinit.exe -show - On Windows 7:
ie4uinit.exe -ClearIconCache
Run this command via the Win + R -> command -> Enter.
![]()
The command is absolutely safe. It simply forces Windows to redraw the icons in Explorer and on the desktop. This method proves effective in cases of icon cache corruption, such as when files or devices containing the source images for these icons are inaccessible. However, it doesn’t help in all cases.
Script to Rebuild the Icon Cache in Windows
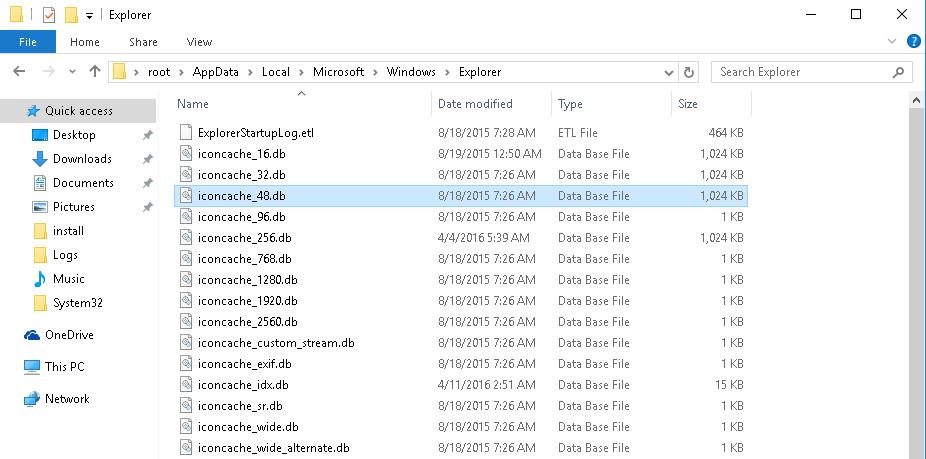
In Windows 11 and Windows 10, the icon cache consists of a set of hidden files that are stored within the user profile directory. To open the icon cache directory, navigate to %userprofile%\AppData\Local\Microsoft\Windows\Explorer using File Explorer.
This directory contains several files whose names begin with iconcache_ (iconcache_16.db, iconcache_32.db, iconcache_48.db, etc, according to the size of the icons in pixels.)
To clear the current icon cache, delete all *.DB files in this folder whose names begin with “iconcache“. But first, you need to stop the File Explorer process so it does not lock access to the iconcache files.
Let’s look at how to reset the icon cache without restarting Windows.
- Close all running apps.
- Open a command prompt window (
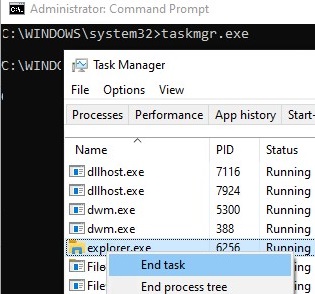
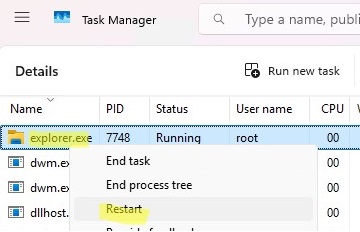
cmd.exe) as an administrator; - Open the Task Manager:
taskmgr.exe - In Task Manager, go to the Details tab. Find the explorer.exe process and kill it by selecting End Task.

- You can also stop the process from the command prompt:
taskkill /f /im explorer.exe - To delete the icon cache files in the user profile, run the following commands one by one.
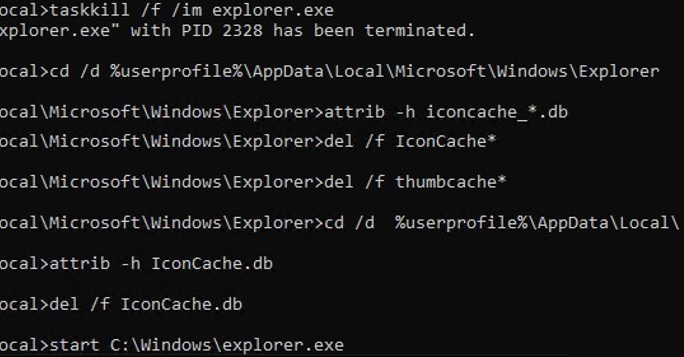
On Windows 11 or 10, just copy and paste this code into the command prompt or save it as a text file reset_icon_windows.bat.
taskkill /f /im explorer.exe
 cd /d %userprofile%\AppData\Local\Microsoft\Windows\Explorer
 attrib -h iconcache_*.db
 del /f IconCache*
 del /f thumbcache*
 cd /d  %userprofile%\AppData\Local\
 attrib -h IconCache.db
 del /f IconCache.db
 start C:\Windows\explorer.exe
The last command restarts the File Explorer process (explorer.exe) which rebuilds the icon cache files (according to the configured file associations).
access denied error), but this didn’t affect the final result. The icon cache was successfully flushed!Restore the Default Shortcut IconHandler Value in Registry
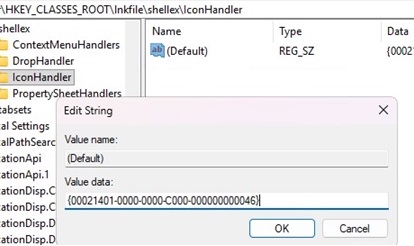
Incorrect shortcut icons displayed in File Explorer may be the result of a corrupt registry association for .LNK file types. The IconHandler registry value under HKEY_CLASSES_ROOT\lnkfile\shellex\IconHandler sets the Windows Explorer shell extension responsible for displaying the shortcut icon based on the target file.
If the IconHandler value is not set or is incorrect, blank white icons will be shown instead of application shortcuts. To restore the default IconHandler configuration:
- Open the Registry Editor (
regedit.exe) - Go to the registry key
HKEY_CLASSES_ROOT\lnkfile\shellex\IconHandler - Check the value of the Default property. This should be specified here:
{00021401-0000-0000-C000-000000000046}
- If a different value is specified here or if the parameter or registry key is missing, restore its default value manually.
- Restart the
explorer.exeprocess.
8 comments
Amazing! Thank you so much
I have an issue when only icons for .url shortcuts on my desktop are missing (steam games etc.).
Following the script process didn’t solve the issue but I did have the iconcache_16.db (along with the iconcache_idx.db) fail to be deleted due to an access denied error.
Your tips and tricks always saved my life, thank you!
Champion.
This worked! You rock!
Perfect man – incredibly beautiful. Thank you.
Hey, somehow i can’t delete the icon and thumb caches even tho i am local admin and started my command prompt as administrator.
Also took full ownership of the folder already.
CMD is saying acces is denied
Worked on Windows 11 24H2. Thank you so much!