Shadow connection mode in Windows allows administrators to connect to any user’s RDP/RDS session to view and interact with their desktop (with or without user consent). The Remote Desktop Shadowing mode is typically used to provide technical support to users on RDS servers. Shadow connections can be established to user RDP sessions in all modern versions of Windows, including Windows Server 2025, 2022, and 2019, as well as desktop versions such as Windows 11 and 10.
Shadow User Session on Windows Server RDS
Administrators can connect to an active RDP user’s session from the Server Manager GUI (on servers with the RDSH role installed) or via the command prompt using the built-in mstsc.exe tool.
Open the Server Manager console on the RDS server and navigate to the Remote Desktop Services section. Select your RDS collection (for example, QuickSessionCollection ).

The right pane shows the list of users with sessions on this RDSH host in this collection. Right-click on the desired user session and select Shadow from the drop-down menu.
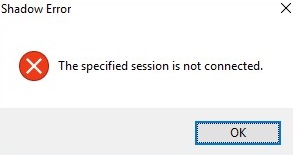
Shadow Error - The specified session is not connected.
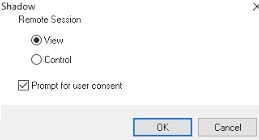
A form with shadow connection options will appear. You can either View or Control a user’s RDP session. Additionally, you can enable the Prompt for user consent option.
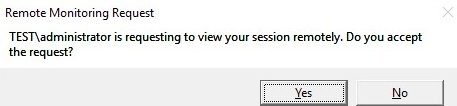
If this option is checked, the following request appears in the user’s RDP session:
Remote Monitoring Request
woshub\administrator is requesting to view your session remotely. Do you accept the request?
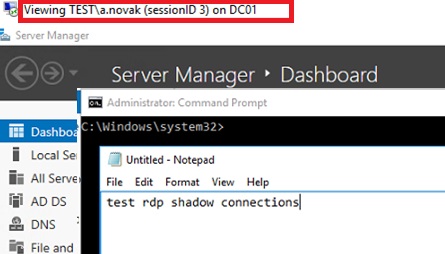
Once the user confirms the shadow connection, the administrator will be able to view the user’s desktop, but won’t be able to interact with it.
If the “Prompt for user consent” option is selected, a prompt will appear in the user session.
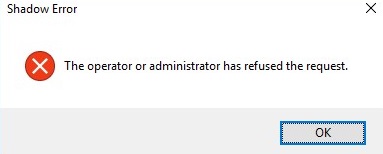
If a user rejects the administrative Shadow RDS connection, the following message appears:
Shadow Error: The operator or administrator has refused the request.
ALT+* on the workstation or Ctrl+* on the RDS serverPress Ctrl+Alt+Break to switch to full-screen shadow connection mode.
The following firewall rules must be enabled on the host to allow remote connection to the user session on it via RD Shadow mode.
- Remote Desktop – Shadow (TCP-In)
- Remote Desktop – User Mode (TCP-In)
- Remote Desktop – User Mode (UDP-In)
Remote Desktop Shadowing Using MSTSC Command
However, the built-in Windows RDP client (mstsc.exe) is a much more convenient tool because it provides several special options for connecting to a user session via Remote Desktop shadowing mode.
Mstsc.exe [/shadow:sessionID [/v:Servername] [/control] [/noConsentPrompt] [/prompt]]
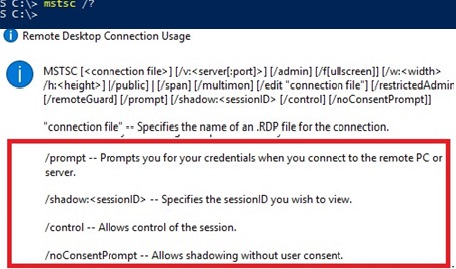
- /shadow:ID – connect to the user’s RDP session with the specified ID;
- /v:servername – used to specify the hostname or IP address of the remote RDP/RDS host. If not set, connections are made to local user sessions on the current host;
- /control – allows to interact with the user session (desktop). The administrator can control the user’s mouse and input data from the keyboard. If this parameter is not set, the user’s session View mode is used;
- /noConsentPrompt – this option allows administrators to force a connection to any session without prompting users for confirmation;
- /prompt – allows to connect with other credentials (prompt for a username and password).
Therefore, to connect to a user’s desktop, you must first know the ID of their RDP session. Use the command:
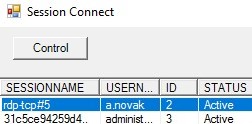
quser or qwinsta

The command lists RDP sessions and includes information such as the username, ID, and status (Active or Disconnected).
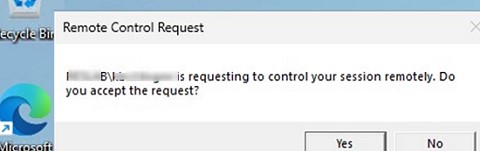
In the list, find the username you want to connect to and note its session ID (in this example ID= 3 ). To shadow this user’s RDP session in control mode, specify this ID in the command:
mstsc /shadow:3 /control

A shadow connection request will appear in the user’s session, and they can choose to either accept or decline it.
To list the logged-in users on a remote server, specify its FQDN or IP address in the command:
qwinsta /server:rdsh2
Use the following command to connect to a user session on a remote server:
Mstsc /v:rdsh2:3389 /shadow:3 /control
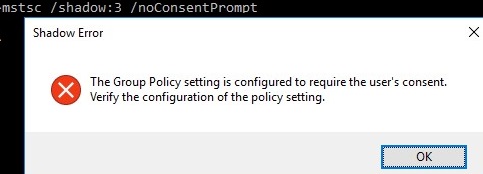
To connect to a user’s session without prompting, use the command:
mstsc /shadow:3 /control /noConsentPrompt
However, by default, Windows security settings prevent users from shadowing another user’s session without a prompt.
Shadow Error: The Group Policy setting is configured to require the user’s consent. Verify the configuration of the policy settings.
Next, let’s look at how to change the default shadow connections security settings in Windows
Configure Remote Desktop Shadowing Options via GPO
Use the Group Policy Editor (gpedit.msc) to modify the default configuration for shadowing RDS user sessions. The parameter Set rules for remote control of Remote Desktop Services user sessions, located under the User and Computer Configuration sections of the GPO: Policies -> Administrative Templates -> Windows components -> Remote Desktop Services -> Remote Session Host -> Connections.
This policy can be used to configure the following Remote Desktop Shadow connection options:
- No remote control allowed (corresponds to the value of the registry parameter
Shadow = 0); - Full Control with user’s permission (
1); - Full Control without user’s permission (
2); - View Session with user’s permission (
3); - View Session without user’s permission (
4).
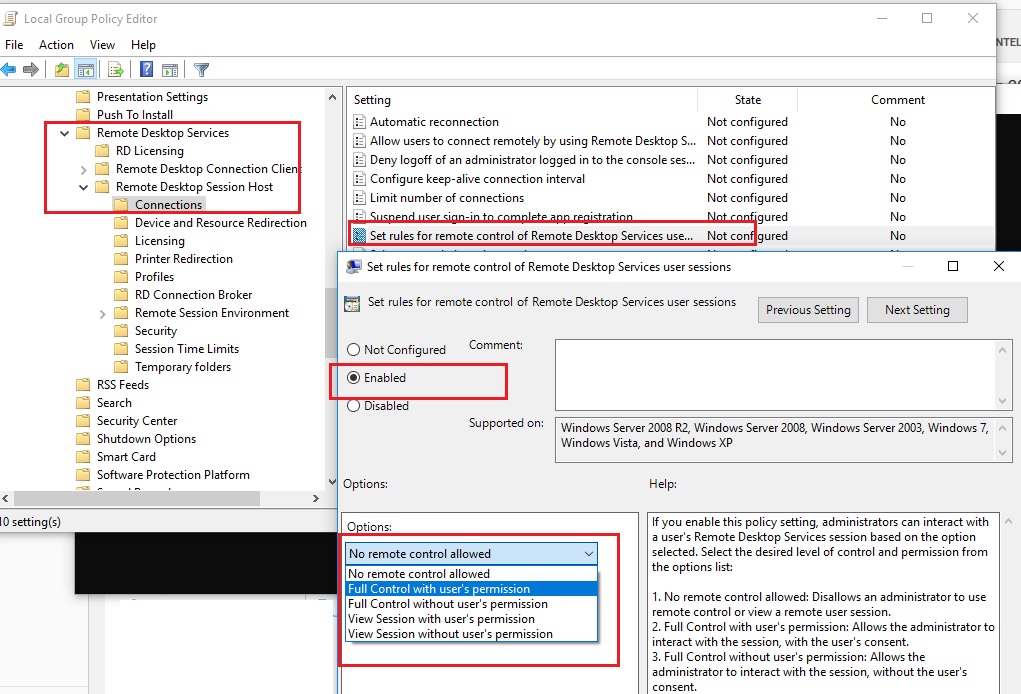
This policy corresponds to the Shadow DWORD registry parameter in the HKLM\SOFTWARE\Policies\Microsoft\Windows NT\Terminal Services key (the available values of this parameter that correspond to the policy settings are indicated in parentheses). For example, to enable full control during a shadow session without notifying the user, create this registry parameter using the following command:
reg add "HKEY_LOCAL_MACHINE\SOFTWARE\Policies\Microsoft\Windows NT\Terminal Services" /v Shadow /t REG_DWORD /d 4
Shadowing RDS Session with PowerShell
You can also use the Shadow feature of Remote Desktop Services to connect to a user’s session from PowerShell. First, list the sessions on the RDS host (user sessions will be grouped according to their state):
Get-RDUserSession | ft Username, UnifiedSessionId, SessionState, HostServer, ApplicationType -GroupBy Sessionstate

The following BAT script can be used to more conveniently shadow RDP user sessions. It prompts you to enter the name of the remote RDS server, displays a list of active sessions, and prompts you to specify the session (ID) to which you want to connect to:
shadow.bat
@echo off
 set /P rcomp="Enter name or IP of a Remote PC: "
 query session /server:%rcomp%
 set /P rid="Enter RDP user ID: "
 start mstsc /shadow:%rid% /v:%rcomp% /control
Save this BAT file to the %Windir%\System32 directory. This will enable you to use the shadow command to initiate a shadow connection.
You can also use the PowerShell script with a GUI to list active RDP sessions on the local server (The script is available on our GitHub repository rds_shadow_gui.ps1):
https://github.com/maxbakhub/winposh/blob/main/RDS/rds_shadow_gui.ps1
Run the script, select the user account whose session you want to shadow, then click Connect.
An administrator can shadow a user’s session without the user’s knowledge. There are no notifications in the taskbar or on the desktop. You can set up automatic sound notifications for users when an administrator connects to their session via RD shadowing. Run the following PowerShell script at each user logon to play a sound alert when a shadow connection is detected.
while($true){
 if (Get-Process -Name "RdpSa" -ErrorAction SilentlyContinue){[console]::beep(1000,500);(New-Object System.Media.SoundPlayer "C:\Windows\Media\chimes.wav").PlaySync();Write-Host "RdpSa is running at $(Get-Date)"}
 Start-Sleep -Seconds 30
 }
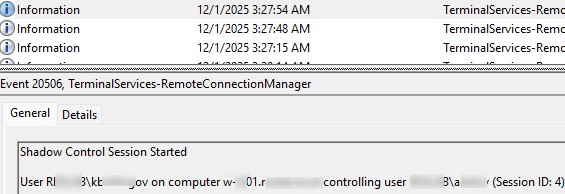
Audit Remote Desktop Shadow Session Usage in Windows
To audit the RDS Shadow connection logs, filter the Microsoft-Windows-TerminalServices-RemoteConnectionManager/Operational log by the following event IDs:
- Event ID 20510: Shadow View Permission Granted
- Event ID 20506: Shadow View Session Started
- Event ID 20507: Shadow View Session Stopped
- Event ID 20510: Shadow Control Permission Granted
- Event ID 20511: Shadow Control Permission Denied
- Event ID 20509: Shadow View Permission Denied
- Event ID 20510: Shadow Control Permission Granted
Using a simple PowerShell script, you can query Event Viewer and print information about who and when RD shadow connections were used on an RDS host.
$logName = "Microsoft-Windows-TerminalServices-RemoteConnectionManager/Operational"
 $eventIds = 20506, 20507
 Get-WinEvent -FilterHashtable @{LogName = $logName; Id = $eventIds} | ForEach-Object {
 $event = $_
 $message = $event.Message
 $timeCreated = $event.TimeCreated
 Write-Host "Time: $timeCreated"
 Write-Host "Event ID: $($event.Id)"
 Write-Host "RD Shadow action: $message"
 Write-Host "------------------"
 }
How to Allow Non-Admin Users to Shadow Remote Desktop Sessions
In the above examples, local administrator permissions on the RDS host were required to shadow an RDP user session. However, you can allow a non-admin user to shadow RDP sessions without granting them local admin permissions on the computer or server.
For example, you want to allow members of the AllowRDSShadow group to use a shadow connection to RDP user sessions. Open the elevated command prompt (cmd.exe) and run the command:
wmic /namespace:\\root\CIMV2\TerminalServices PATH Win32_TSPermissionsSetting WHERE (TerminalName=”RDP-Tcp”) CALL AddAccount “woshub\AllowRDSShadow”,2
Available TerminalServices access permissions:
0= WINSTATION_GUEST_ACCESS1= WINSTATION_USER_ACCESS2= WINSTATION_ALL_ACCESS
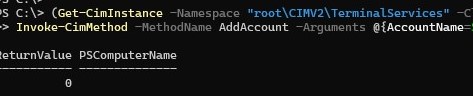
Since the WMIC command is deprecated in newer versions of Windows, this change must be made using the Invoke-CimMethod command.
$group = "woshub\AllowRDSShadow "
 (Get-CimInstance -Namespace "root\CIMV2\TerminalServices" -ClassName Win32_TSPermissionsSetting -Filter "TerminalName='RDP-Tcp'") |
 Invoke-CimMethod -MethodName AddAccount -Arguments @{AccountName=$group; PermissionPreSet=2}
To remove shadow connection permissions for a group, run:
$group = "woshub\AllowRDSShadow"
 $tsPermissions = Get-CimInstance -Namespace "root\CIMV2\TerminalServices" -ClassName Win32_TSPermissionsSetting -Filter "TerminalName='RDP-Tcp'"
 Invoke-CimMethod -InputObject $tsPermissions -MethodName RemoveAccount -Arguments @{AccountName=$group}
Most common issues when using RD Shadowing:
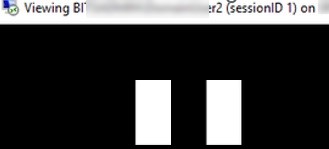
- If the user’s RDP session is locked, or a UAC prompt appears on a Secure Desktop (enabled by default), then connecting via mstsc without the
[/control] flag will cause the administrator to see a black desktop with a pause symbol. Using the [/control] option in the shadow connection prevents the UAC prompt from showing on a Secure Desktop.
- If the RD Shadow window displays a black screen instead of the published RemoteApp program image when shadowing a RemoteApp session, disable the Use advanced RemoteFX graphics for RemoteApp option in the GPO.

18 comments
It is too bad that MS removed it from 2012 server. Thankfully they put it back in R2. We desperately needed shadowing for our terminal server users since they need support for their software packages all the time. We finally found a 3rd party product that allows us to do it in a much easier way:
http://www.intelliadmin.com/index.php/2012/04/easily-shadow-remote-desktop-sessions/
We tried to see if dameware, or radmin did these this but no luck. So far it is the only one we have found. Wondering if anyone knows of a free solution.
Starting a remote control by mstsc does not work. It gives an error “Access denied”. You can use the Server Manager only.
BTW, to find the logged users, just issue “quser”. No need to fire up PowerShell for that.
Hello,
Copy / paste this into notepad and save as batch file (.bat). Edit ‘servername’ into your servers name…
@echo off
qwinsta
set /P id=Enter id: %=%
mstsc /v:servername /shadow:%id% /control /noConsentPrompt
Jelle
To allow non-administrator users connect to other user session via shadowing on Win 2012 R2 RDS, you ned to execute the following command:
wmic /namespace:\\root\CIMV2\TerminalServices PATH Win32_TSPermissionsSetting WHERE (TerminalName=”RDP-Tcp”) CALL AddAccount “corp\RDSSupport”,2
It doesn’t work for me too. When I try to shadow to user’s session I get the message “Access denied”. The WMIC command above doesn’t help either. It looks like local admin rights are mandatory.
[…] Quelle: Windows OS Hub – How to Shadow (Remote Control) a User RDP session on RDS Windows Server 2016 … […]
shadow.bat
@echo off
for /f “tokens=2-4” %%a in (‘query session /server:%1’) do @if “%%c”==”Active” set session=%%b
mstsc.exe /multimon /span /v:%1 /shadow:%session% /control
multimon and span don’t seem to work though
RE: previous post. You need to fix the single and double quotes to NOT be backwards and forwards or this will not work.
It looks like the comments system decided to change them for no apparent reason.
In January 2018, after installing the update KB4056898 (the Windows patch against Meltdown and Specter), users encountered that the RDS shadow stopped working. When attempting to perform a shadow connection to a user session, the message “An unidentified error” appeared (there is a STATUS_BAD_IMPERSONATION_LEVEL error in the Windows logs). A similar problem arose on the RDS farm Windows Server 2016.
To solve the problem, you need to install the following patches:
for Windows Server 2016 — KB4057142 (January 17, 2018)
for Windows Server 2012 R2 — KB4057401 (January 17, 2018)
can you also etablsih a rdp shadow connection over the internet? i tried this and nat forward the port 445 but it didn’t work. does anybodyknow if you can do this also from an external acces with directing to the public ip of the remote host? any ideas?
Port 445 is SMB, not RDS/RDP. RDS/RDP uses port 3389 TCP and UDP.
This is dangerous to allow on the internet because bad actors frequently scan these ports looking for desktops to exploit.
Hi and thank you for this.
Any idea on how to offer the user who is sharing is session to see in live who is connected to it’s session through shadowing ?
For now, only thing I’ve got is looking inside eventlogs, but it’s not really user friendly.
Thanks
I had to execute the wmic command for a domain admin account on a domain-joined server too, otherwise I got “Access denied”, just in case somebody else experiences the same problem…
And it seems I also have to start cmd in Admin-Mode, otherwise I get access denied as well.
If you want to see if anyone is connected try netstat and look for connections on port 3389
 @echo off
 rem Requires registry/group policy setting to allow shadowing
 rem https://woshub.com/rds-shadow-how-to-connect-to-a-user-session-in-windows-server-2012-r2/
 for /f "tokens=2-4" %%a in ('query session /server:%1') do @if "%%c"=="active" set session=%%b
 mstsc.exe /multimon /span /v:%1 /shadow:%session% /control
#############################################################################################################################################
## Author……: Doug Valentine DateCreated: 2023-12-14 DateModified: ##
## Description.: PowerShell script to query RDSH servers and list session in USERNAME order, upon Click open a RDP SHADOW session. ##
#############################################################################################################################################
Add-Type -assembly System.Windows.Forms
## Set up the environment
Add-Type -AssemblyName System.Windows.Forms
$LastColumnClicked = 0 # tracks the last column number that was clicked
$LastColumnAscending = $false # tracks the direction of the last sort of this column
# Calculating the factors to multiply the Width and Height
$monitor = [System.Windows.Forms.Screen]::PrimaryScreen
$widthFactor = 850 / $monitor.WorkingArea.Width
$heightFactor = 800 / $monitor.WorkingArea.Height
# Create a FORM & Configure
$gForm = New-Object System.Windows.Forms.Form
$gForm.Text =’Shadow Session Connect’
$gForm.Width = $gForm.ClientRectangle.Width
$gForm.AutoSize = $true
$gForm.Size = New-Object System.Drawing.Size (1920 * $widthFactor), (1080 * $heightFactor)
$dBttn = New-Object System.Windows.Forms.Button
$dBttn.Text = ‘Control’
$dBttn.Location = New-Object System.Drawing.Point(15,10)
$gForm.Controls.Add($dBttn)
$gForm.StartPosition = “CenterScreen”
#$gForm.StartPosition.BringToFront()
# Create a LIST & Configure
$dList = New-Object System.Windows.Forms.ListView
$dList.Location = New-Object System.Drawing.Point(0,50)
$dList.Width = $gForm.ClientRectangle.Width
$dList.Height = $gForm.ClientRectangle.Height
$dList.Anchor = “Top, Left, Right, Bottom”
$dList.MultiSelect = $False
$dList.View = ‘Details’
$dList.FullRowSelect = 1;
$dList.GridLines = 1
$dList.Scrollable = 1
$gForm.Controls.add($dList)
# Add columns to the ListView
$Header = “SESSIONNAME”, “USERNAME”,”ID”, “STATUS”, “RDS HOST”, “COMMAND”
$dList.Columns.Add(“SESSIONNAME”) | Out-Null
$dList.Columns.Add(“USERNAME”) | Out-Null
$dList.Columns.Add(“ID”) | Out-Null
$dList.Columns.Add(“STATUS”) | Out-Null
$dList.Columns.Add(“RDS HOST”) | Out-Null
$dList.Columns.Add(“COMMAND”) | Out-Null
## Query each RDS session. if we add an RDSH server we want to add the below code for the new RDSH server.
## RDSH = SERVER:RDS-10
$(qwinsta.exe /SERVER:RDS-10 | findstr “Active”) -replace “^[\s>]” , “” -replace “\s+” , “,” | ConvertFrom-Csv -Header $Header | ForEach-Object {
$dListItem = New-Object System.Windows.Forms.ListViewItem($_.SESSIONNAME)
$dListItem.Subitems.Add($_.USERNAME) | Out-Null
$dListItem.Subitems.Add($_.ID) | Out-Null
$dListItem.Subitems.Add($_.STATUS) | Out-Null
$dListItem.Subitems.Add(“RDS-10”) | Out-Null
$dListItem.Subitems.Add(“mstsc /v:RDS-10 /shadow:” + $_.ID + ” /control /noConsentPromptl”) | Out-Null
$dList.Items.Add($dListItem) | Out-Null
}
## RDSH = SERVER:RDS-11
$(qwinsta.exe /SERVER:RDS-11 | findstr “Active”) -replace “^[\s>]” , “” -replace “\s+” , “,” | ConvertFrom-Csv -Header $Header | ForEach-Object {
$dListItem = New-Object System.Windows.Forms.ListViewItem($_.SESSIONNAME)
$dListItem.Subitems.Add($_.USERNAME) | Out-Null
$dListItem.Subitems.Add($_.ID) | Out-Null
$dListItem.Subitems.Add($_.STATUS) | Out-Null
$dListItem.Subitems.Add(“RDS-11”) | Out-Null
$dListItem.Subitems.Add(“mstsc /v:RDS-11 /shadow:” + $_.ID + ” /control /noConsentPrompt”) | Out-Null
$dList.Items.Add($dListItem) | Out-Null
}
## RDSH = SERVER:RDS-12
$(qwinsta.exe /SERVER:RDS-12 | findstr “Active”) -replace “^[\s>]” , “” -replace “\s+” , “,” | ConvertFrom-Csv -Header $Header | ForEach-Object {
$dListItem = New-Object System.Windows.Forms.ListViewItem($_.SESSIONNAME)
$dListItem.Subitems.Add($_.USERNAME) | Out-Null
$dListItem.Subitems.Add($_.ID) | Out-Null
$dListItem.Subitems.Add($_.STATUS) | Out-Null
$dListItem.Subitems.Add(“RDS-12”) | Out-Null
$dListItem.Subitems.Add(“mstsc /v:RDS-12 /shadow:” + $_.ID + ” /control /noConsentPromptl”) | Out-Null
$dList.Items.Add($dListItem) | Out-Null
}
## RDSH = SERVER:RDS-13
$(qwinsta.exe /SERVER:RDS-13 | findstr “Active”) -replace “^[\s>]” , “” -replace “\s+” , “,” | ConvertFrom-Csv -Header $Header | ForEach-Object {
$dListItem = New-Object System.Windows.Forms.ListViewItem($_.SESSIONNAME)
$dListItem.Subitems.Add($_.USERNAME) | Out-Null
$dListItem.Subitems.Add($_.ID) | Out-Null
$dListItem.Subitems.Add($_.STATUS) | Out-Null
$dListItem.Subitems.Add(“RDS-13”) | Out-Null
$dListItem.Subitems.Add(“mstsc /v:RDS-13 /shadow:” + $_.ID + ” /control /noConsentPrompt”) | Out-Null
$dList.Items.Add($dListItem) | Out-Null
}
## RDSH = SERVER:RDS-14
$(qwinsta.exe /SERVER:RDS-14 | findstr “Active”) -replace “^[\s>]” , “” -replace “\s+” , “,” | ConvertFrom-Csv -Header $Header | ForEach-Object {
$dListItem = New-Object System.Windows.Forms.ListViewItem($_.SESSIONNAME)
$dListItem.Subitems.Add($_.USERNAME) | Out-Null
$dListItem.Subitems.Add($_.ID) | Out-Null
$dListItem.Subitems.Add($_.STATUS) | Out-Null
$dListItem.Subitems.Add(“RDS-14”) | Out-Null
$dListItem.Subitems.Add(“mstsc /v:RDS-14 /shadow:” + $_.ID + ” /control /noConsentPrompt”) | Out-Null
$dList.Items.Add($dListItem) | Out-Null
}
## if the column header clicked, note the column selected.
$dList.add_ColumnClick({SortListView $_.Column})
## Code to sort selected column Ascending or Descending.
## PowerShell: Sort a Windows Forms ListView without a Custom Comparer
## https://etechgoodness.wordpress.com/2014/02/25/sort-a-windows-forms-listview-in-powershell-without-a-custom-comparer/
function SortListView
{
param([parameter(Position=0)][UInt32]$Column)
$Numeric = $true # determine how to sort
# if the user clicked the same column that was clicked last time, reverse its sort order. otherwise, reset for normal ascending sort
if($Script:LastColumnClicked -eq $Column)
{
$Script:LastColumnAscending = -not $Script:LastColumnAscending
}
else
{
$Script:LastColumnAscending = $true
}
$Script:LastColumnClicked = $Column
$ListItems = @(@(@())) # three-dimensional array; column 1 indexes the other columns, column 2 is the value to be sorted on, and column 3 is the System.Windows.Forms.ListViewItem object
foreach($ListItem in $dList.Items)
{
# if all items are numeric, can use a numeric sort
if($Numeric -ne $false) # nothing can set this back to true, so don’t process unnecessarily
{
try
{
$Test = [Double]$ListItem.SubItems[[int]$Column].Text
}
catch
{
$Numeric = $false # a non-numeric item was found, so sort will occur as a string
}
}
$ListItems += ,@($ListItem.SubItems[[int]$Column].Text,$ListItem)
}
# create the expression that will be evaluated for sorting
$EvalExpression = {
if($Numeric)
{ return [Double]$_[0] }
else
{ return [String]$_[0] }
}
# all information is gathered; perform the sort
$ListItems = $ListItems | Sort-Object -Property @{Expression=$EvalExpression; Ascending=$Script:LastColumnAscending}
## the list is sorted; display it in the listview
$dList.BeginUpdate()
$dList.Items.Clear()
foreach($ListItem in $ListItems)
{
$dList.Items.Add($ListItem[1])
}
$dList.EndUpdate()
}
$dBttn.Add_Click( {
$SelectedItem = $dList.SelectedItems[0]
if ($SelectedItem -eq $null) {
[System.Windows.Forms.MessageBox]::Show(“Select a user session to connect “)
}else
{
$session_id = $SelectedItem.subitems[2].text
$rds_host = $SelectedItem.subitems[4].text
$(mstsc /v:$rds_host /shadow:$session_id /control /noConsentPrompt)
“mstsc /v:” +$rds_host+ ” /shadow:” +$session_id+ ” /control /noConsentPrompt” | Clip ## copy to clipboard ##
#[System.Windows.Forms.MessageBox]::Show($session_id & ” – ” & $rds_host)
}
}
)
## Sort the list view “USERNAME” ascending order
SortListView(1)
$dList.columns[0].width = 75
$dList.columns[1].width = 150
$dList.columns[2].width = 50
$dList.columns[3].width = 75
$dList.columns[4].width = 100
$dList.columns[5].width = 400
## Show form to user.
$gForm.TopMost = $true
$gForm.ShowDialog()
##$gForm.topmost = $true
We use Shadowing to support users on AVD hosts where no one should have local admin permissions especially support staff who may not understand config changes and app installs need to be made to all hosts in a host pool or user experience will be inconsistent.
How can we perform the following config via GPO?
wmic /namespace:\\root\CIMV2\TerminalServices PATH Win32_TSPermissionsSetting WHERE (TerminalName=”RDP-Tcp”) CALL AddAccount “woshub\AllowRDSShadow”,2
You can run this code as a GPO logon script:
https://woshub.com/running-powershell-startup-scripts-using-gpo/
to run this script only once on each computer:
https://woshub.com/run-gpo-logon-script-once/