OpenVPN is a set of open-source tools that is one of the most popular and lightweight solutions for building a secure corporate VPN network. OpenVPN can connect servers and clients into a single network, including clients behind NAT or firewalls, and can also connect remote office networks. The OpenVPN server can be deployed on any operating system, including Linux, *BSD, and even a standard workstation running a desktop edition of Windows 10 or 11, as well as Windows Server.
This guide provides a detailed walkthrough of how to deploy and configure an OpenVPN server on a Windows computer. We cover all the key aspects, including certificate management, server and client configuration, firewall rules, and configurations involving NAT, routing, and access to private LAN networks. We also explain how to configure an OpenVPN server to route all client internet traffic through the VPN.
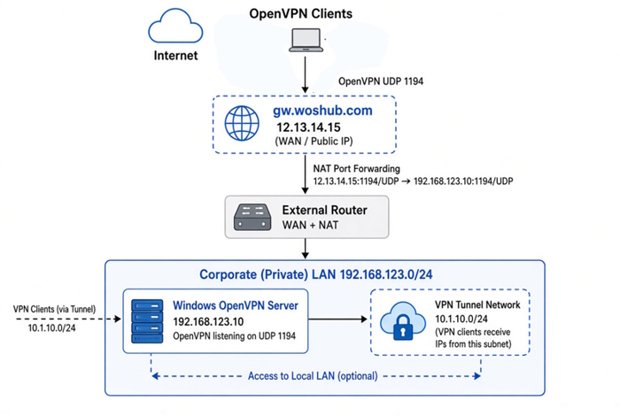
We are going to deploy the OpenVPN server in the following environment:
- Corporate (private) LAN:
192.168.123.0/24 - This is the IP address of the Windows computer on which we are deploying the OpenVPN server in a LAN:
192.168.123.10 - IP subnet for VPN clients:
10.1.10.0/24 - OPenVPN port and protocol:
UDP 1194 - This is the external (public) IP address or DNS name that OpenVPN clients will connect to:
gw.woshub.com (12.13.14.15)
We assume that the Windows computer running the OpenVPN server does not have a public IP address. You need to configure a NAT rule on the external (WAN) interface of the router to forward traffic from port 12.13.14.15:1194/UDP to the OpenVPN server’s IP address on the LAN 192.168.123.10:1194/UDP.
The basic network diagram and IP addressing for a typical OpenVPN solution implementation are presented below:
Before you start, make sure that you can configure a NAT/port forwarding rule on your external router, and that you understand how it works. The configuration is even simpler if your Windows host has a public IP address assigned directly to its network interface, since clients can then connect to the host directly.
How to Install OpenVPN Server on Windows
To deploy an OpenVPN server, you need a computer running Windows 11/10 Pro or Enterprise (installation on the Home edition is also possible, but with some limitations) or a Windows Server 2019/2022/2025 if you are planning to implement a complex VPN configuration involving multiple routing and NAT rules.
Download the OpenVPN Community Edition MSI installer for your version of Windows from the official website. For this guide, I am using OpenVPN-2.7.6-amd64.msi (5.6 MB). The installer includes both the server and client components.
Run the installation. Install the following OpenVPN features:
- OpenVPN Service with documentation and config samples
- Data Channel Offload Driver (this is the optimal driver for Windows in OpenVPN version 2.7 or later)
- OpenSSL Utilities (including EasyRSA 3 script)
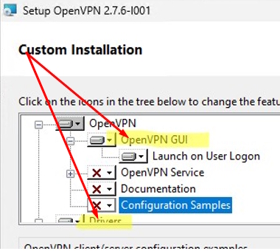
Uncheck the OpenVPN GUI installation option (this is a VPN client that is not required on the server). Discard the installation of the TAP-Windows6 driver.
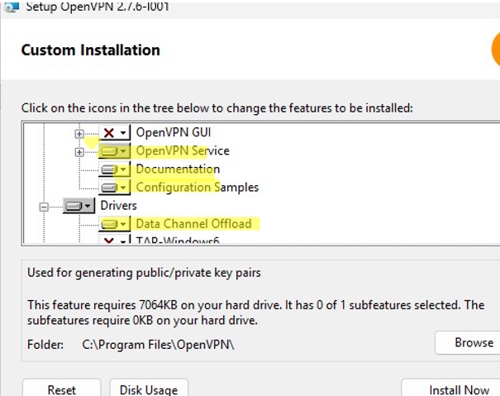
ovpn-dco-win) driver. This driver processes VPN traffic at the Windows kernel level.TAP-Windows6 is an even older OpenVPN network adapter driver, which is only recommended for legacy deployments.
Complete the installation.
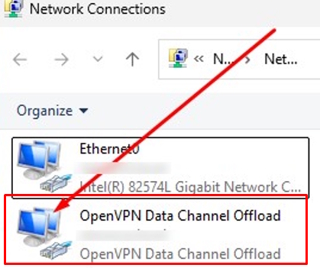
C:\Program Files\OpenVPN .Once installation is complete, a new OpenVPN Data Channel Offload network adapter will appear in the network connection control panel (ncpa.cpl). This adapter is disabled if the OpenVPN service is not running.
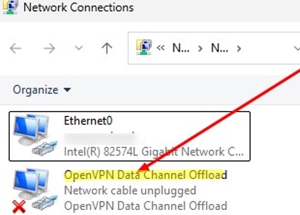
Generate OpenVPN Encryption Keys and Certificates
OpenVPN uses the OpenSSL open-source library to provide cryptographic functions and perform key exchange. This means that cryptographic keys and certificates must be generated using RSA3 to establish secure communication between the VPN client and server. The Easy-RSA scripts are used to create your local Public Key Infrastructure (PKI), including the Certificate Authority (CA), server and client certificates, and their corresponding private keys.
Open the command prompt and navigate to the easy-rsa directory:
cd "C:\Program Files\OpenVPN\easy-rsa"
You can set the EasyRSA PKI environment variables (this is optional, so you can skip this step). To do this, create a copy of the file:
copy vars.example vars
You can then edit the vars file using any text editor to change the PKI environment settings. For example, I will uncomment and complete the basic DN information fields for the certificates (optional).
set_var EASYRSA_REQ_COUNTRY "DE"
set_var EASYRSA_REQ_PROVINCE "BY"
set_var EASYRSA_REQ_CITY "MUN"
set_var EASYRSA_REQ_ORG "WOSHUB-Com"
set_var EASYRSA_REQ_EMAIL "admin@woshub.com"
set_var EASYRSA_REQ_OU "IT dept"
Or you can set certificate expiration dates:
set_var EASYRSA_CA_EXPIRE 3650
set_var EASYRSA_CERT_EXPIRE 825
Save the file and run the command:
EasyRSA-Start.bat
All of the following commands must be run in the EasyRSA shell:
Initialize PKI:
./easyrsa init-pki
You should see this message:
init-pki complete; you may now create a CA or requests.
Your newly created PKI dir is: C:/Program Files/OpenVPN/easy-rsa/pki
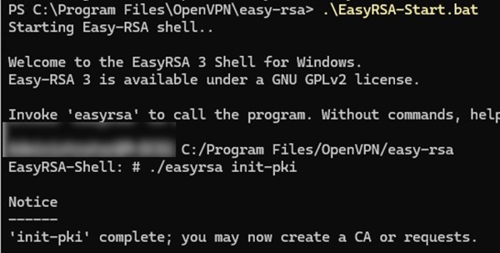
openssl.exe library executable file is available on your computer. In the latest versions of OpenVPN, it is part of the distro package.Then generate the root Certificate Authority (CA):
./easyrsa build-ca
Set a CA password (type twice):
CA creation is complete and you may now import and sign cert requests.
The above command has generated:
- A root certificate of the Certification Authority:
C:\Program Files\OpenVPN\easy-rsa\pki\ca.crt - A Certification Authority private key: C
:\Program Files\OpenVPN\easy-rsa\pki\private\ca.key
Then generate a certificate request and a key for your OpenVPN server:
./easyrsa gen-req server nopass
The tool will generate two files:
req: C:/Program Files/OpenVPN/easy-rsa/pki/reqs/server.req
key: C:/Program Files/OpenVPN/easy-rsa/pki/private/server.key
Sign the request file to issue a server certificate using your CA:
./easyrsa sign-req server server
Confirm the data by typing yes.
Then enter the CA password for your root CA.
The server.crt file will appear in the issued folder (C:\Program Files\OpenVPN\easy-rsa\pki\issued\server.crt).

Then you can generate Diffie-Hellman keys (takes a long time):
./easyrsa gen-dh
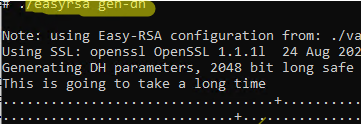
Enabling the tls-crypt option in OpenVPN 2.6/2.7 provides additional protection for the TLS control channel (the tls-auth option was previously used). To generate an additional pre-shared static secret key for OpenVPN, run the following command from a regular Command Prompt
cd "C:\Program Files\OpenVPN\bin"
./openvpn --genkey secret tc.key
A key file should appear C:\Program Files\OpenVPN\bin\tc.key
Now you can generate the keys for OpenVPN clients. Each client that connects to your server should have its own unique key pair (private key and certificate).
There are several ways to generate OpenVPN keys and distribute them to clients. In the following example, we will generate and sign a client certificate for a client named testuser1 and protect its private key with a password (PEM passphrase):
./easyrsa build-client-full testuser1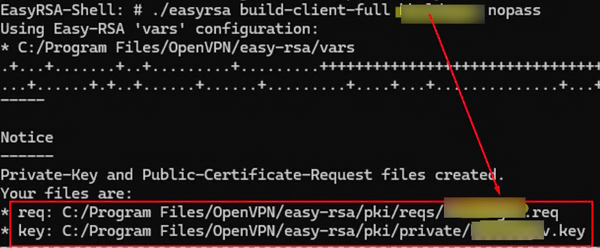
Copy the key file (C:\Program Files\OpenVPN\easy-rsa\pki\private\testuser1.key) to the client computer and tell the user the password (voice, email, SMS). The client can disable the password protection for the key:
openssl rsa -in "C:\Program Files\OpenVPN\easy-rsa\pki\private\testuser1.key"-out "C:\Program Files\OpenVPN\easy-rsa\pki\private\testuser1_use.key"

If you want to generate a key that is not password protected, add the nopass option:
./easyrsa build-client-full testuser1 nopass
You may create any number of keys and certificates for users on your VPN server. Generate private keys and certificates for other clients in the same way.
Therefore, we have generated a set of keys and certificates for the OpenVPN server and one client. Now you can configure and run the OpenVPN service on a server machine.
OpenVPN Server Configuration File for Windows
By default, OpenVPN server settings are stored in the C:\Program Files\OpenVPN\config-auto\server.ovpn configuration file. Either create a new plain text file with this name, or copy the OpenVPN server configuration file template.
copy "C:\Program Files\OpenVPN\sample-config\server.ovpn" "C:\Program Files\OpenVPN\config-auto\server.ovpn"
Copy the following key and certificate files to the C:\Program Files\OpenVPN\config-auto directory on the server:
- ca.crt from
C:\Program Files\OpenVPN\easy-rsa\pki - dh.pem from
C:\Program Files\OpenVPN\easy-rsa\pki - server.crt from
C:\Program Files\OpenVPN\easy-rsa\pki\issued - server.key from
C:\Program Files\OpenVPN\easy-rsa\pki\private - tc.key from
C:\Program Files\OpenVPN\bin\
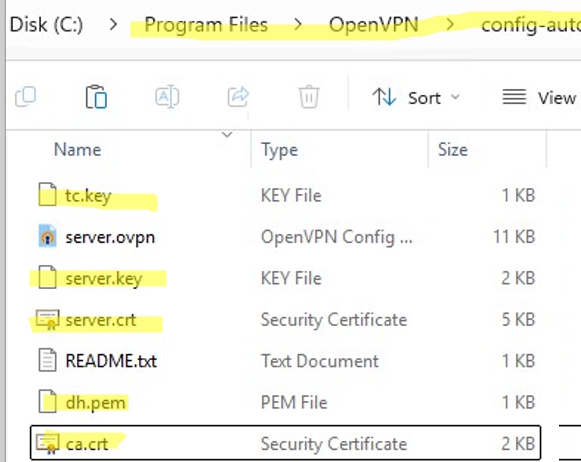
Open the server.ovpn file in any text editor and configure your OpenVPN server settings. Here is an example of a basic OpenVPN server config file:
# Specify a port, a protocol and a device type
port 1194
proto udp
dev tun
# Server certificates and private keys
ca ca.crt
cert server.crt
key server.key
dh dh.pem
# Pre-shared static key to encrypt and authenticate the TLS control channel
tls-crypt tc.key
# Specify the IP network settings (i.e. the IP address pool) from which VPN clients will receive addresses. You can add DHCP address reservations for clients to the specified text file
server 10.1.10.0 255.255.255.0
ifconfig-pool-persist dhcp_reservations.txt
# If you want to allow your clients to connect using the same key, enable the duplicate-cn option (not recommended)
# duplicate-cn
# Cryptography settings (modern ciphers only):
data-ciphers AES-256-GCM:AES-128-GCM:CHACHA20-POLY1305
data-ciphers-fallback AES-256-GCM
# Disconnect inactive clients
keepalive 20 60
persist-key
persist-tun
# logs
log-append server.log
status openvpn-status.log
verb 3
mute 20
Save the file.
ca "C:\\Program Files\\OpenVPN\\easy-rsa\\pki\\cerver.crt"
cert "C:/Program Files/OpenVPN/easy-rsa/pki/issued/ca.crt"
Open the specified OpenVPN port on the server’s firewall. You can open the port in Windows Firewall using PowerShell:
New-NetFirewallRule -DisplayName "AllowOpenVPN-In" -Direction Inbound -Protocol UDP –LocalPort 1194 -Action Allow
Also, enable OpenVPN clients to check the Windows host’s availability via ICMP
Set-NetFirewallRule -Name CoreNet-Diag-ICMP4-EchoRequest-In -enabled True -RemoteAddress 10.1.10.0/24
Then run the OpenVPN service and change its startup type to automatic. Use PowerShell to enable the service:
Set-Service OpenVPNService –startuptype automatic –passthru
 Get-Service OpenVPNService| Start-Service

Open the Network Connections panel and make sure that the OpenVPN Data Channel Offload virtual network adapter is enabled. If not, check the log file C:\Program Files\OpenVPN\log\server.log.
Options error: In C:\Program Files\OpenVPN\config-auto\server.ovpn:1: Maximum option line length (256) exceeded, line starts with…
Change the line break character to Windows CRLF (in Notepad++, select Edit -> EOL Conversion -> Windows CR LF) in server.ovpn. Save the file and restart the OpenVPNService.
Enable IP Routing and NAT for VPN Traffic in OpenVPN
The configuration described above allows remote clients to access only the OpenVPN server itself and the services running on it. VPN clients cannot access other computers and services on the server’s local area network (LAN).
To allow OpenVPN clients to access the entire private network where the server is located, as well as other networks that can be reached via the server, you need to add routes for the IP networks that should be accessible to VPN clients to the OpenVPN server configuration file (server.ovpn). These routes will be added to the client’s routing table when the VPN connection is established.
push "route 10.1.10.0 255.255.255.0"
push "route 192.168.123.0 255.255.255.0"
You can assign specific DNS server addresses to clients for name resolution within the OpenVPN network.
push "dhcp-option DNS 192.168.13.11"
push "dhcp-option DNS 192.168.13.12"
To route all client requests (including Internet traffic) to your OpenVPN server, add the following option:
push "redirect-gateway def1"
In this configuration, when the client accesses the Internet, all its traffic will be forwarded through the VPN server.
Enable the IPEnableRouter option in the registry (enables IP routing in Windows, including routing between Hyper-V networks, and allows you to use port-forwarding):
reg add "HKLM\SYSTEM\CurrentControlSet\Services\Tcpip\Parameters" /v IPEnableRouter /t REG_DWORD /d 1 /f
Enable IP packet forwarding. This allows Windows to forward packets between network interfaces rather than dropping non-local packets:
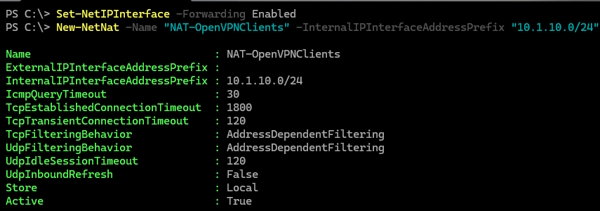
Set-NetIPInterface -Forwarding Enabled
This will turn your Windows device into a basic network router.
Next, enable NAT masquerading on the Windows host running the OpenVPN server. This enables Windows to translate VPN clients’ IP addresses (10.1.10.x) into the host’s own IP address on the local network interface. To create a masquerading rule for your VPN network, run the following PowerShell command:
New-NetNat -Name "NAT-OpenVPNClients" -InternalIPInterfaceAddressPrefix "10.1.10.0/24"
If you are running an OpenVPN server on a Windows Server host, you can use the Routing and Remote Access (RRAS) role to configure more complex traffic routing and NAT rules. Add this Windows Server role using PowerShell:
Install-WindowsFeature -Name Routing -IncludeManagementTools
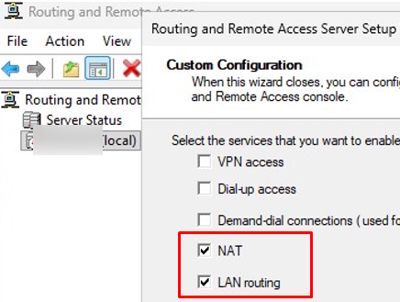
Open the RRAS Management snap-in (rrasmgmt.msc) and create a new custom configuration with the NAT and LAN routing options enabled.
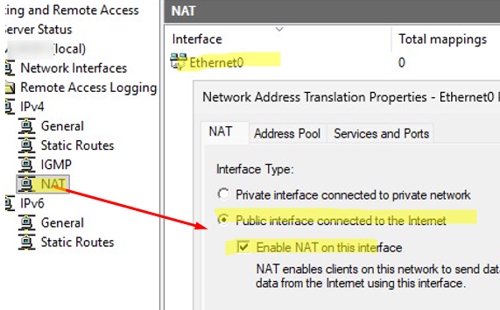
Start the service, then navigate to IPv4 –> NAT and add a new rule to the configuration. Add your LAN interface, then enable the Public interface connected to the Internet and Enable NAT on this interface options in its properties.
Configuring OpenVPN Client on Windows
Now let’s look at how to configure the OpenVPN client on a Windows computer. The first step is to install the OpenVPN client. This is installed using the same distribution that was used for the server deployment.
When deploying the client using the OpenVPN-2.7.6-I001-amd64.msi MSI file, only select the OpenVPN GUI and the network driver for installation. Disable installation of the OpenVPN service and the OpenSSL tools, as these are not required by the client.
Or, you can install the OpenVPN client on Windows using the built-in WinGet package manager. Run the command:
winget install OpenVPNTechnologies.OpenVPN
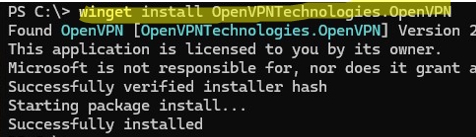
The OpenVPN client configuration file can be stored in the current user’s profile (C:\Users\username\OpenVPN\config) or in C:\Program Files\OpenVPN\config\ (a configured VPN connection in this directory will be available to all Windows users).
Copy the following keys and certificates from the OpenVPN server to the client and place them in one of the client configuration directories listed above:
- ca.crt (server root certificate) from
C:\Program Files\OpenVPN\easy-rsa\pki - testuser1.crt (client certificate) from
C:\Program Files\OpenVPN\easy-rsa\pki\issued - testuser1.key (client private key) from
C:\Program Files\OpenVPN\easy-rsa\pki\private - tc.key (TLS encryption secret key) from
C:\Program Files\OpenVPN\bin\
Create a configuration file for the OpenVPN client in the same folder with the following settings (the file name is testuser1.ovpn):
client
dev tun
proto udp
remote gw.woshub.com 1194
resolv-retry infinite
nobind
persist-key
persist-tun
ca ca.crt
cert testuser1.crt
key testuser1.key
remote-cert-tls server
tls-crypt tc.key
data-ciphers AES-256-GCM:AES-128-GCM:CHACHA20-POLY1305
data-ciphers-fallback AES-256-GCM
connect-retry-max 25
verb 3
You can embed the keys and certificates directly into the OVPN configuration file, thereby eliminating the need to distribute them as separate files. To do this, open each cert file in a text editor and copy its contents directly into the testuser1.ovpn file, placing them inside the appropriate tags:
# ca ca.crt
# cert testuser1.crt
# key testuser1.key
# tls-crypt tc.key
<ca>
-----BEGIN CERTIFICATE-----
ca.crt...
-----END CERTIFICATE-----
</ca>
<cert>
-----BEGIN CERTIFICATE-----
testuser1.crt
-----END CERTIFICATE-----
</cert>
<key>
-----BEGIN PRIVATE KEY-----
testuser1.key
-----END PRIVATE KEY-----
</key>
<tls-crypt>
-----BEGIN OpenVPN Static key V1-----
tc.key...
-----END OpenVPN Static key V1-----
</tls-crypt>

Save the file. You can now connect to the OpenVPN server. Right-click the OpenVPN GUI icon in the notification area and select Connect.
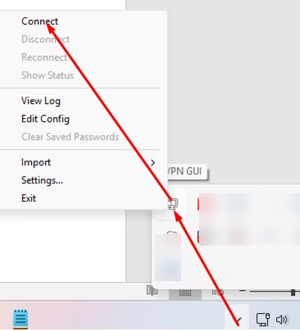
If everything has been configured correctly, a message will appear to indicate that the connection has been successful and an IP address from the VPN range has been assigned to the client.

Open the Network Connections dialog (ncpa.cpl) and check that the OpenVPN Data Channel Offload network adapter is active.
If something doesn’t work or errors occur, you can find the OpenVPN client logs in the file %userprofile%\OpenVPN\log\client.log .
How to Revoke OpenVPN Client Certificate in Windows
OpenVPN allows you to revoke client certificates that have been issued using a Certificate Revocation List (CRL). This may be necessary if the certificate holder leaves the company, or if the certificate is compromised.
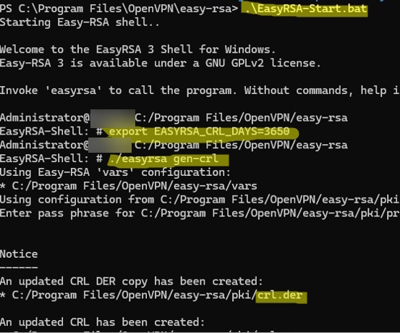
By default, the file that stores the certificate revocation list has a limited validity period of 180 days. To prevent the OpenVPN server from disconnecting clients with a ‘CRL has expired’ error after this period, you must first increase the CRL’s expiration date.
cd "C:\Program Files\OpenVPN\easy-rsa"
EasyRSA-Start.bat
export EASYRSA_CRL_DAYS=3650 (or make changes to the vars file)
./easyrsa gen-crl
Revoke the client certificate by specifying its name:
./easyrsa revoke myclient01
Update the certificate revocation list:
./easyrsa gen-crl
Copy the file C:\Program Files\OpenVPN\easy-rsa\pki\crl.pem to the directory containing the OpenVPN server configuration.
Add the following directive to the end of the server.ovpn config file:
crl-verify crl.pem
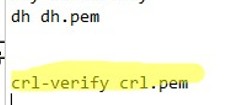
Restart the OpenVPN Service. Users with revoked certificates will no longer be able to connect to the OpenVPN server.
27 comments
Hello,
thanks for the detailed guide.
in which step did you create “testuser1.crt”
its mentioned twice once in the files we need to move along with the OVPN file and inside the openvpn config file itself, but you didn’t generate it in the guide?
Create .req and .key
./easyrsa gen-req testuser1 nopassThen run the following to create and sign a .crt file.
./easyrsa sign-req client testuser1Hi, thanks for a great guide!
Following up on the same question, I get:
C:\Program Files\OpenVPN\bin>./easyrsa gen-req testuser1 nopass
‘.’ is not recognized as an internal or external command,
operable program or batch file.
Not sure if I understood what to do there. Can you please write the step for dummies LOL?
can this be installed on windows server 2008 r2
I haven’t tested OpenVPN servers on WS 2008 in production, but I don’t think there will be any issues with it.
Hi!
Thank you for the guide. It is way more readable than the documentation from OpenVPN 🙂
My OpenVPN Wintun virtual adapter is not enabled after folowing your steps.
The log says ” All tap-windows6 adapters on this system are currently in use or disabled.”
Do you know how to resolve this error? Disabling and re-enabling the driver doesn’t help and neither does restarting the PC and/or services.
Also i have a question:
I am installing the VPN on a Win10 machine in my home so that i can reach it at all times.
When specifying “your_vpn_server_address” in the client config, i suppose i should use my Homw Wi-Fi’s public IP?
And for that to work i would need to do some port forwarding, right?
Will this still be safe then?`
Thanks in advance!
_https://woshub.com/install-configure-openvpn-server-windows/#h2_4
works perfect. Execept to get WinTun pluged in I needed to reboot the server.
I was able to RDP to a mobile (4G) sim. For this project
_http://122.168.196.104/tramoret.html
Thanks anyways
Seems like web UI is not running with this set up, right?
Any why to have it run nevertheless?
Hi. Thanks for the great walkthrough.
I’m following it step-by-step on mg VPS running Windows 10, and everything is working great. However there’s a very small issue which makes the entire process being left useless.
When I add the config to my client, it gets connected without any issues. Both the server and the client logs are showing that the connection is established. But when I try to check my IP address on my client, it shows my public IP before the VPN connection. I tried playing with the config files but didn’t get any lucks. It either doesn’t connect at all, or it connects and my traffic is still going through my own public IP address.
I’ll be highly grateful if you can help me with this.
If you want to send all the packets from your computer into the VPN tunnel, then you need to add the following option to the client’s config file
push "redirect-gateway def1"I have this problem
C:\Program Files\OpenVPN\easy-rsa>EasyRSA-Start.bat
Welcome to the EasyRSA 3 Shell for Windows.
Easy-RSA 3 is available under a GNU GPLv2 license.
Invoke ‘./easyrsa’ to call the program. Without commands, help is displayed.
EasyRSA Shell
# ./easyrsa init-pki
Notice
——
‘init-pki’ complete; you may now create a CA or requests.
Your newly created PKI dir is:
* C:/Program Files/OpenVPN/easy-rsa/pki
Using Easy-RSA configuration:
* C:/Program Files/OpenVPN/easy-rsa/vars
EasyRSA Shell
# ./easyrsa build-ca
Using Easy-RSA ‘vars’ configuration:
* C:/Program Files/OpenVPN/easy-rsa/vars
EasyRSA version 3.1.7
Error
—–
Temporary directory does not exist:
* /temp
How to solve it?
crea una carpeta llamada temp directamente en C:\
create a folder called temp directly in C:\Hello, my VPN server and client have been configured correctly and can connect successfully. I can ping the server and the DNS resolution is also to the DNS address specified by the OpenVPN server. However, I am unable to connect to the internet. What could be the reason for this? Thank you for your support.
1) Add the following directive to the OVPN server configuration file
push “redirect-gateway def1”
2) Enable the registry option on the server HKEY_LOCAL_MACHINE\SYSTEM\CurrentControlSet\Services\Tcpip\Parameters, set IPEnableRouter to 1
3) Enable Internet Connection Sharing on the server Key+R -> ncpa.cpl -> right-click the Internet adapter -> Properties -> Sharing tab -> share with OpenVPN adapter)
Hola. Primero felicitarte por el tutorial, está muy bien realizado. Me ocurre igual que AMil…he seguido los pasos y al verificar OpenVPN Wintun no está habilitado. He buscado info pero hay un mar de ideas y soluciones. ¿Sabrías tu por que ocurre esto? Gracias.
Hello. First of all, congratulations on the tutorial, it is very well done. The same thing happens to me as AMil... I followed the steps and when I checked OpenVPN Wintun is not enabled. I searched for information but there are a sea of ideas and solutions. Do you know why this happens? Thanks.The OpenVPN Wintun virtual adapter is enabled after the OpenVPN service is started.
Check the log file if not
C:\Program Files\OpenVPN\log\server.logGreat tutorial. I followed every step and nothing was missing. However, when I attempt to connect from my Windows 10 machine to my Windows Server machine with the OpenVPN server running, I received “Authenticate/Decrypt packet error: packet HMAC authentication failed” along with “LS Error: incoming packet authentication failed from [AF_INET]…” Seems to have something to do with the ta.key but I just generated all of that and it just will not connect. The firewall at the server side seems to be allowing 1194 through (both Windows and the network firewall). Any ideas?
Make sure that both the OpenVPN client and server configuration files have the correct tls-auth directive pointing to the same ta.key. Check the paths and NTFS permissions on the ta.key file.
In this example:
server.ovpn
tls-auth "C:\\Program Files\\OpenVPN\\easy-rsa\\pki\\ta.key" 0client.ovpn
tls-auth ta.key 1No internet connection, I am skeptic anyone could make the internet work.
Certifique-se de que o NAT está ativado no servidor (Windows)
Se você estiver executando o OpenVPN no Windows, será necessário ativar o NAT para que o tráfego da VPN possa sair para a internet:
a. Habilitar Compartilhamento de Conexão (ICS)
Vá em Painel de Controle > Rede e Internet > Conexões de Rede.
Clique com o botão direito na conexão que tem acesso à internet.
Vá em Propriedades > Guia Compartilhamento.
Marque “Permitir que outros usuários da rede se conectem pela conexão deste computador”.
Selecione o adaptador da VPN (tun, wintun, etc.).
Make sure NAT is enabled on the server (Windows)
If you are running OpenVPN on Windows, you will need to enable NAT so that VPN traffic can go out to the internet:
a. Enable Connection Sharing (ICS)
Go to Control Panel > Network and Internet > Network Connections.
Right-click the connection that has access to the internet.
Go to Properties > Sharing tab.
Check “Allow other network users to connect through this computer’s connection”.
Select the VPN adapter (tun, wintun, etc.).
Open the network connections dialog (ncpa.cpl) and make sure that OpenVPN Wintun virtual adapter is now enabled. If it is not, check the log file C:\Program Files\OpenVPN\log\server.log.
OpenVPN Wintun virtual adapter on Windows
the adapter is disabled and there is no server.log. I’m stuck.
I’m having same issue. No internet. I shared the adapter with Wintun adapter, added firewall excections to in/outbound and same issue. No matter what I do. Also did registry fix. Also redirected gateway and restarted services.
server.ovpn adicionei:
# Permitir acesso à LAN Allow LAN access
push “route 10.24.1.0 255.255.255.0”
push “route 192.168.1.0 255.255.255.0”
# Servidores DNS opcionais (use os corretos da sua rede) Optional DNS servers (use the correct ones for your network)
push “dhcp-option DNS 8.8.8.8”
push “dhcp-option DNS 1.1.1.1”
# (Opcional) Redirecionar TODO o tráfego pela VPN (Optional) Redirect ALL traffic through VPN
push “redirect-gateway def1 bypass-dhcp”
Configurei o compartilhamento:
Certifique-se de que o NAT está ativado no servidor (Windows)
Se você estiver executando o OpenVPN no Windows, será necessário ativar o NAT para que o tráfego da VPN possa sair para a internet:
I have set up the sharing:
Make sure NAT is enabled on the server (Windows)
If you are running OpenVPN on Windows, you will need to enable NAT so that VPN traffic can go out to the internet:
a. Habilitar Compartilhamento de Conexão (ICS)
a. Enable Connection Sharing (ICS)
Vá em Painel de Controle > Rede e Internet > Conexões de Rede.
Clique com o botão direito na conexão que tem acesso à internet.
Vá em Propriedades > Guia Compartilhamento.
Marque “Permitir que outros usuários da rede se conectem pela conexão deste computador”.
Selecione o adaptador da VPN (tun, wintun, etc.).
Go to Control Panel > Network and Internet > Network Connections.
Right-click on the connection that has Internet access.
Go to Properties > Sharing tab.
Check “Allow other network users to connect through this computer’s connection”.
Select the VPN adapter (tun, wintun, etc.).
and in powershell I added the record:
e no powershell adicionei o registro:
reg add “HKLM\SYSTEM\CurrentControlSet\Services\Tcpip\Parameters” /v IPEnableRouter /t REG_DWORD /d 1 /f
reiniciei o Windows 10 (Server) e funcionou.
I restarted Windows 10 (Server) and it worked.
Thanks for the detailled instructions
Hello.
Thanks for thid tutorial, it is gratefull.
I have followed all the instructions, step by step, but I got this errors:
2025-12-08 12:55:08 NOTE: –remote is not defined, disabling data channel offload.
Options error: –ca fails with ‘ca.crt’: El sistema no puede encontrar el archivo especificado. (errno=2)
Options error: –cert fails with ‘server.crt’: El sistema no puede encontrar el archivo especificado. (errno=2)
2025-12-08 12:55:08 WARNING: cannot stat file ‘server.key’: El sistema no puede encontrar el archivo especificado. (errno=2)
Options error: –key fails with ‘server.key’: El sistema no puede encontrar el archivo especificado. (errno=2)
Options error: Please correct these errors.
I have the server.ovpn like you wrote, and even I changed below lines by:
ca “C:\Program Files\OpenVPN\easy-rsa\pki\ca.crt”
cert “C:\Program Files\OpenVPN\easy-rsa\pki\issued\server.crt”
key “C:\Program Files\OpenVPN\easy-rsa\pki\private\server.key”
dh “C:\Program Files\OpenVPN\easy-rsa\pki\dh.pem”
(I changed \\ by \)
But I got the same error.
I am using a direct connection (patch cord).
I’ve found the error. I had some other *.ovpn files in “OpenVPN” folder (or sub folders). The paths were correct, but the server misunderstood these files. The only one *.ovpn file must be “server.ovpn”.
Now I have a different problem: If I write the right passkey, I got answer from server telling it to me, but if I write a wrong passkey I got no answer and I got disconnected due to time out. Did you know something about it?
my server.ovpn looks like this
# Specify a port, a protocol and a device type
#local 10.24.1.1
port 1194
proto udp
#proto tcp
dev tun
topology subnet
# Specify paths to server certificates
ca “C:\\Program Files\\OpenVPN\\easy-rsa\\pki\\ca.crt”
cert “C:\\Program Files\\OpenVPN\\easy-rsa\\pki\\issued\\server.crt”
key “C:\\Program Files\\OpenVPN\\easy-rsa\\pki\\private\\server.key”
dh “C:\\Program Files\\OpenVPN\\easy-rsa\\pki\\dh.pem”
# Specify the settings of the IP network your VPN clients will get their
# IP addresses from
server 10.24.1.0 255.255.255.0
route 10.24.1.0 255.255.255.0
#push route 10.24.1.0 255.255.255.0
client-to-client
ifconfig-pool-persist ipp.txt
client-config-dir “C:\\Program Files\\OpenVPN\\ccd”
#server 192.168.1.0 255.255.255.0
# If you want to allow your clients to connect using the same key, enable the duplicate-cn option (not recommended)
#duplicate-cn
# TLS protection
tls-auth “C:\\Program Files\\OpenVPN\\easy-rsa\\pki\\ta.key” 0
cipher AES-256-GCM
# Other options
keepalive 20 60
persist-key
persist-tun
status “C:\\Program Files\\OpenVPN\\log\\status.log”
log “C:\\Program Files\\OpenVPN\\log\\openvpn.log”
verb 3
mute 20
windows-driver wintun
management localhost 5001
#enabling below kills internet of clients
#push “redirect-gateway def”