When users connect to a corporate VPN server (AlwaysOnVPN, Windows Server RRAS, or OpenVPN server) from a home network, they may report that Internet access is unavailable while the VPN tunnel is active. In this article, we’ll look at why users might not be able to access the Internet in Windows when they’re connected to a VPN and how to fix it.
When creating a new VPN connection in Windows (all versions), the Use default gateway on remote network option is enabled by default. This means that all network traffic from your computer is sent through the VPN tunnel. If the VPN server is configured to allow remote clients to access only internal (corporate) resources while blocking Internet access, users will not be able to access external websites or other Internet services from their machines while connected to the VPN. After disconnecting from the VPN, all user traffic is routed through the user’s local network (ISP), and Internet access is restored.
Enable VPN Split Tunneling Mode on Windows
The mode in which only part of the traffic (such as access to corporate resources) is routed through the VPN tunnel, while the rest (such as Internet access) is routed through the user’s local network connection, is known as Split Tunneling.
There are three ways to enable split tunneling mode in Windows:
- In the TCP/IP settings of the VPN connection
- Via rasphone.pbk file
- Using the Set-VpnConnection PowerShell cmdlet with the SplitTunneling option
Changing the TCP/IP settings for your VPN connection through the GUI is the easiest way to enable Split Tunneling mode.
- Open the list of network connections in the Control Panel (
Control Panel\Network and Internet\Network Connectionsor run thencpa.cplcommand to navigate here) and go to the properties of your VPN connection - Go to the Networking tab, select Internet Protocol Version 4 (TCP/IPv4), and click Properties
- Click Advanced
- Disable the Use default gateway on remote network option on the IP Settings tab.

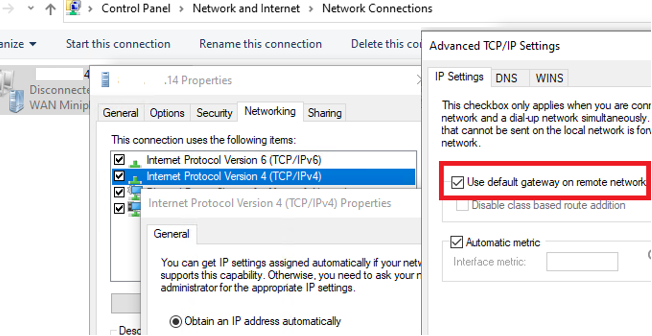
Reconnect to the VPN gateway and verify that your computer is now able to work with corporate resources and access the Internet at the same time.
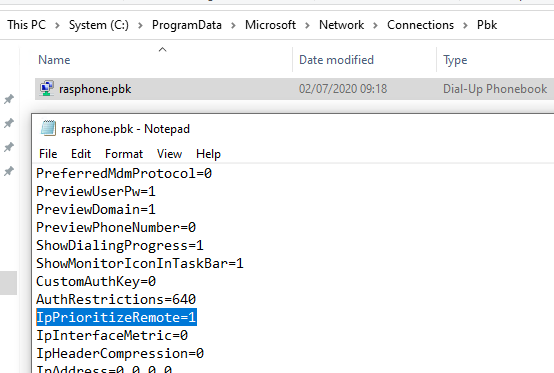
The rasphone.pbk file containing the VPN connection settings is located in one of the following directories:
-
C:\ProgramData\Microsoft\Network\Connections\pbk\– when the VPN connection is created for all users on the computer C:\Users\username\AppData\Roaming\Microsoft\Network\Connections\Pbk– if the VPN connection is created for the current user only
Open the rasphone.pbk with any text editor. The settings of all configured VPN connections are stored in this file. Locate the IpPrioritizeRemote parameter. By default, its value is 1. Change it to 0, save rasphone.pbk, and restart your VPN connection.
You can also configure the splitting of VPN traffic by using PowerShell. List the available VPN connections:
Get-VpnConnection
Make sure that the SplitTunneling option is disabled for your connection (SplitTunneling: False).
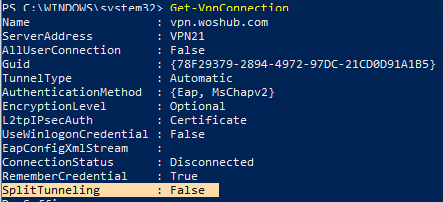
To enable SplitTunneling, copy the name of your VPN connection and run the command:
Set-VpnConnection –name vpn.woshub.com -SplitTunneling $true
Reconnect to the VPN server and verify that both Internet access and connectivity to corporate resources behind the VPN gateway are working properly. Enabling the SplitTunneling option is similar to disabling the Use default gateway on remote network option in the TCP/IPv4 settings for a VPN connection (after you run this PowerShell command, the option checkbox is cleared).
Adding Static Routes to VPN Networks on a Windows Client
The split tunneling option described above will only work in simple scenarios where the IP addresses in the corporate network match the virtual network address assigned to the VPN clients. Otherwise, after the VPN connection is established, you will need to manually add static routes for all the required corporate IP networks located behind the VPN tunnel.
The built-in Windows VPN client has an option to automatically add static routes after the connection is established. To add a static route for your VPN connection, use this PowerShell command:
Add-VpnConnectionRoute -ConnectionName vpn.woshub.com -DestinationPrefix 10.0.0.0/16 -PassThru
If you are using a third-party VPN client, use the route add command to add static routes. For example,
route add 192.168.31.0 mask 255.255.255.0 192.168.200.1
Where, 192.168.31.0 is a remote network (behind VPN), 192.168.200.1 is a VPN gateway IP. To make the route persistent, add the -p option (not always applicable).
To view the current routing table, run the command:
route print
Check which network interface is used to route traffic to a specific host:
tracertoute myCorpPCName
Check which interface is used to access Internet resources:
Get-NetRoute -DestinationPrefix 0.0.0.0/0
To automatically connect VPN and add the required routes, you can create the following BAT file on your desktop:
rasdial.exe vpn.woshub.com
 route add destination_network MASK subnet_mask vpn_gateway_ip
The solutions described in this article may not work with third-party VPN clients (such as Cisco AnyConnect, Checkpoint, etc.), which may have their routing logic.
1 comment
I installed version 3.8.0 on a PC on which I had previously used OpenVPN, but on which I had to re-install Windows 10 (old PC) because of a hard disk crash. I got the problem cited above: connection with the server OK, access to files on server OK, but no Internet. So I switched back to the version I had been using previously (2.6.13) and everything works fine.