To check the integrity of Windows system files and component libraries and repair any corruption, you can use the built-in SFC(System File Checker) and DISM (Deployment Image Servicing and Management) tools in Windows and Windows Server. These tools can be extremely useful when the operating system becomes unstable, errors occur when trying to run built-in apps or services, or after malware attacks.
In this article, we will look at how to use the sfc /scannow, DISM /Online /Cleanup-Image /RestoreHealth, and Repair-WindowsImage -Online -RestoreHealth commands to repair the Windows component store (Windows image) and corrupted system files in Windows 11 and 10, as well as Windows Server 2025, 2022, 2019, and 2016.
- DISM and SFC: Proper Windows Repair Procedure
- Check Windows Component Store Health Using DISM
- Repair Windows Image Using DISM /RestoreHealth
- How to Use an Offline Windows Image (ISO, WIM) as a DISM Repair Source
- Repair Windows Image and System Files with PowerShell
- How to Use DISM Offline to Repair a Windows Image
- SFC /ScanNow: Repair Corrupted Windows System Files
DISM and SFC: Proper Windows Repair Procedure
The main command for scanning and repairing the Windows component store is:
DISM /Online /Cleanup-Image /RestoreHealth
This command scans the Windows component store (the WinSxS directory) and detects corrupted component files by comparing the actual SHA-256 hashes of binary files with the reference values stored in their manifests. If necessary, DISM downloads the original component files from the Windows Update servers over the Internet and uses them to replace the corrupted files.
The next important command is:
sfc /scannow
This command verifies the integrity of the protected system files currently in use. If a file is missing or its hash does not match the expected value, SFC replaces it with the corresponding version from the WinSxS component store, which serves as the reference source.
In other words, the SFC /SCANNOW relies on the Windows component store as its source for replacement files. Therefore, you should run DISM first, so that the reference files in the component store are in a healthy state before running SFC.
Check Windows Component Store Health Using DISM
The built-in DISM (Deployment Image Servicing and Management) tool in Windows is used to service, prepare, modify, and repair Windows images.
To service the Windows component store, use the DISM /Cleanup-Image option together with one of the following arguments:
/CheckHealth– performs a quick check for existing component store corruption flags. It typically takes only a few seconds./ScanHealth– performs a full scan of the component store without attempting to repair any detected corruption. This takes up to 30 minutes./RestoreHealth– performs a comprehensive health check of the Windows component store and automatically repairs any corruption it detects. This operation can take considerably longer.
To check whether the Windows image has been marked as corrupted by the CBS (Component-Based Servicing) subsystem, open an elevated command prompt and run:
DISM /Online /Cleanup-Image /CheckHealth
As mentioned earlier, this command doesn’t perform a full scan of the component store. The command only checks if your Windows image is marked by the CBS flag as corrupted and if it is possible to fix it. No changes are made to the image. The command checks whether the Windows image is currently marked as corrupted and whether the detected corruption can potentially be repaired.
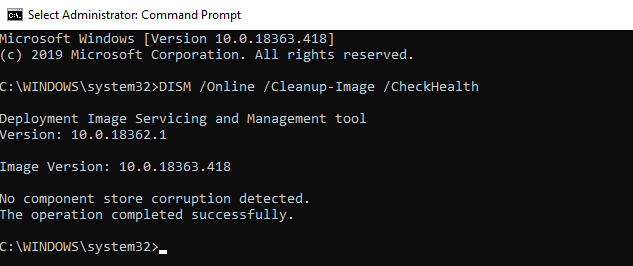
In this example, the command has returned that the Windows image has no corruption:
No component store corruption detected.
The operation completed successfully.
To run a full health check scan against the Windows Component Store, run the command:
DISM /Online /Cleanup-Image /ScanHealth
Checking the Windows image can take quite a long time (10-30 minutes). It will return one of three results:
- No component store corruption detected – DISM found no errors in the component store
- The component store is repairable – DISM has found errors in the Component Store and can fix them
- The component store is not repairable – DISM cannot fix the Windows Component Store (try using a newer version of DISM or you will have to restore a Windows image from a backup, reset or completely reinstall your Windows instance).

C:\Windows\Logs\CBS\CBS.log .Before proceeding, make sure that the computer is not pending a reboot after adding or removing a Windows component/role or installing updates. If the system is in a Pending Restart state, DISM will always return the following status:
The component store is repairable.
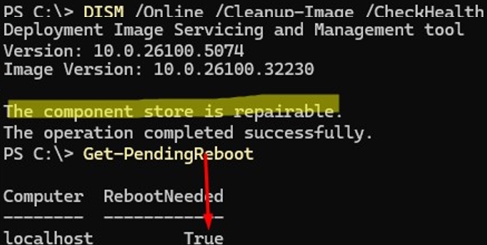
In some cases, the DISM /ScanHealth returns the following errors:
- DISM Error 1726 – “The remote procedure call failed”
- DISM Error 1910 – “The object exporter specified was not found”
It definitely means that your Windows image is corrupted and needs to be repaired.
Repair Windows Image Using DISM /RestoreHealth
To repair corruption in the Windows image Component Store, use the RestoreHealth option of the DISM command. This option instructs DISM to find missing or corrupted files in the component store and automatically download and replace them with known-good versions obtained from Windows Update (the computer must have Internet access). Run the command:
DISM /Online /Cleanup-Image /RestoreHealth
DISM.exe /Online /Cleanup-Image /ScanHealth The process of scanning and repairing the Component Store may take quite a long time (30 minutes or more). DISM will automatically download and replace the files of corrupted or missing components with original file versions from Windows Update.
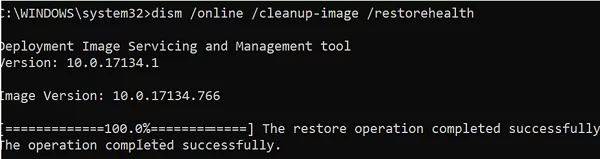
If the repair has been successful, the following message will appear:
The restore operation completed successfully.
How to Use an Offline Windows Image (ISO, WIM) as a DISM Repair Source
If your computer (server) has no direct Internet access (located behind a proxy, or connected to an internal WSUS update server to get security and build updates) or the Windows Update service is disabled/ corrupted (how to repair Windows Update client), DISM may return errors when attempting to repair the component store:
- 0x800f0906 – The source files could not be downloaded. Use the Source option to specify the location of the files that are required to restore the feature;
- 0x800f0950 – DISM failed. No operation was performed;
- 0x800F081F – The source files could not be found. Use the Source option to specify the location of the files that are required to restore the feature.
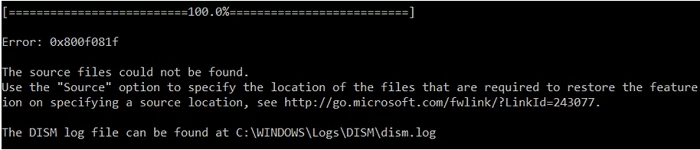
In all of these cases, you can use an alternative source to get the original Component Store files. Possible sources include:
- A bootable USB flash drive or ISO image containing the Windows installation media
- A mounted
install.wimfile from the Windows installation image - The
\sources\SxSdirectory on the Windows installation media
The DISM command allows you to specify an offline WIM or ESD file from the original Windows installation image to be used as the source to repair the system files in the Windows component store. For example, assume that you have mounted a Windows installation ISO image as a virtual drive D:.
Check which Windows version and build is installed on your computer using the following PowerShell command:
Get-ComputerInfo |select WindowsProductName,WindowsEditionId,WindowsVersion, OSDisplayVersion
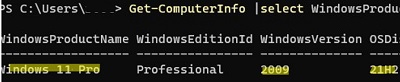
List the editions of Windows available in the installation WIM image:
Get-WindowsImage -ImagePath "D:\sources\install.wim"
In our case, the Windows 11 Pro image in the install.wim file has ImageIndex = 6.
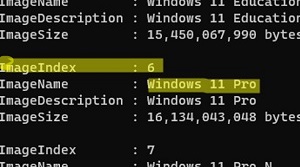
To repair the Component Store from a local WIM/ESD file using the local source files (without using Windows Update online services), run the following command (remember to specify the Windows version index in the image file):
DISM /online /cleanup-image /restorehealth /source:WIM:D:\sources\install.wim:6 /limitaccess
or:
DISM /online /cleanup-image /restorehealth /source:ESD:D:\sources\install.esd:6 /limitaccess
The system cannot find the file specified . 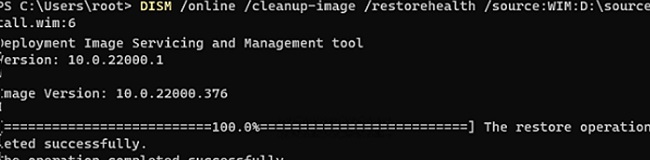
- Error: 50: DISM does not support servicing Windows PE with the /Online option – this means that DISM thinks you are trying to repair a WinPE image. To fix this, remove the registry key
HKEY_LOCAL_MACHINE\SYSTEM\CurrentControlSet\Control\MiniNT; - DISM Error 87: make sure the DISM command is written correctly, and make sure you are using the DISM version for your Windows version (usually when booting in WinPE/ WinRE).
- 0x80073701 The referenced assembly could not be found error while trying to install Windows roles or features. DISM is unable to repair the issue, so you may need to manually fix the Windows component store configuration in the registry.
- 0x800f0915 – The repair content could not be found anywhere. Check the Internet connectivity or use the /Source option to specify the location of the files required to restore the Windows image. To resolve this issue, run:
DISM /Online /Cleanup-Image /StartComponentCleanup /ResetBaseThen clear the Windows Update cache (C:\Windows\SoftwareDistribution), Reset the Windows Update configuration using the Reset Windows Update Tool (wureset), reboot the computer, and run the DISM repair again.
Repair Windows Image and System Files with PowerShell
Instead of using the DISM command to check and repair the Windows Component Store, you can use the equivalent PowerShell cmdlet,Repair-WindowsImage, which is available in Windows 10/11 and Windows Server 2025, 2022, and 2019. Run this command to scan the Windows component store and find any corruptions:
Repair-WindowsImage -Online –ScanHealth
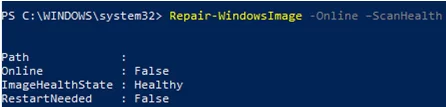
If no errors are found in the Component Store, the following message appears:
ImageHealth State: Healthy
To repair the component store in the Windows image and system files, run the command:
Repair-WindowsImage -Online -RestoreHealth
If the computer doesn’t have Internet access, this command may hang during the image repairing process. You can instead restore the system components store from an offline Windows image file (install.wim or install.esd), which can be copied from a Windows Installation ISO. In this case, you also need to specify the Windows edition index within the WIM/ESD file as the repair source:
Repair-WindowsImage -Online -RestoreHealth -Source F:\sources\install.wim:5 -LimitAccess
How to Use DISM Offline to Repair a Windows Image
If Windows won’t boot at all, you can use DISM to check and repair system files offline by booting your computer into the Windows Recovery Environment (WinRE) or from an installation USB flash drive.
- Boot your device from the Windows installation image (you can use the Media Creation Tool to create a bootable Windows USB stick) and press
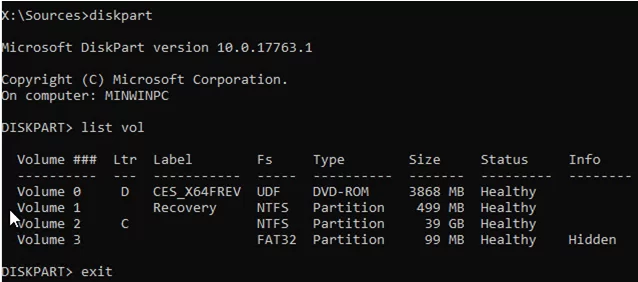
Shift + F10on the initial Windows Setup screen. - To find out which drive letters have been assigned to volumes in WinPE, run the command
diskpart->list vol(in my example, the drive letter C:\ is assigned to the disk on which Windows is installed, and I will use this drive letter in the next commands).
- In this example, we will use the WIM file from the Windows installation media as a repair source. Run the following command to repair the offline Windows component store.
Dism /image:C:\ /Cleanup-Image /RestoreHealth /Source:D:\sources\install.wim
- If there is not enough free space on the target system drive, you can use a separate drive or USB flash drive with enough free space to store DISM’s temporary files. For example, if the additional drive is
F:, I will create an empty scratch directory:mkdir F:\scratch. Then run the component store repair while specifying this temporary scratch directory:Dism /image:C:\ /Cleanup-Image /RestoreHealth /Source:D:\sources\install.wim /ScratchDir:F:\scratch - Check the system files and repair the corrupted ones using the SFC tool in offline mode:
sfc /scannow /offbootdir=C:\ /offwindir=C:\Windows


DISM /Add-Package–install MSU/CAB update files, integrate security updates into the Windows imageDISM /Get-Drivers– get the list of installed driversDISM /Add-Driver– inject drivers into the Windows installation imageDISM /Export-Driver– export installed Windows driversDISM /Add-Capability– used to install additional Windows features via Features on Demand (FoD). For example, RSAT, OpenSSH server, or Windows SSH client)DISM /Enable-Featuresand/Disable-Features– enable and disable Windows optional features (for example, the SMBv1 protocol)DISM /StartComponentCleanup– clean up the Component Store and remove old component versions (from the WinSxS folder);DISM /Set-Edition– upgrade from the evaluation to the full Windows edition without reinstalling.
SFC /ScanNow: Repair Corrupted Windows System Files
Once you have repaired the Windows Component Store using DISM, you can use the System File Checker (SFC) tool to verify and repair the integrity of the protected system files.
First, use the /verifyonly option to check whether any system files require repair. This performs the integrity check without attempting to repair any detected issues.
sfc /verifyonly

Beginning system scan.  This process will take some time.
Beginning verification phase of system scan.
Verification 100% complete.
Windows Resource Protection did not find any integrity violations.
If corrupted files are detected, and you want to perform a full integrity scan and automatic repair, run:
sfc /scannow
If the sfc /scannow command detects any missing or corrupt system files, it will try to replace them with the original versions from the Windows component store (C:\Windows\WinSxS).
It is likely that it will be able to restore any damaged or missing system files and display a success message.
Windows Resource Protection found corrupt files and successfully repaired them.
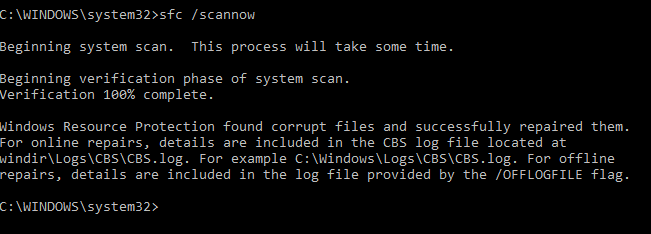
If the SFC.exe doesn’t detect any damage to the system files, a message will appear
Windows Resource Protection did not find any integrity violations.
%windir%\logs\cbs\cbs.log . All SFC entries in the CBS.log file are tagged with [SR]. To list only entries related to SFC from the CBS log, use the following command:findstr /c:"[SR]" %windir%\Logs\CBS\CBS.log >"%userprofile%\Desktop\sfc.txt"
If the sfc /scannow command returns the error “Windows Resource Protection found corrupt files but was unable to fix some of them“, it is likely that the tool could not locate the necessary system files in the Windows Component Store.
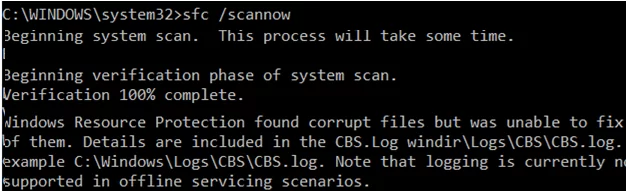
It is probable that you have not yet attempted to repair the Windows Component Store using the DISM.exe command. After repairing the Windows image, you can run the SFC tool again to repair system files.
11 comments
Wow thank a lot. Can it solve the “missing Winre” to create a recovery drive?
Good article. Thank you so much!
I need to do an offline DISM repair of my Windows 10 but the boot usb disk created does not have an install.wim file. Instead, it has install.esd file. As mentioned in the online DISM repair I used it in the /Source parameter (/Source:D:\sources\install.esd) . But during the DISM repair I get error saying source not found. The log file has many entries mentioning failure… the first failure log says –
DISM DISM Provider Store: PID=1396 TID=1740 Failed to get and initialize the PE Provider. Continuing by assuming that it is not a WinPE image. – CDISMProviderStore::Final_OnConnect
Further the log file also has these entries :
CBS Session: 376_1129843 initialized by client DISM Package Manager Provider, external staging directory: (null), external registry directory: (null)
CBS Exec: Addsource called, Session: 376_1129843, Client: DISM Package Manager Provider, from GPO: No, Path: E:\Sources\install.esd
CBS The alternate source path directory could not be accessed [HRESULT = 0x8007007b – ERROR_INVALID_NAME]
Can you please help me understanding why it could be failing? And how to resolve it?
Appreciate your help
Edit : The actual value for /Source I used is /Source:E:\sources\install.esd and not /Source:D:\sources\install.esd as I mentioned previously. (My USB boots into E drive. Windows is on C: )
I am trying to do the offline DISM repair from a USB stick created with the Windows Media Creator but there is no file “install.wim” in the X:/sources/ folder.
that’s normal, it’s a esd image nowadays. yet another untested tutorial. the 15th I’m trying since yesterday
After the Windows Update error 0x80073712 is fixed by the removal of the pending updates:
DISM.exe /Online /Remove-Package /PackageName:Package_for_KB4520724~31bf3856ad364e35~amd64~~14393.3320.1.1 /quiet /norestart
I received DISM error:
Error: 0x800f0906
The source files could not be downloaded.
This is fixed by repairing the component files from the original ISO installation image:
dism /online /cleanup-image /restorehealth /source:e:\sources\install.wim:2 /LimitAccess
error 50 & I checked the arguments of the command
First, run chkdsk, then DISM. And SFC as the last ones (without restart after DISM!!). This is important because the SFC repair source is the DISM repair target.
Do not change the order of the commands!
If a command returns an error, do not proceed to the next one!Troubleshoot and fix the problem first. Only when the command has been successfully executed can you move on to the next one.
Great summary. The best site on the subject for me, so far. It helped me solve a long-standing problem. Windows Update is working again too. Thank you!
i am having a bad error, all of my folders even the folders i made just now refuses to open please help me with this