Windows OS Hub
  • Windows
    • Windows 11
    • Windows Server 2022
    • Windows 10
    • Windows Server 2019
    • Windows Server 2016
  • Microsoft
    • Active Directory (AD DS)
    • Group Policies (GPOs)
    • Exchange Server
    • Azure and Microsoft 365
    • Microsoft Office
  • Virtualization
    • VMware
    • Hyper-V
  • PowerShell
  • Linux
  • Home
  • About

Windows OS Hub

  • Windows
    • Windows 11
    • Windows Server 2022
    • Windows 10
    • Windows Server 2019
    • Windows Server 2016
  • Microsoft
    • Active Directory (AD DS)
    • Group Policies (GPOs)
    • Exchange Server
    • Azure and Microsoft 365
    • Microsoft Office
  • Virtualization
    • VMware
    • Hyper-V
  • PowerShell
  • Linux

 Windows OS Hub / Windows Server 2019 / Configure DNS Scavenging to Clean Up Stale DNS Records in AD

April 25, 2024 Active DirectoryWindows Server 2019

Configure DNS Scavenging to Clean Up Stale DNS Records in AD

Two special Windows Server DNS features can be used to automatically clean up old DNS records in Active Directory:

  • DNS Aging – allows to determine the age of the dynamically registered DNS record (difference between the last timestamp and the current time)
  • DNS Scavenging – automatically removes stale dynamic DNS that hasn’t been updated (used) for some time

Windows Server DNS has two types of records – dynamic and static. Dynamic records have a timestamp parameter (the time at which the DNS record was last updated). Active Windows clients update the timestamp in their DNS records at boot or every 24 hours. This parameter allows the DNS server to identify records that have not been updated for a long time and therefore have not been used.

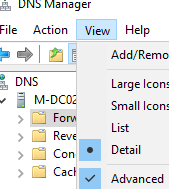
Open the DNS server management console on the AD domain controller (dnsmgmt.msc) and check the Advanced option in the View menu.

DNS Manager mmc snap-in

There are static and dynamic records among the zone DNS records (with time in the timestamp).

Static and dynamic (with timestamp) records in DNS zone on Windows Server

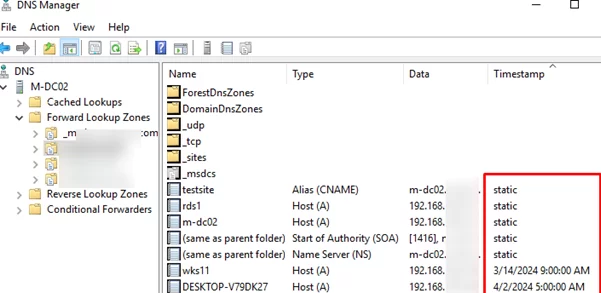
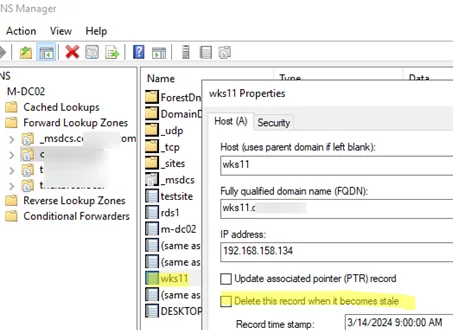
Static DNS records are not deleted automatically. Such DNS records are created by the administrator, or if the Delete this record them it becomes stale option is disabled in their settings.

Look closely at the dynamic entries in your DNS zone. Disable this option in the properties for any DNS records that should never be automatically deleted. The type of such a DNS record will change to static.

Ensure that static records are configured for all your servers, network devices, printers, scanners, and other network services.

DNS option: Delete this record them it becomes stale

The scavenging process automatically deletes only dynamic DNS records.

By default, automatic scavenging for stale DNS records is disabled in Windows Server.

Open your DNS zone properties and click the Aging button on the General tab.

  1. Check the option Scavenge stale resource records.
  2. The No-Refresh Interval parameter sets the time interval during which the timestamp of the DNS record will not be updated (reduces DNS server load and AD replication). However, if the computer’s hostname has changed, the DNS record will be updated successfully.
  3. Refresh Interval – this is a time during which the DNS record timestamp can be updated.

The value for the No refresh interval should be set to half of the IP address lease time set on your DHCP server. For example, if the IP address lease time on the DHCP server is 12 days, enter 6 here. In this case, the dynamic DNS record will be considered outdated and will be purged by the scavenging job after 12 days of inactivity.

Enable DNS Aging on Windows Server

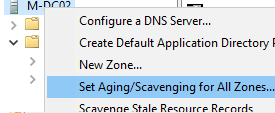
By clicking on the DNS server and selecting Set Aging/Scavenging for All Zones, the aging settings can be applied to all primary DNS zones on a domain controller.

Set Aging/Scavenging for All Zones

Currently, you only have the DNS record age option configured for the zone. DNS records won’t be removed unless you have enabled the automatic cleanup in the DNS server settings.

Before you start cleaning the DNS zone for the first time, we recommend that you export all the resource records in the DNS zone to a CSV file. This will allow you to manually re-create critical DNS records if necessary:

Get-DnsServerResourceRecord -ZoneName 'contoso.com' | Select-Object hostname, timestamp, recordtype, @{Name='RecordData';Expression={$_.RecordData.ipv4address}}| Export-CSV -Csv "C:\temp\BackupDNSZoneContoso.csv" -NoTypeInformation

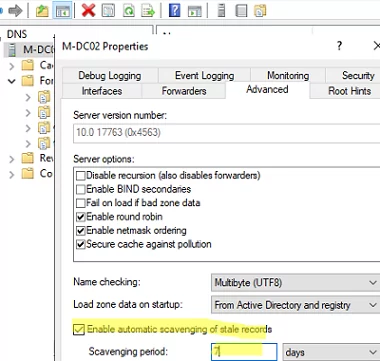
Go to the Advanced tab in the DNS server properties.

Enable the Enable automatic scavenging of status records option and specify how many days after the DNS record is marked as obsolete by the aging mechanism it should be deleted (default is 7 days). After this, the Scavenging mechanism will automatically delete old DNS records once a day.

Enable automatic scavenging of status records

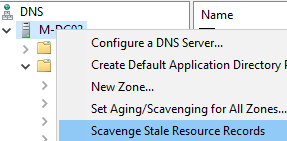
Right-click the DNS server and select Scavenging Stale Resource Records to perform the cleanup immediately. Or run the command:

Start-DnsServerScavenging -Verbose

Scavenging Stale Resource Records on Domain Controller DNS

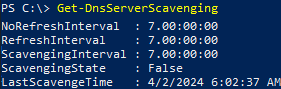
The current DNS server scavenging settings and the time of the last cleanup can be obtained using PowerShell:

Get-DnsServerScavenging

NoRefreshInterval : 7.00:00:00
RefreshInterval : 7.00:00:00
ScavengingInterval : 7.00:00:00
ScavengingState : False
LastScavengeTime : 4/2/2024 6:02:37 AM

Get-DnsServerScavenging settings

Most AD installations use the built-in DNS zones, which are automatically replicated between domain controllers(there is no classic PRIMARY DNS server for such zones). Therefore, you only need to configure scavenging on one of the domain controllers (except RODC). If such a DC is removed or decommissioned, the same configuration must be repeated on another domain controller.
0 comment
4
Facebook Twitter Google + Pinterest
previous post
How to Read Outlook Emails with PowerShell
next post
Read, Modify, and Parse JSON File (Object) with PowerShell

Related Reading

Configure NTP Time Source for Active Directory Domain

May 6, 2025

How to Block Common (Weak) Passwords in Active...

March 25, 2025

Exclude a Specific User or Computer from Group...

March 12, 2025

AD Domain Join: Computer Account Re-use Blocked

March 11, 2025

Remote Desktop fix: The number of connections to...

February 7, 2025

Leave a Comment Cancel Reply

join us telegram channel https://t.me/woshub
Join WindowsHub Telegram channel to get the latest updates!

Categories

  • Active Directory
  • Group Policies
  • Exchange Server
  • Microsoft 365
  • Azure
  • Windows 11
  • Windows 10
  • Windows Server 2022
  • Windows Server 2019
  • Windows Server 2016
  • PowerShell
  • VMware
  • Hyper-V
  • Linux
  • MS Office

Recent Posts

  • Cannot Install Network Adapter Drivers on Windows Server

    April 29, 2025
  • Change BIOS from Legacy to UEFI without Reinstalling Windows

    April 21, 2025
  • How to Prefer IPv4 over IPv6 in Windows Networks

    April 9, 2025
  • Load Drivers from WinPE or Recovery CMD

    March 26, 2025
  • How to Block Common (Weak) Passwords in Active Directory

    March 25, 2025
  • Fix: The referenced assembly could not be found error (0x80073701) on Windows

    March 17, 2025
  • Exclude a Specific User or Computer from Group Policy

    March 12, 2025
  • AD Domain Join: Computer Account Re-use Blocked

    March 11, 2025
  • How to Write Logs to the Windows Event Viewer from PowerShell/CMD

    March 3, 2025
  • How to Hide (Block) a Specific Windows Update

    February 25, 2025

Follow us

  • Facebook
  • Twitter
  • Telegram
Popular Posts
  • Allow Non-admin Users RDP Access to Windows Server
  • Configure Windows LAPS (Local Administrator Passwords Solution) in AD
  • Refresh AD Groups Membership without Reboot/Logoff
  • How to Disable NTLM Authentication in Windows Domain
  • Enable Single Sign-On (SSO) Authentication on RDS Windows Server
  • How to Add, Set, Delete, or Import Registry Keys via GPO
  • How to Reset Active Directory Domain Admin Password
Footer Logo

@2014 - 2024 - Windows OS Hub. All about operating systems for sysadmins


Back To Top