When we analyzed the server licenses in use, we found that one of the servers had a much more expensive edition of Windows Server Datacenter installed than the tasks running on the server required (no Hyper-V virtualization, S2D, Azure Stack, Storage Replica, etc.). It was considered to change (downgrade) the edition of the installed Windows Server 2019 Datacenter to Standard to save on more expensive licenses. We did not consider a clean reinstall of Windows Server because the server already has a number of roles configured and additional software installed that is strictly licensed to the operating system and hardware.
Check Windows Server Edition
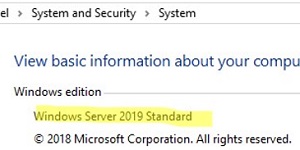
You can use the Control Panel to check which edition of Windows Server is installed on the host. Navigate to Control Panel –> System and Security -> System (or run the command: control /name Microsoft.System).

In this example, Windows Server 2019 Datacenter is installed on the host.
You can also view the version and edition of Windows from the command line:
systeminfo | findstr /B /C:"OS Name" /B /C:"OS Version"
or
wmic os get Caption, Version, BuildNumber, OSArchitecture
![]()
Or with PowerShell:
Get-WindowsEdition –Online
![]()
Get-ComputerInfo | select WindowsProductName, WindowsVersion, OsHardwareAbstractionLayer
The ServerDatacenter edition is installed on the host in this example.
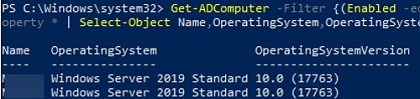
You can use the Get-ADComputers cmdlet to get the edition of all the Windows Server hosts in an Active Directory domain:
Get-ADComputer -Filter {(Enabled -eq $True) -and (OperatingSystem -Like '*Windows Server*')} -Property * | Select-Object Name,OperatingSystem,OperatingSystemVersion
How to Downgrade Windows Server Datacenter to Windows Server Standard
Previously, we discussed upgrading a Windows Server edition from lower to higher using DISM (see the post How to convert Windows Server Evaluation to Full). You can also do the reverse procedure by downgrading from Datacenter edition to Standard, keeping all your current settings, installed roles, and applications.
Before performing a downgrade, we strongly recommend that you create a full image backup of your operating system (at least using Windows Server Backup).
You should also be careful if you are downgrading a Windows server with the ADDS domain controller role installed. It is recommended that you transfer FSMO roles from the Windows Server host (it is assumed that you have at least one additional domain controller) and demote it to a domain member server before downgrading. Back up your Domain Controller so that you can restore the DC from a backup in the event of a problem.
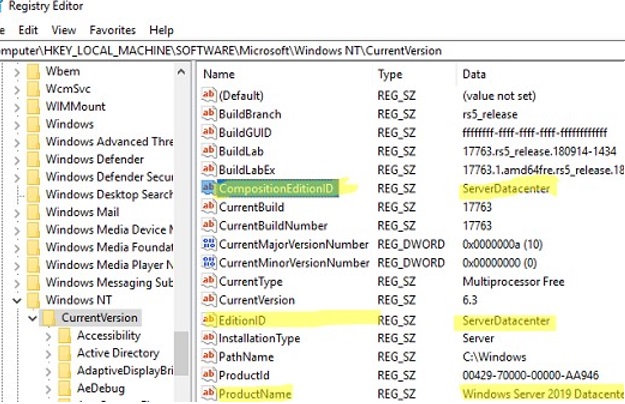
- On a host running Windows Server 2019 Datacenter, start Registry Editor and navigate to the registry key HKEY_LOCAL_MACHINE\SOFTWARE\Microsoft\Windows NT\CurrentVersion;
- Check the values of the following REG_SZ parameters: EditionID = ServerDatacenter, ProductName = Windows Server 2019 Datacenter, CompositionEditionID=ServerDatacenter;The CompositionEditionID setting is present in the registry for Windows Server 2019 and Windows Server 2022. This registry parameter is missing in Windows Server 2016 and doesn’t need to be created manually.

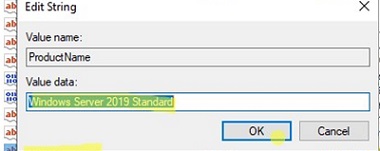
- Change the values as follows:
EditionIDandCompositionEditionIDto ServerStandard,ProductNameto Windows Server 2019 Standard;It should be noted that there is a fairly rare edition of Windows Server Essentials available. To downgrade to Essential Edition, you must specify EditionID = ServerSolution.;
- Close the Registry Editor;Do not restart the server after changing the values of the specified registry keys, otherwise, they will automatically revert to the previous values and you will get an error when trying to perform a downgrade in the next step “
Your Files and Settings cannot be kept because you try to install an other version as the currently used“. - Mount the Windows Server 2019 installation ISO image and run the setup wizard (setup.exe);

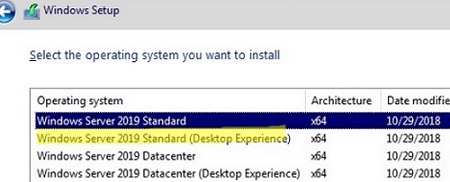
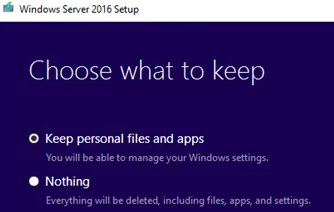
- When you select the installation options in the Windows Server Setup window, select Upgrade and Windows Server 2019 Standard (Desktop Experience);

- Check the option Keep personal files and apps. If this option isn’t available and you get the message “
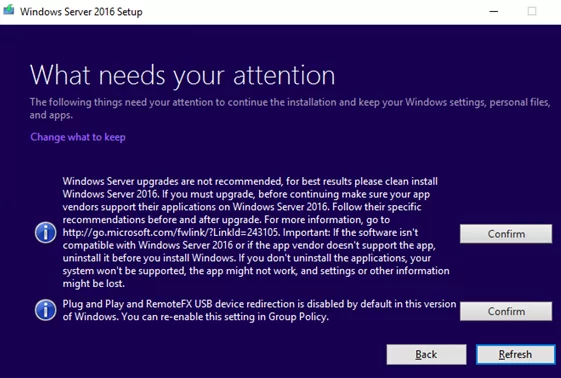
You can’t keep Windows settings, personal files, and apps because your current version of Windows might be installed in a unsupported directory”, check the values of theProgramFilesPath,ProgramFilesDir(x86), andProgramW6432Dirregistry parameters under the HKEY_LOCAL_MACHINE\SOFTWARE\Microsoft\Windows\CurrentVersion registry key); - Click the Confirm button for each item found. In my case, the first item said that a Windows Server upgrade is not recommended, and it was better to clean install the OS, and the second one said that PnP and RemoteFX USB device redirection was disabled by default in this Windows version;
- Start the Windows Server offline upgrade process. Wait for it to finish, and after a few restarts, check that Windows 2019 Standard Edition is now running on the host.


This downgrade method works for all supported versions of Windows Server (2012R2/2016/2019/2022).
Downgrade Rights: Windows Server 2022 to 2019/2016
Microsoft license agreements allow you to use earlier versions of Windows Server if you have a license for a newer version of the product (downgrade rights). For example, if you have the required commercial licenses for Windows Server 2022, you can run Windows Server 2019 and 2016.
To activate a previous version of Windows Server through a downgrade, you need to get a valid product key from your Volume Licensing Service Center (VLSC) account. If you do not have such a key, you can contact Microsoft support to generate a product key under the downgrade right.
It is not possible to perform an in-place downgrade of an already installed Windows operating system version. This means that if you have Windows Server 2022 installed but need Windows Server 2016 for legacy compatibility, you will not be able to downgrade your deployed operating system version. You will need to perform a fresh installation of Windows Server 2016 and activate it with the appropriate product key.
53 comments
Awesome!! This is really worked well. Thanks 🙂
Y r a Machine God kkkkk, worked wonderfully
This works, but after when looking at the local server in the Server Administrator the Product ID shows as Unknown. Any way to fix this?
Hey guys,
Its not working for me, after modifying the registry and running the setup.exe again I do not get the screen to pick the version but instead whether I want updated or not to my current version and no matter what I chose I am being asked for a SN which is obviously not accepting a standard one but a datacenter one.
Any ideas ?
apparently this is only possible for 2016, for 2019 it isnt working …
See my comment below. It worked on 2019 for me.
super awesome cos it worked
Worked for me on 2019. Accidentally installed the wrong version, then installed all my apps. Didn’t want to have to rebuild. With this procedure, downgraded 2019 Datacenter to Standard.
To the commenter above who says it didn’t work on 2019, there is another reg key to edit called “CompositionEditionID” … I also changed this from ServerDatacenter to ServerStandard before running the setup. Perhaps that’s necessary for it to work? I don’t know for sure as I didn’t try it without doing that. Just seemed to make sense to change that as well. 🙂
Thanks Matt, works for my 2019 accident also
Hey Matt,
u got the “unknown” state at the local server in the Server Administrator the Product ID and some other Entries too?
any solution so show the
Sry for typo,
any solution for this issue?
ps: worked and slmgr /dlv gives also the expected output (std).
Wehn i got to the point to pick what to keep, there is the prompt: “Your Files and Settings cannot be kept because you try to install an other version as the currently used”.
Works for my Windows Server 2019 Domain Controller with changing three (!) registry parameters:
CompositionEditionID = ServerDatacenter,
EditionID = ServerDatacenter,
ProductName = Windows Server 2019 Datacenter,
to ServerStandard / Windows Server 2019 Standard
Thx!
[…] Strangely I'm going the other way as Std Licencing was far cheaper than DC. It's not an officially supported route (AFAIK) but it seems pretty straight forward. How to Downgrade Windows Server Datacenter to Standard Edition? | Windows OS Hub […]
This tutorial is perfect and this is the only one working on the Internet. I’ve just converted my Windows 2019 Datacenter Trial to Windows 2019 Standard Retail. Previously I have downloaded Windows 2019 Datacenter VHD from MS Website and installed AD, DNS, SQL and other stuff and really tried to avoid reinstalling all the stuff once again.
First (1), I’ve setup secondary AD controller and demoted my W2019 Datacenter.
Second (2), did the hack with HKLM registry (all three values updated: CompositionEditionID, EditionID, ProductName).
Then (3) I’ve downloaded VL ISO Windows 2019 Standard – it took me hours to find out that with Windows 2019 Standard TRIAL we cannot save files and apps! You really NEED to have a licensed copy of ISO (mine was: “SW_DVD9_Win_Server_STD_CORE_2019_1909.4_64Bit_English_DC_STD_MLF_X22-29333.ISO”) to be able to run setup and save the files and apps. If you use trial ISO, the first save option will be always greyed out.
And finally couple of reboots, and change of license to mine (slmgr.vbs /upk + slmgr.vbs /cpky + slmgr.vbs /ipk xxxxx-xxxxx-xxxxx-xxxxx + slmgr.vbs /ato) and I have working licensed Windows 2019 Standard. All is fine when querying via GUI or DISM /online /get-currentedition or sslmgr /dlv. Now will promote DC again, keep fingers crossed! PP
Thanks very much for posting your experience – it was exactly what my problem was and I was able to follow your steps to fix it.
Worked perfectly from 2016 Datacenter to 2019 Standard.
Thank you!
ISO used: SW_DVD9_Win_Server_STD_CORE_2019_1809.18_64Bit_English_DC_STD_MLF_X22-74330.ISO
Unfortunately, this does not work for us. I have a 2019 Datacenter VM that I want to downgrade. I make the changes to the registry, boot from our image “Windows Server 2019 Datacenter SSS_X64FRE_DE-DE_DV9.iso”.
When I select “Upgrade”, the message appears:
The upgrade option is not available when you boot the computer using the Windows installation media.
you’re not supposed to boot from the iso. Just mount it and run setup.exe
Ok, I run setup. I have to enter a license key to continue.
I enter the standard key, choose Windows Server Standard, continue and cannot choose to keep data.
“Your Files and Settings cannot be kept because you try to install an other version as the currently used”.
The same as Sebastian wrote.
Got the solution. You MUST NOT reboot the machine after changing the values in the registry, or otherwise they will be reverted.
Our AVMA key is not accepted in the “SAFE_OS” phase.
But I tried it once more with the general KMS key and changed it later, that worked.
i have the same problem on win19 .. can you give me the details pls ? “But I tried it once more with the general KMS key and changed it later, that worked.”
You can google for the KMS Key. That key is normally used with a key management system, a special server in your network. Therefore, that key is always accepted when installing and is later checked for validity. In our case, that key cannot be validated and so after reboot Windows is not activated. You can then provide a valid key and Windows gets activated.
Hi there – thanks for your guide. I’ve come across an issue where im unable to upgrade the server despite making the following reg key changes:
CompositionEditionID = ServerStandard,
EditionID = ServerStandard,
ProductName = Windows Server 2019 Standard,
When i try to update the server, the option to ‘Keep personal files and apps’ is greyed out. Below i get the following message, ‘your files, apps. and settings can’t be kept because you’re installing an edition of Windows that’s different thna the once you’re currently using’.
Have you got any guidance around what could help to resolve this issue?
Double check check you Windows version and build number:
Get-ComputerInfo | select WindowsProductName, WindowsVersion, OsHardwareAbstractionLayerHi We were able to complete these steps successfully. Just struggling to activate windows now… we get the following error code: 0x8007232B. Alternatively, i have tried to clear the key with CMD and input a legitimate key for 2019 Server Standard and getting the following error code: 0xC004E016.
Any thoughts on how we can get past this?
0x8007232B: DNS name does not exist (The KMS client cannot find KMS server resource records (SRV RRs) in DNS)
0xC004E016 – The Software Licensing Service reported that the product key is invalid.
hi, i have the same problem how did you solved?
Hi all, it works perfect fot me from W2K12 DC to Std., also for W2k8. But now I’ve found one server with W2k8 R2 Enterprise and changing to Std. doesn’t not work – there is still greyed out “keep files” even for Std., even for Datacenter (tried w2k12,w2k16, w2k19, w2k22). Changing both keys – done. But there still in About this comp “Windows Server 2008 R2 Enteprise” (but both keys are changed), also tried restart.
any idea? thanks
Thanks for the tip ! And what about moving an AD server from 2012 R2 datacenter to 2019 standard ? Is there any problem with the FSMO roles ?
Dear All, I had finished multiple downgrades (2019 Datacenter to Standard). Thank you very much for the article. FYI, if you are going to downgrade Hyper-V Host Server, please downgrade the guest machines first, afterwards, shutdown the guest machines and disable the automatic start of the guest machines before initiating downgrade process for Hyper-V host. This will give you a smooth operation. Best Regards,
hi im tryng to downgrade windows datacenter 2019 to standar edition 2019 but i cant press ‘keep files’ its gray.
i changed this keys
CompositionEditionID = ServerStandard
EditionID = ServerStandard
ProductName = Windows Server 2019 Standard
and checked late with this
Get-ComputerInfo | select WindowsProductName, WindowsVersion, OsHardwareAbstractionLayer
i didnt reset the vm. some help?
In 2019 I installed, configured, and deployed a Windows Server 2019 Domain Controller and Application Server ( RemoteApp ) before i realized the VHD I used was DataCenter Edition ( didn’t notice until I went to apply the licenses ). I could not find a way to downgrade at the time, and so I kicked the can down the road for a couple years by resetting the trial license before finding this article. I thought I was going to have to re-create the application server, which isn’t trivial to do ( due to SSL and what not ). Thanks You So Much!
hi im tryng to downgrade windows datacenter 2019 to standar edition 2019 but i cant press ‘keep files’ its gray.
i changed this keys
CompositionEditionID = ServerStandard
EditionID = ServerStandard
ProductName = Windows Server 2019 Standard
and checked late with this
Get-ComputerInfo | select WindowsProductName, WindowsVersion, OsHardwareAbstractionLayer
i didnt reset the vm. some help?
Please read the previous comments. Are you using Windows 2019 Standard trial ISO?
Why? Are you not able to use the Eval ISO to do this?
Works like charm. This is practically the only article on the internet that works and straightforward. Been on this for a while now.
For finding OS version just click on Run and enter winver
Hi. Worked perfect for Domain Controller and FileServer 2019 DataCenter to Standard. Not worked for Server 2019 Datacenter with RDS Role installed. Removed RDS Role and the Licence downgrade worked perfect. Thank you!
When I try to do a downgrade it hangs on 33% then fails. Any idea what’s causing it to fail?
Verifique se não é o espaço em disco faltando… precisa de ao menos 25GB livre…
Check that you are not running out of disk space… you need at least 25GB free…
it didn’t work for me,
Facing issues with keep files is greyed out, I tried all of the above solutions and didn’t work.
Any updates?
As I had pointed before, “If you use trial ISO, the first save option will be always greyed out”. Have you used licensed ISO?
me too in 2022 version, cant keep files apps and configurations
After downgrading, my access to TS only works if the user is in the Administrators group. Any solution?
Is server 2016 datacenter to server 2019 standard?
Tried this for WS2022 Datacenter to Standard and once I changed the three entries in registry I ran setup.exe. It would not allow me to keep my files. I went back to the registry and noticed two entries reverted to their original. I changed them again and re-ran setup.exe and could keep my files.
The same here!
The same for me on 2019 Datacenter to Standard
Thank you for the guide!
I had the same issue as some of the others here.
The option to “keep files” were greyed out due to the simple mistake by me:
I didn’t choose the DESKTOP EXPERIENCE of the version I was installing.
After changing that, it worked like a charm!
Thank you!
Yeee works for me, but with Windows server 2022 ServerDatacenter to ServerStandard:
Follow the procedure, and for the key use the generic Windows Server 2022 Standard
You cant use the eval edition ISO file. It looks to work with the full ISO without issue. Thanks for the post super useful.