Most Microsoft Office apps (Outlook, SharePoint, Office365, Skype for Business, etc,) allow using an Active Directory (Azure AD) photo of the currently signed-in user as the user’s avatar in their interface. In this article, we’ll show you how to use an Active Directory user’s photo as an account logon image (avatar) for a Windows user profile that appears on the Lock Screen, Welcome Screen, in the Start Menu, etc.
For this task, we will use a small PowerShell logon script. The script should run when the user logs on to Windows, get the user’s photo from Active Directory (thumbnailPhoto attribute), and set it as the profile picture of the Windows user profile.
How to Add Photos for Active Directory Users?
The user’s photo is stored in a special attribute (thumbnailPhoto) of the account in Active Directory. You can set images for your users using third-party tools, or the Set-ADUser cmdlet from the Active Directory module for Windows PowerShell.
- Save the user’s photo to disk in JPEG/BMP format (the maximum avatar image file size must not exceed 100 KB and the image resolution up to 96×96 pixels);
- In order to set the AD account image for a user
jchan, run the commands:
$photo = [byte[]](Get-Content C:\PS\jchan_photo.jpg -Encoding byte)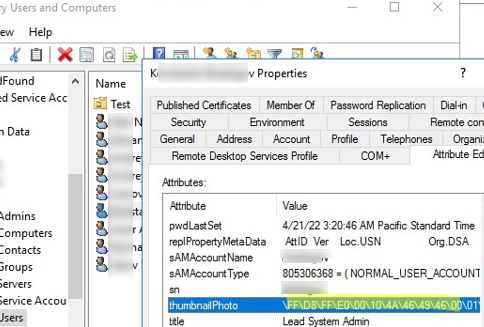
Set-ADUser jchan -Replace @{thumbnailPhoto=$photo} - Open the Active Directory Users and Computers console (ADUC), switch to the Attribute Editor tab, and check if the thumbnailPhoto attribute now contains a value.

Create a GPO to Apply an Account Profile Picture on Windows
Now you need to configure a domain Group Policy that will configure the environment options to use Active Directory user photos as the account logon images on Windows computers.
- Open the Group Policy Management console (
gpmc.msc). Create a new GPO and link it to the OU (Organizational Unit) that contains users’ computers; - In Windows, you can set the user’s avatar image (the path to the JPG file used for the user’s profile) through the HKLM\SOFTWARE\Microsoft\Windows\CurrentVersion\AccountPicture\Users registry key. You need to allow users to change their profile photo directly via the registry;
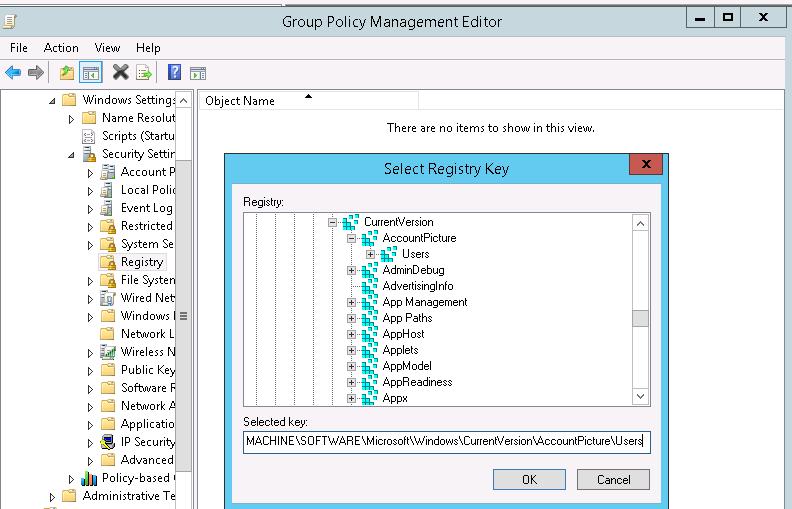
- You can deploy the registry key permissions in the AD domain using GPO. Navigate to the GPO section Computer Configuration -> Policies -> Windows Settings -> Security Settings -> Registry. Create a new registry key (Add key) with the path MACHINE\SOFTWARE\Microsoft\Windows\CurrentVersion\AccountPicture\Users;

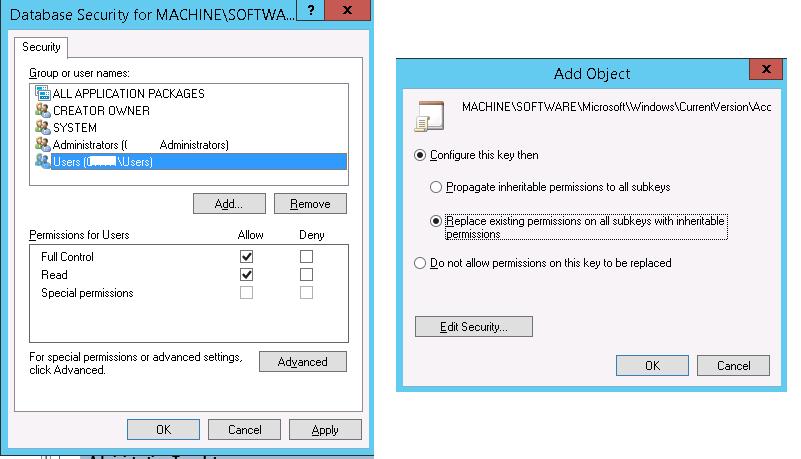
- Grant Full Control permissions for domain users group (
[DomainName]\Users) on the Database Security screen; - In the next window, select the option Replace existing permission on all subkeys with inheritable permissions, otherwise, users won’t have privileges to nested registry subkeys;

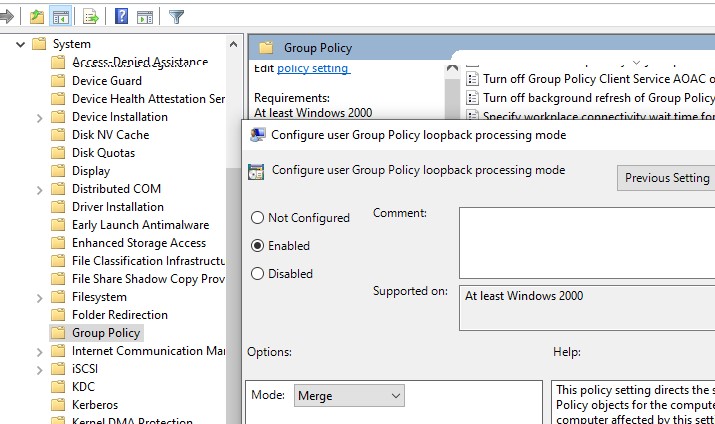
- Enable the GPO option Configure user Group Policy Loopback Processing mode = Merge (Computer Configuration -> Administrative Templates -> System -> Group Policy). This will allow you to apply the policy to OU with computer accounts.

Set User Account Profile Photo on Windows with PowerShell
Next, you need to create a PowerShell script that will get the current user’s photo from Active Directory, save it to a JPG file, and set it as the user’s profile image.
There are two ways to get a user’s photo from AD. You can use the Get-ADUser cmdlet from the ActiveDirectory module (this module must be installed on all computers via RSAT, or you can just copy the necessary RSAT-AD-PowerShell module files without installing RSAT). In order for the script to be universal and work correctly without installing RSAT (including on Windows 7), we will connect AD using the ADSISearcher class.
SetADPicture.ps1 script code:
Function ResizeImage {
 Param (
 [Parameter(Mandatory = $True, HelpMessage = "image in byte")]
 [ValidateNotNull()]
 $imageSource,
 [Parameter(Mandatory = $true, HelpMessage = "Betwwen 16 and 1000")]
 [ValidateRange(16, 1000)]
 $canvasSize,
 [Parameter(Mandatory = $true, HelpMessage = "Between 1 and 100")]
 [ValidateRange(1, 100)]
 $ImgQuality = 100
 )
 [void][System.Reflection.Assembly]::LoadWithPartialName("System.Drawing")
 $imageBytes = [byte[]]$imageSource
 $ms = New-Object IO.MemoryStream($imageBytes, 0, $imageBytes.Length)
 $ms.Write($imageBytes, 0, $imageBytes.Length);
 $bmp = [System.Drawing.Image]::FromStream($ms, $true)
 # Image size after conversion
 $canvasWidth = $canvasSize
 $canvasHeight = $canvasSize
 # Set picture quality
 $myEncoder = [System.Drawing.Imaging.Encoder]::Quality
 $encoderParams = New-Object System.Drawing.Imaging.EncoderParameters(1)
 $encoderParams.Param[0] = New-Object System.Drawing.Imaging.EncoderParameter($myEncoder, $ImgQuality)
 # Get image type
 $myImageCodecInfo = [System.Drawing.Imaging.ImageCodecInfo]::GetImageEncoders() | Where-Object { $_.MimeType -eq 'image/jpeg' }
 # Get aspect ration
 $ratioX = $canvasWidth / $bmp.Width;
 $ratioY = $canvasHeight / $bmp.Height;
 $ratio = $ratioY
 if ($ratioX -le $ratioY) {
 $ratio = $ratioX
 }
 # Create an empty picture
 $newWidth = [int] ($bmp.Width * $ratio)
 $newHeight = [int] ($bmp.Height * $ratio)
 $bmpResized = New-Object System.Drawing.Bitmap($newWidth, $newHeight)
 $graph = [System.Drawing.Graphics]::FromImage($bmpResized)
 $graph.Clear([System.Drawing.Color]::White)
 $graph.DrawImage($bmp, 0, 0 , $newWidth, $newHeight)
 # Create an empty stream
 $ms = New-Object IO.MemoryStream
 $bmpResized.Save($ms, $myImageCodecInfo, $($encoderParams))
 # cleanup
 $bmpResized.Dispose()
 $bmp.Dispose()
 return $ms.ToArray()
 }
 $ADUserInfo = ([ADSISearcher]"(&(objectCategory=User)(SAMAccountName=$env:username))").FindOne().Properties
 $ADUserInfo_sid = [System.Security.Principal.WindowsIdentity]::GetCurrent().User.Value
 If ($ADUserInfo.thumbnailphoto) {
 $img_sizes = @(32, 40, 48, 96, 192, 200, 240, 448)
 $img_base = "C:\Users\Public\AccountPictures"
 $reg_key = "HKLM:\SOFTWARE\Microsoft\Windows\CurrentVersion\AccountPicture\Users\$ADUserInfo_sid"
 If ((Test-Path -Path $reg_key) -eq $false) { New-Item -Path $reg_key } { write-verbose "Reg key exist [$reg_key]" }
 Try {
 ForEach ($size in $img_sizes) {
 $dir = $img_base + "\" + $ADUserInfo_sid
 If ((Test-Path -Path $dir) -eq $false) { $(New-Item -ItemType directory -Path $dir).Attributes = "Hidden" }
 $file_name = "Image$($size).jpg"
 $path = $dir + "\" + $file_name
 Write-Verbose " Crete file: [$file_name]"
 try {
 ResizeImage -imageSource $($ADUserInfo.thumbnailphoto) -canvasSize $size -ImgQuality 100 | Set-Content -Path $path -Encoding Byte -Force -ErrorAction Stop
 Write-Verbose " File saved: [$file_name]"
 }
 catch {
 If (Test-Path -Path $path) {
 Write-Warning "File exist [$path]"
 }
 else {
 Write-Warning "File not exist [$path]"
 }
 }
 $name = "Image$size"
 try {
 $null = New-ItemProperty -Path $reg_key -Name $name -Value $path -Force -ErrorAction Stop
 }
 catch {
 Write-Warning "Reg key edit error [$reg_key] [$name]"
 }
 }
 }
 Catch {
 Write-Error "Check permissions to files or registry."
 }
 }
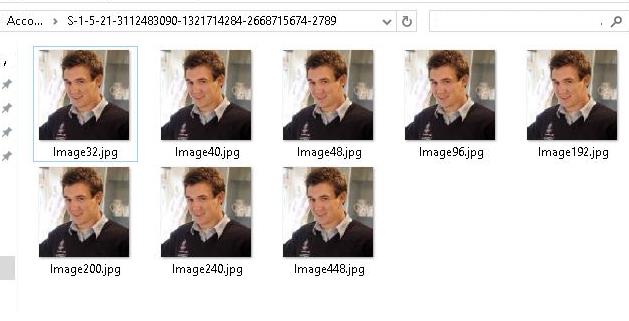
The script gets the value of thumbnailphoto attribute of the current user from Active Directory and saves it to the local folder C:\Users\Public\AccountPictures\{User SID}. The folder will contain JPG files with different resolutions for different Windows interface elements: image32.jpg (32×32), image40.jpg (40×40), etc.
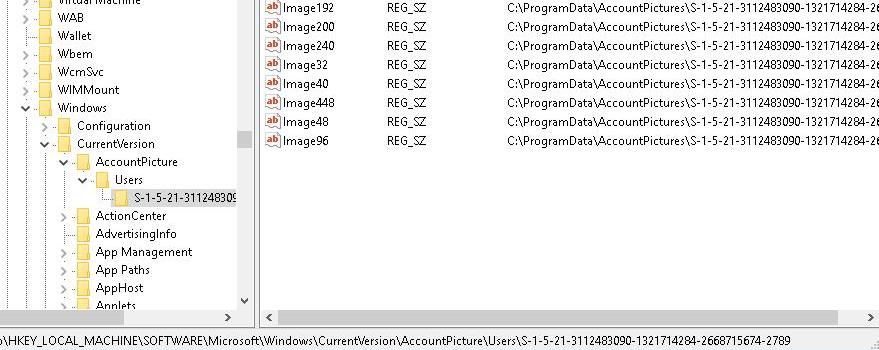
In order to bind these photo files to a user profile, the script will create mappings under the registry key HKLM\SOFTWARE\Microsoft\Windows\CurrentVersion\AccountPicture\Users\{User_SID}.
Copy the PowerShell script code and save it to a new PS1 file on a domain controller in the NetLogon folder ( \\woshub.com\NETLOGON\SetADPicture.ps1 )
You need to run this PowerShell script when the user logs into Windows. The easiest way to implement this is to use the GPO logon script feature.
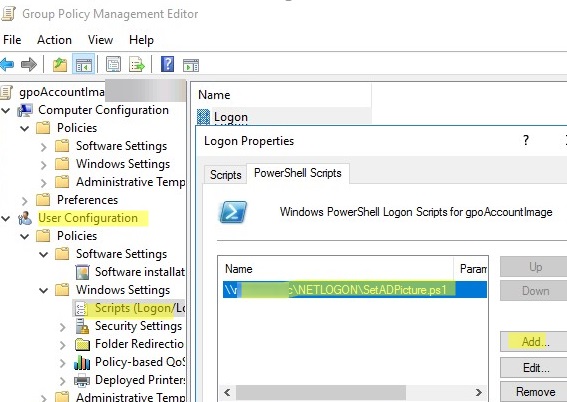
- To do it, open the previously created GPO and navigate to User Configuration -> Policies -> Windows Settings -> Scripts (Logon/Logoff);
- Select Logon, go to the PowerShell Scripts tab, and click Add;
- Specify the full UNC path to the SetADPicture.ps1 script file in NETLOGON.
You must log out and log in (twice) to apply the new GPO settings and set your Active Directory photo to your Windows user profile.
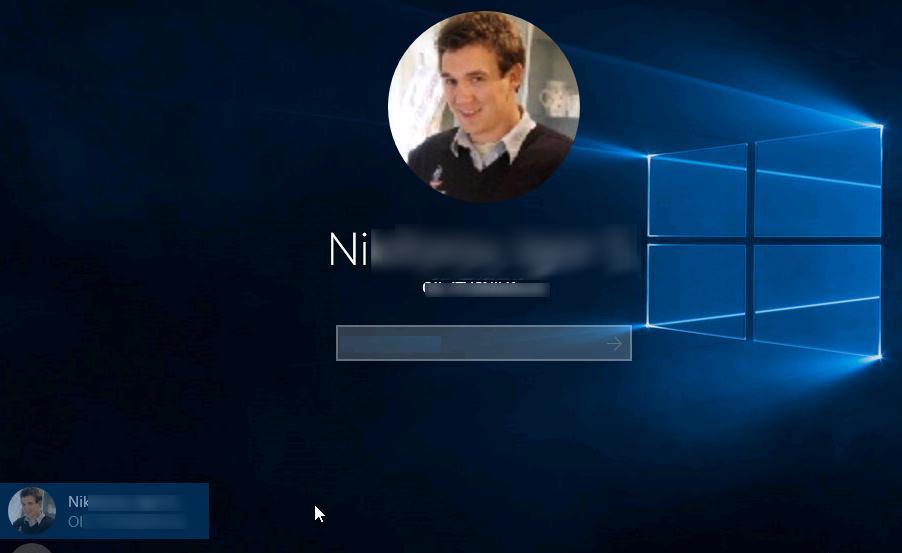
Check if the user’s photo from AD is now displayed on the Windows Login Screen, Start Menu, and in other interface elements. For example, check your user image on the Account tab in the Settings panel (shortcut URI command ms-settings:accounts).
![]()
If the policy didn’t work:
- If Windows is not activated, it will not display the user’s avatar (check Windows activation status on user computers);
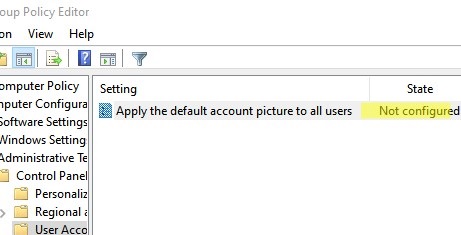
- Check the resulting GPO settings and make sure that the policy Apply the default logon picture to all users (Computer Settings-> Policies-> Administrative Templates-> Control Panel-> User Accounts) is not enabled;

- Troubleshoot Group Policy on target computers with the gpresult tool.
3 comments
Hi I tried all your steps it works on Windows server 2016 but the picture doesnt show on Windows 7 client
Please advise
You can setup picture from AD on Windows 7 client with the help of tool https://adusertile.codeplex.com/
“Project Description
When you deploy user pictures in AD, using thumbnailPhoto atribute, and visible in Lync or Exchange address book, they are not by default set on User Tile in logon screen or explorer of Windows 7 or Windows Vista.
This program runs as GPO startup script, and sets user tile from Active Directory”
Good afternoon, thank you for your collaboration, I am writing to you from Venezuela, I am telling you: the Scripts works perfectly in Windows 10, but I wanted to see if they can help me with anything, starting the session with the user the image of perfir loads without problem the detail is that it looks pixelated and does not have the sharpness, I wanted to know if you know if there is an option in the Scripts to make the image look sharper, thanks in advance I will be attentive to your comments …