The Remote Server Administration Tools (RSAT) enable IT administrators to remotely manage roles and features on Windows Server hosts from Windows workstations or other servers. The RSAT tools include management MMC snap-ins, command-line tools, and PowerShell modules. When installing RSAT tools, users can select the specific remote management and administration tools they need. RSAT can be installed on Windows in two ways: through the GUI or the command prompt using PowerShell or DISM commands. This article explains how to install the Remote Server Administration Tools (RSAT) on Windows 11/10 workstations, hosts running Windows Server 2025/2022/2019/2016, and offline computers in isolated networks.
- Install RSAT Tools on Windows 11/10
- How to Install RSAT on Previous Versions of Windows (10, 8.1, or 7)
- Installing RSAT Tools on Windows with PowerShell
- How to Install Remote Server Administration Tools on Windows Server
- Fix RSAT Tools Installation Error 0x800f0954 on Windows
- Offline RSAT Installation Using the FoD Image
- How to Remove RSAT Tools from Windows
Install RSAT Tools on Windows 11/10
In Windows 11 and recent Windows 10 builds, RSAT components are included in the Feature on Demand (FoD) component set. These features are missing from the Windows image, but they can be downloaded and installed on demand from the Windows Update servers.
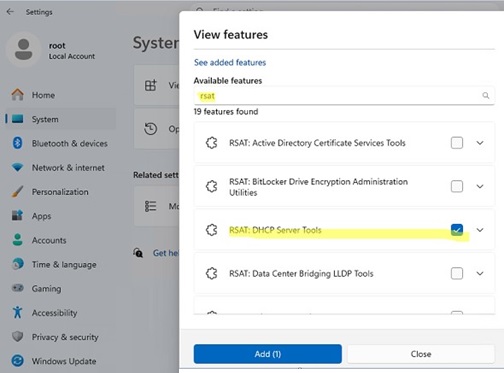
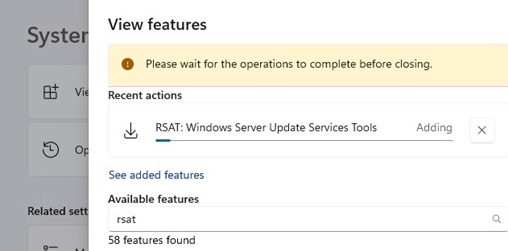
On Windows 11, RSAT administrative tools can be installed via the Settings app. Go to Settings -> Apps -> Optional Features -> Add an optional feature.
Type RSAT into the search bar to view the available features.
The following RSAT administration tools can be installed on Windows (the set of RSAT options available on Windows 11/10 desktop editions is slightly smaller than the list of tools available on Windows Server):
- RSAT: Active Directory Domain Services and Lightweight Directory Services Tools
- RSAT: BitLocker Drive Encryption Administration Tools for AD
- RSAT: Active Directory Certificate Services Tools
- RSAT: DHCP Server Tools
- RSAT: DNS Server Tools
- RSAT: Failover Clustering Tools
- RSAT: File Services Tools
- RSAT: Group Policy Management Tools – GPO management console and the Group Policy module for PowerShell
- RSAT: IP Address Management (IPAM) Client
- RSAT: Data Center Bridging LLDP Tools
- RSAT: Network Controller Management Tools
- RSAT: Network Load Balancing Tools
- RSAT: Remote Access Management Tools
- RSAT: Remote Desktop Services Tools
- RSAT: Server Manager
- RSAT: Shielded VM Tools
- RSAT: Storage Migration Service Management Tools
- RSAT: Storage Replica Module for Windows PowerShell
- RSAT: System Insights Module for Windows PowerShell
- RSAT: Volume Activation Tools (KMS activation server console)
- RSAT: Windows Server Update Services Tools.
Select the required RSAT components and click Install.
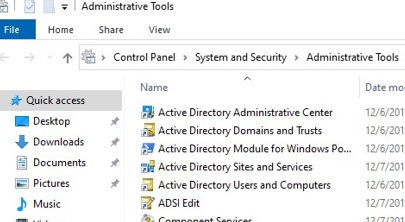
After installation, RSAT graphical MMC snap-ins are accessible in the Windows Tools (in Windows 11), the Administrative Tools section in Control Panel (Control Panel\System and Security\Administrative Tools) or under the folder %ProgramData%\Microsoft\Windows\Start Menu\Programs\Administrative Tools.
How to Install RSAT on Previous Versions of Windows (10, 8.1, or 7)
In earlier Windows 10 versions (prior to build 1809) and Windows 8.1, RSAT tools can be enabled after installing the separate KB2693643 update, which requires manually downloading the MSU file from the Microsoft website (https://www.microsoft.com/en-us/download/details.aspx?id=45520). Windows 7 requires update KB958830 to enable RSAT tools.
After installing the KB2693643 update, you can enable the necessary RSAT tools from the Control Panel -> Programs and Features -> Turn Windows features on or off (optionalfeatures.exe). Expand the Remote Server Administration Tools and select the admin tools that you want to enable.

Installing RSAT Tools on Windows with PowerShell
The RSAT tools can be installed on Windows 10 and 11 using PowerShell or DISM commands.
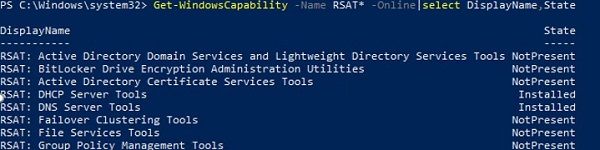
Open a PowerShell console and list the available RSAT features on a computer:
Get-WindowsCapability -Name RSAT* -Online | Select-Object -Property DisplayName, State
In this example, the DHCP and DNS management tools are installed (Installed), while all other RSAT modules are missing (NotPresent).
To install a specific RSAT feature on Windows, use the PowerShell cmdlet Add-WindowsCapability. The RSAT component’s system name must be specified as an argument to the command. Use the following command to display a complete list of available RSAT tool names in Windows 11:
Get-WindowsCapability -Name RSAT* -Online | Select-Object -Property Name, DisplayName, State
| RSAT tool name |
| Rsat.ActiveDirectory.DS-LDS.Tools~~~~0.0.1.0 |
| Rsat.AzureStack.HCI.Management.Tools~~~~0.0.1.0 |
| Rsat.BitLocker.Recovery.Tools~~~~0.0.1.0 |
| Rsat.CertificateServices.Tools~~~~0.0.1.0 |
| Rsat.DHCP.Tools~~~~0.0.1.0 |
| Rsat.Dns.Tools~~~~0.0.1.0 |
| Rsat.FailoverCluster.Management.Tools~~~~0.0.1.0 |
| Rsat.FileServices.Tools~~~~0.0.1.0 |
| Rsat.GroupPolicy.Management.Tools~~~~0.0.1.0 |
| Rsat.IPAM.Client.Tools~~~~0.0.1.0 |
| Rsat.LLDP.Tools~~~~0.0.1.0 |
| Rsat.NetworkController.Tools~~~~0.0.1.0 |
| Rsat.NetworkLoadBalancing.Tools~~~~0.0.1.0 |
| Rsat.RemoteAccess.Management.Tools~~~~0.0.1.0 |
| Rsat.RemoteDesktop.Services.Tools~~~~0.0.1.0 |
| Rsat.ServerManager.Tools~~~~0.0.1.0 |
| Rsat.StorageMigrationService.Management.Tools~~~~0.0.1.0 |
| Rsat.StorageReplica.Tools~~~~0.0.1.0 |
| Rsat.SystemInsights.Management.Tools~~~~0.0.1.0 |
| Rsat.VolumeActivation.Tools~~~~0.0.1.0 |
| Rsat.WSUS.Tools~~~~0.0.1.0 |
To install a specific RSAT tool, for example, the AD management tools (which include the ADUC console and the Active Directory module for Windows PowerShell), run the command:
Add-WindowsCapability –online –Name Rsat.ActiveDirectory.DS-LDS.Tools~~~~0.0.1.0
To install the DNS management console and the PowerShell DNSServer module, run:
Add-WindowsCapability –online –Name Rsat.Dns.Tools~~~~0.0.1.0
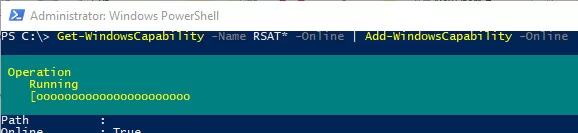
To install all RSAT tools at once, run:
Get-WindowsCapability -Name RSAT* -Online | Add-WindowsCapability –Online
Now, check that the RSAT tools are installed (Installed state).

DISM.exe command can also be used to install RSAT tools on Windows:DISM.exe /Online /add-capability /CapabilityName:Rsat.ActiveDirectory.DS-LDS.Tools~~~~0.0.1.0 /CapabilityName:Rsat.GroupPolicy.Management.Tools~~~~0.0.1.0 /CapabilityName:Rsat.WSUS.Tools~~~~0.0.1.0
How to Install Remote Server Administration Tools on Windows Server
RSAT tools can be installed on Windows Server 2025/2022/2019/2019 without an internet connection. The RSAT components are typically installed automatically when the corresponding Windows Server roles or features are installed. Or you can add them manually using the Server Manager (Add Roles and Features -> Features -> Remote Server Administration Tools). The RSAT components are available under both the Feature Administration Tools and Role Administration Tools sections. Select the tools you want to install and click Next -> Next.

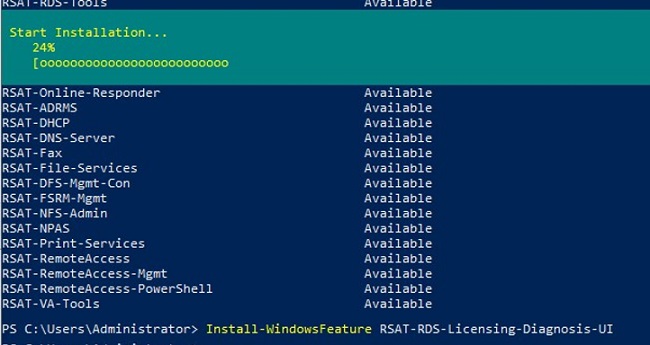
Use the Install-WindowsFeature cmdlet to install RSAT features on Windows Server. List the available RSAT tools on Windows Server:
Get-WindowsFeature -Name RSAT*
Specify the name of the required RSAT feature to install it. For example, let’s install the RDS Licensing Diagnosis console:
Install-WindowsFeature RSAT-RDS-Licensing-Diagnosis-UI
Install the Hyper-V Manager remote management console and the Hyper-V PowerShell module:
Get-WindowsFeature | Where-Object {$_.Name -like "RSAT-Hyper-V-Tools"}| Install-WindowsFeature -IncludeAllSubFeature
You can access installed graphical RSAT consoles from Server Manager or via the Control Panel.
Fix RSAT Tools Installation Error 0x800f0954 on Windows
If your Windows computer is configured to receive updates from a local update server (WSUS) or SCCM (Configuration Manager) Software Update Point (SUP), you may receive error 0x800f0954 when attempting to add RSAT tools using the GUI, Add-WindowsCapability, or DISM:
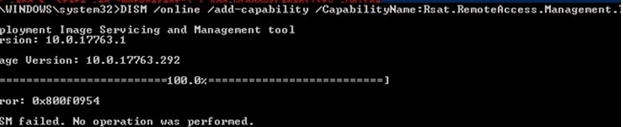
The problem in this case is that Windows attempts to download the RSAT package from your local update server, resulting in a 0x800f0954 error.
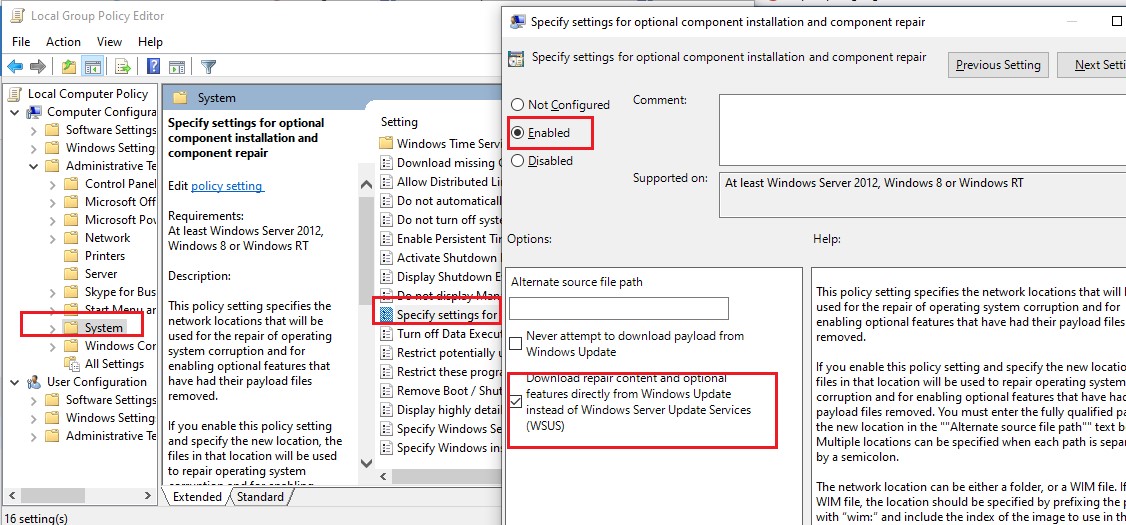
To bypass the local WSUS when installing optional Windows features and Features on Demand (including RSAT), you must enable the special Group Policy option
- Open the local GPO editor
gpedit.mscor use the domain Group Policy Management Console (gpmc.msc) - Go to the Computer Configuration -> Administrative Templates -> System
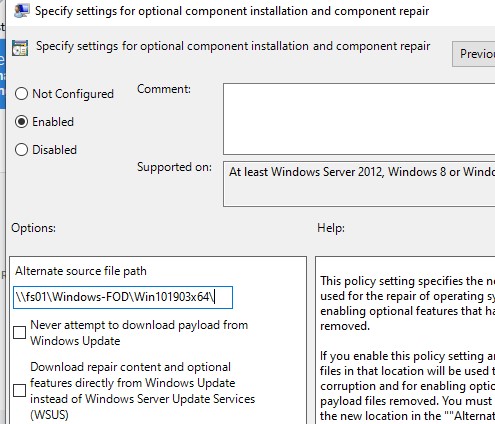
- Enable the policy Specify settings for optional component installation and component repair, and check the option Download repair content and optional features directly from Windows Updates instead of Windows Server Updates Services (WSUS)

- Save the changes and update Group Policy settings (
gpupdate /force); - Restart the Windows Update service:
net stop wuauserv
net start wuauserv - The installation of RSAT using PowerShell or DISM should now be completed without any errors
Alternatively, you can temporarily disable local WSUS usage via the UseWUServer registry parameter, install RSAT, and then restore the parameter to its original value.
Disable the Windows Update service and change the UseWUServer value to 0:
Stop-Service wuauserv
 Set-ItemProperty -Path "HKLM:\SOFTWARE\Policies\Microsoft\Windows\WindowsUpdate\AU" -Name "UseWUServer" -Value 0
 Start-Service wuauserv
Start the installation of the required RSAT feature:
Add-WindowsCapability –online –Name Rsat.ActiveDirectory.DS-LDS.Tools~~~~0.0.1.0
Set the UseWUServer parameter to its original value:
Stop-Service wuauserv
 Set-ItemProperty -Path "HKLM:\SOFTWARE\Policies\Microsoft\Windows\WindowsUpdate\AU" -Name "UseWUServer" -Value 1
 Start-Service wuauserv
HKLM\SOFTWARE\Policies\Microsoft\Windows\WindowsUpdate:DoNotConnectToWindowsUpdateInternetLocations= 0DisableWindowsUpdateAccess= 0
Then restart the wuauserv service.
Offline RSAT Installation Using the FoD Image
If you cannot access the Microsoft Update servers directly from your workstation, you can use an offline RSAT installation. This is recommended for corporate networks that are disconnected from the internet.
For offline RSAT installation, download the Languages and Optional Features for Windows 11 ISO image containing the Feature on Demand (FoD) components matching your Windows 10/11 version from the Microsoft website (https://learn.microsoft.com/en-us/azure/virtual-desktop/windows-11-language-packs)
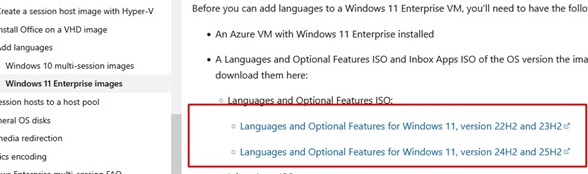
For example, for Windows 11 25H2, download the image W11-25H2-FoD-26100.1.240331-1435.ge_release_amd64fre_CLIENT_LOF_PACKAGES_OEM.iso. Mount this ISO image in Windows. To install the RSAT tools from a local source, use the -Source parameter to specify the path to the LanguagesAndOptionalFeatures folder in the offline FoD image:
Add-WindowsCapability -Online -Name Rsat.ActiveDirectory.DS-LDS.Tools~~~~0.0.1.0 -Source D:\LanguagesAndOptionalFeatures -LimitAccess

You can also use the above Group Policy option to specify the path to the directory containing the FoD image files. To do this, specify the UNC path to the directory containing the FoD files in the Alternative source file path parameter.
Or, you can set this parameter via the registry with a Group Policy Preferences by specifying the path to the FoD directory in the LocalSourcePath parameter (REG_Expand_SZ) under the registry key HKLM\SOFTWARE\Microsoft\Windows\CurrentVersion\Policies\Servicing.
Users will now be able to install the RSAT feature independently via the Optional Features graphical interface in Windows.
DISM.exe /Online /Add-Package /PackagePath:WindowsTH-KB2693643-x64.cab
Common Remote Server Administration Tools Installation Errors on Windows:
- 0x8024402c, 0x80072f8f – Windows cannot access the Windows Update servers to download the RSAT binary files. Check that you have Internet access, or install the components from a local FoD image:
Add-WindowsCapability -Online -Name Rsat.Dns.Tools~~~~0.0.1.0 -LimitAccess -Source D:\LanguagesAndOptionalFeatures - 0x800f081f – check the path to the directory containing the RSAT components specified in the
–Sourceparameter - 0x800f0950 – the error is similar to 0x800f0954
- 0x80070490 – check and repair your Windows image using DISM:
DISM /Online /Cleanup-Image /RestoreHealth
How to Remove RSAT Tools from Windows
To uninstall a specific RSAT feature on Windows, use the command:
Remove-WindowsCapability -Online -Name Rsat.ActiveDirectory.DS-LDS.Tools~~~~0.0.1.0

So, we looked at how to install the RSAT administration tools on Windows, which can be used to remotely manage various server roles on Windows Server hosts.
35 comments
What I did in my work computer was: Try to install all RSAT features using PowerShell, error 0x800f0954 showed up, then I wen to settings, Windows Update, search online for updates. Then it downloaded and installed all RSAT tools for me, without having to disable WSUS.
Get-WindowsCapability -Name RSAT* -Online | where State -EQ NotPresent |select name| Add-WindowsCapability -Online
just a few typos in there otherwise good work.
You have the following in a few spots
Add-WindowsCapacity
Should be
Add-WindowsCapability
Thanks! I fixed the error
You’re missing one, guys:
“You can use the Add-WindowsCapacity cmdlet to install RSAT features on Windows.”
Thanks!
I can’t see BitLocker Recovery Key or BitLocker tab even tough it’s installed. I wondering if is it a bug?!
Love the article!
The command to install only disabled RSAT components can be made simpler. Like this:
Get-WindowsCapability -Name RSAT* -Online | where State -EQ NotPresent | Add-WindowsCapability -Online
[My New Blog Post]: Quick Start Guide RSAT Windows 10 1903 Offline Feature On Demand – SCCM-MDT OSD.
Use this quick guide to install RSAT tools for Windows 10 1903 (or 1809) without the need for an internet connection when using an SCCM or MDT OS Deployment task sequence.
Sure you can find ONLINE PowerShell scripts but that requires an internet connection. This blog post removes that need for customers. #Windows10 #MDT #WaaS #SCCM
[…] этой ситуации администраторы используют разные пути. Некоторые идут по пути наименьшего сопротивления, не заморачиваясь при этом вопросами удобства и […]
“(…) starting from Windows 10 1809 (17763), it is no longer necessary to download the latest version of RSAT from Microsoft. Now, the Remote Server Administration Tools package is built into the Windows 10 image (…)”
It’s incorrect – you still have to download RSAT from Microsoft (if it were already in the Windows 10 image, why the need to connect to Windows Update?). If you are offline it seems that a iso from VLSC is needed to add this feature.
Thanks for you post – it helped me to eventually get these tools installed. As a dinosaur not yet well-versed in using PowerShell, your script was very useful.
This is the best write up/article i have come across for this topic!
Thanks for taking the time to share, its a very valuable reference.
Finally a solution that works (without need to download iso image).
Thank you!
Very useful post! Thanks mate! I needed to read until the bottom. The WSUS regkey finally made my day.
Getting the following error while installing RSAT for 1809 via PS:
Any suggestions?
=============
Add-WindowsCapability : Add-WindowsCapability failed. Error code = 0x8024402c
At line:1 char:1
+ Add-WindowsCapability –online –Name Rsat.ActiveDirectory.DS-LDS.Tools …
+ ~~~~~~~~~~~~~~~~~~~~~~~~~~~~~~~~~~~~~~~~~~~~~~~~~~~~~~~~~~~~~~~~~~~~~
+ CategoryInfo : NotSpecified: (:) [Add-WindowsCapability], COMException
+ FullyQualifiedErrorId : Microsoft.Dism.Commands.AddWindowsCapabilityCommand
=========
Thanks,
Sabir
Open the Group Policy Editorr (gpedit.msc) -> Computer Configuration -> Admin. Templates -> Windows Components -> Windows Update -> Specify intranet Microsoft update service location -> Disabled
Reboot your computer and try to install RSAT components.
Thanks this was very useful and just what i needed
I get the installation completed successfully. But when I check the status its in “staged” and not “installed” status. How to get these in installed status? Since they are in “Staged” I cannot see any tools.
Hi Hasan,
RSAT does not work for Windows 10 Home (I had this issue) It works only for Professional versions.
Ref: https://docs.microsoft.com/en-us/troubleshoot/windows-server/system-management-components/remote-server-administration-tools
Hope that helps.
Great post! Really got around the subject – thanks!
Hi, Getting the following error while installing RSAT for 20H2 via PS:
Any suggestions?
Add-WindowsCapability -online -Name “Rsat.GroupPolicy.Management.Tools~~~~0.0.1.0” Add-WindowsCapability : Error de Add-WindowsCapability. Código de error = 0x80240438
En línea: 1 Carácter: 1
+ Add-WindowsCapability –online –Name “Rsat.GroupPolicy.Management.Tool …
+ ~~~~~~~~~~~~~~~~~~~~~~~~~~~~~~~~~~~~~~~~~~~~~~~~~~~~~~~~~~~~~~~~~~~~~
+ CategoryInfo : NotSpecified: (:) [Add-WindowsCapability], COMException
+ FullyQualifiedErrorId : Microsoft.Dism.Commands.AddWindowsCapabilityCommand
I get this after when I try to install AD components. ALready did trick with regkey and gpedit.msc
Add-WindowsCapability : Add-WindowsCapability failed. Error code = 0x80072f8f
At line:1 char:1
+ Add-WindowsCapability –online –Name “Rsat.ActiveDirectory.DS-LDS.Tool …
+ ~~~~~~~~~~~~~~~~~~~~~~~~~~~~~~~~~~~~~~~~~~~~~~~~~~~~~~~~~~~~~~~~~~~~~
+ CategoryInfo : NotSpecified: (:) [Add-WindowsCapability], COMException
+ FullyQualifiedErrorId : Microsoft.Dism.Commands.AddWindowsCapabilityCommand
Any suggestions ? Need AD directory ASAP but cant add it :/
Ok, problem solved.
Problem was in domain policy / LAN blocking installation. Connecting workstation to hotspot solved the issue. RSAT finally installed 🙂
Thank you for the very clear and useful information. Using the PS option to disable WSUS helped me through the installation of these tools in an enterprise environment where I do not manage the WSUS server.
For people with gpo set wsus servers and a local computer admin account, you can do the following form an elevated powershell prompt.
Open up the registry editor by typing regedit, navigate to the following path.
HKLM/Software/Policies/Microsoft/Windows/WindowsUpdate/AU/
Change the value from 1 to 0 for the UseWUServer key.
Restart the WSUS Service with the following command.
restart-service “windows update”
Open up a administrative powershell prompt and run the following command.
Get-WindowsCapability -Name RSAT* -Online | Add-WindowsCapability -Online
In the open registry editor, navigate to the following path.
HKLM/Software/Policies/Microsoft/Windows/WindowsUpdate/AU/
Change the value from 0 to 1 for the UseWUServer key.
Restart the WSUS Service with the following command.
restart-service “windows update”
This changes the setting back to original.
no such key in my registry
Installation Error 0x800f0954 on Windows 10, Saving with the same steps for windows 11.
Thx!!
Error 0x800f0954 usually occurs at the time of installing the .NET Framework or sub-components on Windows 10.
Thanks you very mutch for this post.
It’s a very good memento for PowerShell CLI.
I was getting a 0x8024002E error trying to install this DSA and GPMC. Had to set a a regkey HKEY_LOCAL_MACHINE\Software\Policies\Microsoft\Windows\WindowsUpdate –DisableWindowsUpdateAccess key to 0 and then run the powershell commands on administrative powershell window. That got them installed.
The add feature operation didn’t work. Thanks for this page. really helpful.
Thanks a lot, it worked.
do you know where I get the Feature on Demand (FOD) Disk 1, do I need to install rsat offline or will the Windows 11 edition ISO also work?
RSAT can be installed either online or from an offline FoD image, but not from the Windows 11 install ISO.