In Windows, you can manage the settings for your network adapters not only from the GUI but also from the PowerShell command prompt. In this article, we’ll look at the most important cmdlets that you can use to find out the current IP address of a network adapter, assign a static IP address, assign a DNS server IP, or configure a network interface to receive an IP configuration from a DHCP server. You can use these cmdlets to configure networking on both Windows 10/11 and Windows Server (or Server Core editions), Hyper-V Server, to change the IP settings of network adapters on remote computers, and in your PowerShell automation scripts.
- Managing Network Adapter Settings via PowerShell
- How to Get an IP Address Settings with PowerShell
- Set Static IP Address on Windows Using PowerShell
- Set DNS Server IP Addresses in Windows with PowerShell
- Managing Routing Tables with PowerShell
- PowerShell: Change Adapter from Static IP Address to DHCP
- Change DNS and IP Addresses Remotely on Multiple Computers with PowerShell
Previously, the netsh interface ipv4 command was used to manage network settings from the CLI. In PowerShell 3.0 and newer, you can use the built-in NetTCPIP PowerShell module to manage network settings on Windows.
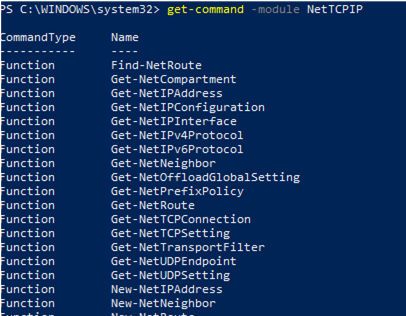
To get the list of cmdlets in this module, run the following command:
get-command -module NetTCPIP
Managing Network Adapter Settings via PowerShell
List available network interfaces on a Windows computer:
Get-NetAdapter
The cmdlet returns the interface name, its state (Up/Down), MAC address, and port speed.
In this example, I have several network adapters on my computer (besides the physical connection, Ethernet0, I have Hyper-V and VMWare Player network interfaces).
To display only enabled physical network interfaces:
Get-NetAdapter -Physical | ? {$_.Status -eq "Up"}

You can view only certain network adapter parameters, such as name, speed, status, or MAC address:
Get-NetAdapter |Select-Object name,LinkSpeed,InterfaceOperationalStatus,MacAddress

Get-NetAdapter –IncludeHidden
The result will be a list of all virtual WAN Miniport adapters that are used for different types of connections, including VPN. A reboot of these adapters often fixes some VPN connection errors with the built-in Windows client. There are separate PowerShell cmdlets for managing VPN connections.
You can refer to network interfaces by their names or indexes (the Index column). In our example, to select the physical LAN adapter Intel 82574L Gigabit Network Connection, use the command:
Get-NetAdapter -Name Ethernet0
or:
Get-NetAdapter -InterfaceIndex 8

You can change the adapter name:
Rename-NetAdapter -Name Ethernet0 -NewName LAN
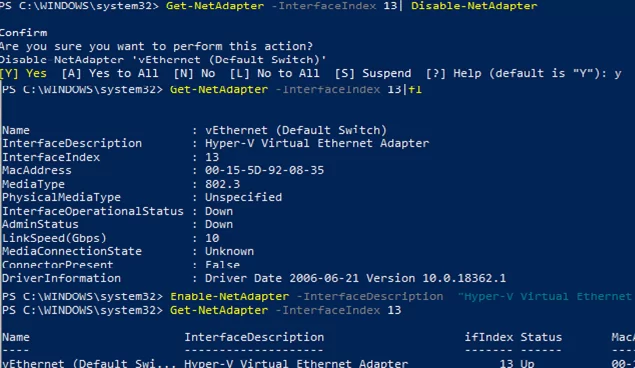
To disable a network interface, use this command:
Get-NetAdapter -Name Ethernet0| Disable-NetAdapter
Enable the NIC by its name:
Enable-NetAdapter -Name Ethernet0
If the network adapter has a configured VLAN number, you can view it:
Get-NetAdapter | ft Name, Status, Linkspeed, VlanID
Here is how you can find out the information about the network adapter driver that you are using:
Get-NetAdapter | ft Name, DriverName, DriverVersion, DriverInformation, DriverFileName

List the information about physical network adapters (PCI slot, bus, etc.):
Get-NetAdapterHardwareInfo
Disable the IPv6 protocol for the network interface:
Get-NetAdapterBinding -InterfaceAlias Ethernet0 | Set-NetAdapterBinding -Enabled:$false -ComponentID ms_tcpip6
Disable the NetBIOS protocol for a network interface:
Set-NetAdapterBinding -Name Ethernet0 -ComponentID ms_netbios -AllBindings -Enabled $True
How to Get an IP Address Settings with PowerShell
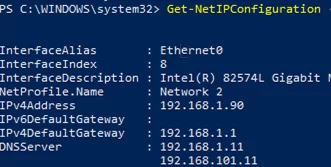
To get current network adapter settings in Windows (IP address, DNS, default gateway):
Get-NetIPConfiguration -InterfaceAlias Ethernet0
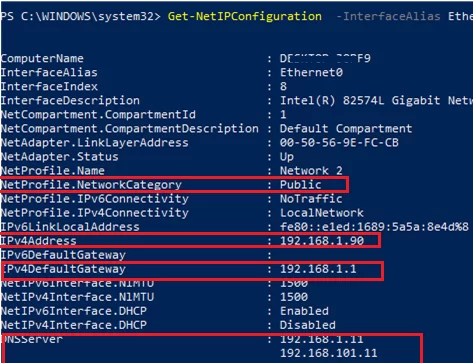
To display more detailed information about the network interface TCP/IP configuration, use the command
Get-NetIPConfiguration -InterfaceAlias Ethernet0 -Detailed
In this case, the assigned network location (profile) (NetProfile.NetworkCategory) of the interface, MTU settings (NetIPv4Interface.NlMTU), whether obtaining an IP address from DHCP is enabled (NetIPv4Interface.DHCP), and other useful information are displayed.
To get the IPv4 interface address only:
(Get-NetAdapter -Name ethernet0 | Get-NetIPAddress).IPv4Address
Return the value of the interface’s IP address only:
(Get-NetAdapter -Name ethernet0 | Get-NetIPAddress).IPv4Address
Set-NetTCPSetting -SettingName DatacenterCustom,Datacenter -CongestionProvider DCTCP
 Set-NetTCPSetting -SettingName DatacenterCustom,Datacenter -CwndRestart True
 Set-NetTCPSetting -SettingName DatacenterCustom,Datacenter -ForceWS Disabled
Display a list of the network protocols that can be enabled or disabled for a network adapter:
Get-NetAdapterBinding -Name ethernet0 -IncludeHidden -AllBindings
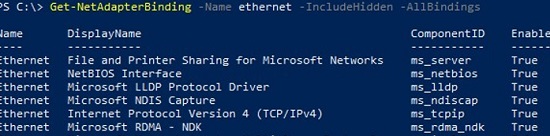
Name                           DisplayName                                        ComponentID          Enabled
----                           -----------                                        -----------          -------
Ethernet                       File and Printer Sharing for Microsoft Networks    ms_server            True
Ethernet                       NetBIOS Interface                                  ms_netbios           True
Ethernet                       Microsoft LLDP Protocol Driver                     ms_lldp              True
Ethernet                       Microsoft NDIS Capture                             ms_ndiscap           True
Ethernet                       Internet Protocol Version 4 (TCP/IPv4)             ms_tcpip             True
Ethernet                       Microsoft RDMA - NDK                               ms_rdma_ndk          True
Ethernet                       Microsoft Network Adapter Multiplexor Protocol     ms_implat            False
Ethernet                       Link-Layer Topology Discovery Mapper I/O Driver    ms_lltdio            True
Ethernet                       NDIS Usermode I/O Protocol                         ms_ndisuio           True
Ethernet                       Point to Point Protocol Over Ethernet              ms_pppoe             True
Ethernet                       Link-Layer Topology Discovery Responder            ms_rspndr            True
Ethernet                       Internet Protocol Version 6 (TCP/IPv6)             ms_tcpip6            True
Ethernet                       Hyper-V Extensible Virtual Switch                  vms_pp               False
Ethernet                       WFP Native MAC Layer LightWeight Filter            ms_wfplwf_lower      True
Ethernet                       Client for Microsoft Networks                      ms_msclient          True
Ethernet                       Npcap Packet Driver (NPCAP)                        INSECURE_NPCAP       True
Ethernet                       WINS Client(TCP/IP) Protocol                       ms_netbt             True
Ethernet                       Bridge Driver                                      ms_l2bridge          True
Ethernet                       WFP 802.3 MAC Layer LightWeight Filter             ms_wfplwf_upper      True
Ethernet                       QoS Packet Scheduler                               ms_pacer             True
Set Static IP Address on Windows Using PowerShell
Let’s try to set a static IP address for the NIC. To change an IP address, network mask, and default gateway for an Ethernet0 network interface, use the command:
Get-NetAdapter -Name Ethernet0| New-NetIPAddress –IPAddress 192.168.2.50 -DefaultGateway 192.168.2.1 -PrefixLength 24
You can set an IP address using an array structure (more visually):
$ipParams = @{
 InterfaceIndex = 8
 IPAddress = "192.168.2.50"
 PrefixLength = 24
 AddressFamily = "IPv4"
 }
 New-NetIPAddress @ipParams
If a static IP address is already configured and needs to be changed, use the Set-NetIPAddress cmdlet:
Set-NetIPAddress -InterfaceAlias Ethernet0 -IPAddress 192.168.2.90
To disable obtaining an IP address from DHCP for your adapter, run the command:
Set-NetIPInterface -InterfaceAlias Ethernet0 -Dhcp Disabled
Remove static IP address:
Remove-NetIPAddress -IPAddress "xxx.xxx.xxx.xxx"
Set DNS Server IP Addresses in Windows with PowerShell
To set the preferred and alternate DNS server IP addresses in Windows, use the Set-DNSClientServerAddress cmdlet. For example:
Set-DNSClientServerAddress –InterfaceIndex 8 –ServerAddresses 192.168.2.11,10.1.2.11
You can also specify DNS nameserver IPs using an array:
$dnsParams = @{
 InterfaceIndex = 8
 ServerAddresses = ("8.8.8.8","8.8.4.4")
 }
 Set-DnsClientServerAddress @dnsParams
After changing the DNS settings, you can flush the DNS resolver cache (equivalent to ipconfig /flushdns ):
Clear-DnsClientCache
Get-DnsClientCacheManaging Routing Tables with PowerShell
The Get-NetRoute cmdlet is used to display the routing table.
Get the default gateway route for a physical network interface in Windows:
Get-NetAdapter -Physical | ? {$_.Status -eq "Up"}| Get-netroute| where DestinationPrefix -eq "0.0.0.0/0"

To add a new route, use the New-NetRoute cmdlet:
New-NetRoute -DestinationPrefix "0.0.0.0/0" -NextHop "192.168.2.2" -InterfaceIndex 8
This command adds a permanent route to the routing table (similar to route -p add). If you want to add a temporary route, add the -PolicyStore "ActiveStore" option. This route will be deleted after restarting Windows.
Remove a route from the routing table:
Remove-NetRoute -NextHop 192.168.0.1 -Confirm:$False
PowerShell: Change Adapter from Static IP Address to DHCP
To configure your computer to obtain a dynamic IP address for the network adapter from the DHCP server, run this command:
Set-NetIPInterface -InterfaceAlias Ethernet0 -Dhcp Enabled
Clear the DNS server settings:
Set-DnsClientServerAddress –InterfaceAlias Ethernet0 -ResetServerAddresses
And restart your network adapter to automatically obtain an IP address from the DHCP server:
Restart-NetAdapter -InterfaceAlias Ethernet0
If you previously had a default gateway configured, remove it:
Set-NetIPInterface -InterfaceAlias Ethernet0| Remove-NetRoute -Confirm:$false
If you need to reset all the IPv4 settings for the computer’s network interfaces and switch them to obtain a dynamic IP address from DHCP, use the following script:
$IPType = "IPv4"
 $adapter = Get-NetAdapter | ? {$_.Status -eq "up"}
 $interface = $adapter | Get-NetIPInterface -AddressFamily $IPType
 If ($interface.Dhcp -eq "Disabled") {
 If (($interface | Get-NetIPConfiguration).Ipv4DefaultGateway) {
 $interface | Remove-NetRoute -Confirm:$false
 }
 $interface | Set-NetIPInterface -DHCP Enabled
 $interface | Set-DnsClientServerAddress -ResetServerAddresses
 }
Change DNS and IP Addresses Remotely on Multiple Computers with PowerShell
You can use PowerShell to remotely change the IP address or DNS server settings on multiple remote computers.
Suppose, your task is to change the DNS settings on all Windows Server hosts in the specific AD Organizational Unit (OU). The following script uses the Get-ADComputer cmdlet to get the list of computers from Active Directory and then connects to the remote computers through WinRM (the Invoke-Command cmdlet is used):
$Servers = Get-ADComputer -SearchBase ‘OU=Servers,OU=Berlin,OU=DE,DC=woshub,DC=cpm’ -Filter '(OperatingSystem -like "Windows Server*")' | Sort-Object Name
 ForEach ($Server in $Servers) {
 Write-Host "Server $($Server.Name)"
 Invoke-Command -ComputerName $Server.Name -ScriptBlock {
 $NewDnsServerSearchOrder = "192.168.2.11","8.8.8.8"
 $Adapters = Get-WmiObject Win32_NetworkAdapterConfiguration | Where-Object {$_.DHCPEnabled -ne 'True' -and $_.DNSServerSearchOrder -ne $null}
 Write-Host "Old DNS settings: "
 $Adapters | ForEach-Object {$_.DNSServerSearchOrder}
 $Adapters | ForEach-Object {$_.SetDNSServerSearchOrder($NewDnsServerSearchOrder)} | Out-Null
 $Adapters = Get-WmiObject Win32_NetworkAdapterConfiguration | Where-Object {$_.DHCPEnabled -ne 'True' -and $_.DNSServerSearchOrder -ne $null}
 Write-Host "New DNS settings: "
 $Adapters | ForEach-Object {$_.DNSServerSearchOrder}
 }
 }
9 comments
Lovely like always!
many thanks
Thanks for the great info.
Would you happen to know a way to get the IP from the PC and then set the internet proxy using the 2nd octet from the IP address?
So I have multiple schools and each has a proxy server, so I want to be able to set the proxy based on where that PC is.
Location 1 gives PC IP address of 100.55.50.100, Proxy at this location is 100.55.100.1:9090
Location 2 gives PC IP address of 100.60.50.26, Proxy at this location is 100.60.100.1:9090
The second octet is what changes between locations for both proxy address and IP schema.
I am trying to do a script at login for the user, so that if the device moves locations, it will not need to have the proxy manually re-entered to get back on the internet.
I think it will be easier for you to configure the Web Proxy Automatic Detection (WPAD) protocol or Proxy Auto-Configuration (PAC) file to automatically configure proxy setting on client computers.
Cheers!
Double thumbs up, well done.
Any Idea how to modify the Connection specific DNS suffix for a network adapter via powershell if possible?
Wow, amazing work!
Was wondering if you know a way to set a static ip for a network adapter without it disconnecting UDP/TCP connections?
Hi,
Could you or anyone help to create two scripts that:
script #1. Reads and records all IP settings for a NIC (IP-, subnet mask-, gateway-, and DNS addresses)
script #2. Changes the IP settings to the settings recorded by script 1
Script 1. Saves all network adapters settings to a json file:
$adapterSettings = @()foreach ($adapter in $adapters) {
$settings = Get-NetIPAddress -InterfaceIndex $adapter.InterfaceIndex
$dns = Get-DnsClientServerAddress -InterfaceIndex $adapter.InterfaceIndex
$adapterInfo = [PSCustomObject]@{
AdapterName = $adapter.Name
IPAddress = $settings.IPAddress
SubnetMask = $settings.PrefixLength
Gateway = $settings.NextHop
DNS = $dns.ServerAddresses
}
$adapterSettings += $adapterInfo
}
$adapterSettings | ConvertTo-Json | Out-File -FilePath "C:\PS\NIC_Settings.json"
Script 2: Apply network settings from file to NICs:
$adapterSettings = Get-Content -Raw -Path "C:\PS\NIC_Settings.json"| ConvertFrom-Jsonforeach ($adapterInfo in $adapterSettings) {
Set-NetIPAddress -InterfaceAlias $adapterInfo.AdapterName -IPAddress $adapterInfo.IPAddress -PrefixLength $adapterInfo.SubnetMask
Set-NetIPInterface -InterfaceAlias $adapterInfo.AdapterName -InterfaceMetric $null
Set-DnsClientServerAddress -InterfaceAlias $adapterInfo.AdapterName -ServerAddresses $adapterInfo.DNS
Set-NetRoute -InterfaceAlias $adapterInfo.AdapterName -NextHop $adapterInfo.Gateway
}
Restart-NetAdapter -Confirm:$false