Windows OS Hub
  • Windows
    • Windows 11
    • Windows 10
    • Windows Server 2025
    • Windows Server 2022
    • Windows Server 2019
    • Windows Server 2016
  • Microsoft
    • Active Directory (AD DS)
    • Group Policies (GPOs)
    • Exchange Server
    • Azure and Microsoft 365
    • Microsoft Office
  • Virtualization
    • VMware
    • Hyper-V
    • Proxmox
  • PowerShell
  • Linux
  • Home
  • About

Windows OS Hub

  • Windows
    • Windows 11
    • Windows 10
    • Windows Server 2025
    • Windows Server 2022
    • Windows Server 2019
    • Windows Server 2016
  • Microsoft
    • Active Directory (AD DS)
    • Group Policies (GPOs)
    • Exchange Server
    • Azure and Microsoft 365
    • Microsoft Office
  • Virtualization
    • VMware
    • Hyper-V
    • Proxmox
  • PowerShell
  • Linux

 Windows OS Hub / Windows 10 / How to Set (Change) the Default Printer in Windows 10 and 11

July 12, 2024

How to Set (Change) the Default Printer in Windows 10 and 11

Microsoft has changed how the default printer is assigned in Windows 10 and 11. Windows now always sets the default printer to the last printer the user successfully printed to in the current location. This means that if you print to different printers, the default printer may constantly change. Let’s look at how to set the default printer using the Windows GUI, command prompt, or Group Policies.

Contents:
  • Set a Default Printer Using the Windows Control Panel
  • Change a Default Printer from the PowerShell Command Prompt
  • How to Set a Default Printer with GPO

Set a Default Printer Using the Windows Control Panel

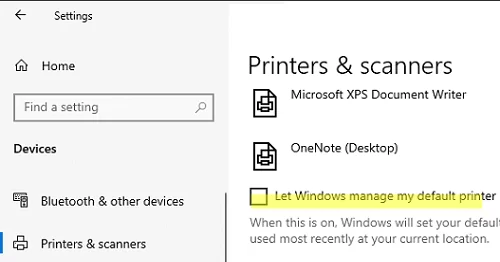
The default printer can be set in Windows via the Settings pane.

  1. Navigate to Settings -> Printers and Scanners
  2. Disable the “Let Windows manage my default printer” option to prevent Windows from automatically changing your default printer. Disable the option 'Let Windows manage my default printer'
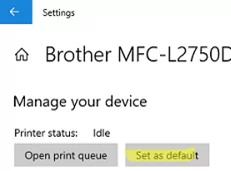
  3. Then select the printer you want to set as the default and click Manage.
  4. Click Set as default. Set printer as default from Setting pane

The classic Windows Control Panel can also be used to set a default printer. Go to Control Panel -> Device and Printer (or run the command shell:PrintersFolder). Right-click on the printer and select Set as default printer. Set a default printer from the classic Control Panel on Windows

Change a Default Printer from the PowerShell Command Prompt

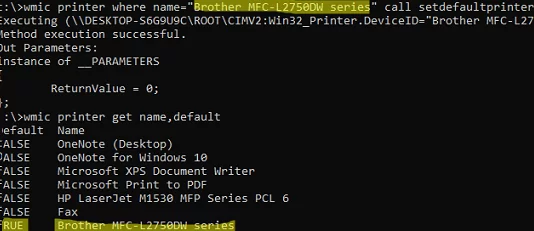
The wmic tool can be used to change a default printer from the command prompt. List installed printers:

wmic printer get name,default

The default printer has the Default=True attribute enabled.
Change the default print:

wmic printer where name="Brother MFC-L2750DW" call setdefaultprinter

wmic command - assign a default printer device

In addition, you can use PowerShell to manage printers.

List printers:

Get-CimInstance -ClassName CIM_Printer |select name,default

Assign a default printer:

$Printer = Get-CimInstance -Class Win32_Printer -Filter "Name='HP LaserJet M1530 MFP Series PCL 6'"
Invoke-CimMethod -InputObject $Printer -MethodName SetDefaultPrinter

In this case, I use the CIM class instead of WMI because the 
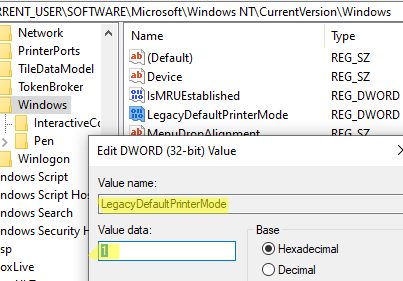
Get-WMIObject cmdlet is not supported in new versions of PowerShell Core 7.x.

Enable the LegacyDefaultPrinterMode registry parameter to prevent Windows from automatically changing the default printer:

REG ADD "HKCU\SOFTWARE\Microsoft\Windows NT\CurrentVersion\Windows" -v LegacyDefaultPrinterMode /t REG_DWORD /d 1 /f

LegacyDefaultPrinterMode - registry option to disable the automatic default printer management

How to Set a Default Printer with GPO

If you need to set the default printer for many users in an Active Directory domain from a central location, you can use a GPO.

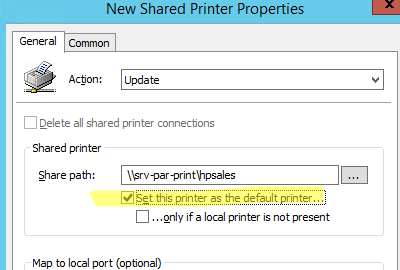
In case you are using Group Policy to assign shared printers to users (User Configuration -> Preferences -> Control Panel Setting -> Printer), enable the Set this printer as the default printer option in the GPP item.

Assign default printer on Windows via GPO

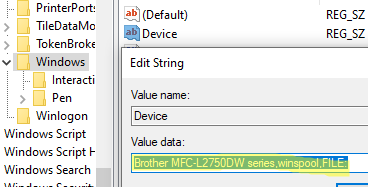
The user’s default printer set is stored in the Device parameter under the HKEY_CURRENT_USER\Software\Microsoft\Windows NT\CurrentVersion\Windows registry key. The following string format is used:

Brother MFC-L2750DW series,winspool,FILE:

default printer configuration in registry

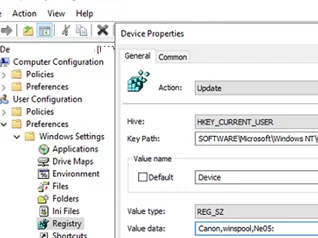
Use the GPO to create this registry parameter on the target user computers. This will change the default printer set in the user profile. Edit a domain GPO, go to User Configuration -> Preferences -> Windows Settings -> Registry, and create a new item with the following settings:

  • Hive: HKCU
  • Key Path: SOFTWARE\Microsoft\Windows NT\CurrentVersion\Windows
  • Value Name: Device
  • Value Type: REG_SZ
  • Value Data: Brother MFC-L2750DW series,winspool,FILE:

Set a default printer via registry and Group Policy Preferences

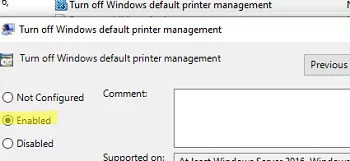
Then disable automatic printer assignment in Windows using the GPO option Turn off Windows default printer management (User Configuration -> Administrative Templates -> Control Panel -> Printers).

GPO: Turn off Windows default printer management

0 comment
2
Facebook Twitter Google + Pinterest
Windows 10Windows 11
previous post
Permanently Disable Driver Signature Enforcement on Windows 11
next post
Mapping SharePoint Online Library as Network Drive in Windows

Related Reading

Refresh AD Groups Membership without Reboot/Logoff

March 15, 2024

Managing Windows Firewall Rules with PowerShell

March 11, 2024

Create a Custom Windows Image with Pre-installed Apps

February 28, 2024

How to Fix ‘An Operating System Wasn’t Found’...

August 24, 2023

Upgrading to Windows 11 on Unsupported Hardware

March 6, 2024

Fixing ‘The Network Path Was Not Found’ 0x80070035...

August 31, 2023

How to Assign (Passthrough) a Physical GPU to...

June 11, 2024

Configuring RemoteApps Hosted on Windows 10/11 (without Windows...

January 25, 2025

Leave a Comment Cancel Reply

join us telegram channel https://t.me/woshub
Join WindowsHub Telegram channel to get the latest updates!

Recent Posts

  • Encrypt Any Client-Server App Traffic on Windows with Stunnel

    June 12, 2025
  • Failed to Open the Group Policy Object on a Computer

    June 2, 2025
  • Remote Desktop Printing with RD Easy Print Redirection

    June 2, 2025
  • Disable the Lock Screen Widgets in Windows 11

    May 26, 2025
  • Configuring Windows Protected Print Mode (WPP)

    May 19, 2025
  • Map a Network Drive over SSH (SSHFS) in Windows

    May 13, 2025
  • Configure NTP Time Source for Active Directory Domain

    May 6, 2025
  • Cannot Install Network Adapter Drivers on Windows Server

    April 29, 2025
  • Change BIOS from Legacy to UEFI without Reinstalling Windows

    April 21, 2025
  • How to Prefer IPv4 over IPv6 in Windows Networks

    April 9, 2025

Follow us

  • Facebook
  • Twitter
  • Telegram
Popular Posts
  • How to Allow Multiple RDP Sessions on Windows 10 and 11
  • How to Run Program without Admin Privileges and Bypass UAC Prompt
  • Fix: BSOD Error 0x0000007B (INACCESSABLE_BOOT_DEVICE) on Windows
  • Fixing ‘The Network Path Was Not Found’ 0x80070035 Error Code on Windows
  • How to Delete Old User Profiles in Windows
  • How to Install Remote Server Administration Tools (RSAT) on Windows
  • How to Backup and Copy Local Group Policy Settings to Another Computer
Footer Logo

@2014 - 2024 - Windows OS Hub. All about operating systems for sysadmins


Back To Top