Remote Desktop Gateway is a Remote Desktop Services role on Windows Server that is used to provide secure access to remote desktops and published RemoteApps from the Internet via an HTTPS gateway. A server with the RD Gateway role acts as an intermediary between external RDP clients and internal RD services. When using RDGW, users don’t need to configure a VPN to connect to RDS in a corporate network. The standard Remote Desktop Connection client (mstsc.exe) is used to connect. In this article, let’s look at how to deploy Remote Desktop Gateway on Windows Server 2019 (the guide is also applicable for Windows Server 2022/2016 and 2012 R2).
Deploy RDS-Gateway Role on Windows Server
The Remote Desktop Gateway service is an optional RDS farm component, so you have to install it separately. In most cases, it is recommended to use a dedicated server to deploy RDGW or combine it with RD Web Access.
You can install the Remote Desktop Gateway role through the Server Manager (Add roles & Features -> Server Role -> Remote Desktop Services) or with PowerShell.
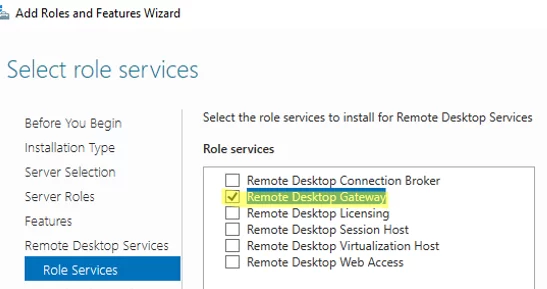
When you install the RDGW service, the IIS web server and NPS (Network Policy Server) role are also installed.
Make sure that the RDS-Gateway role is installed:
Get-WindowsFeature RDS*

Or install the role on Windows Server using the Install-WindowsFeature command:
Install-WindowsFeature RDS-Gateway -IncludeAllSubFeature –IncludeManagementTools
Create access groups in Active Directory using the ADUC (dsa.msc) console or with PowerShell:
- rdgwExtUsers – a group of users allowed to authenticate on the RDGW;
- rdgwExternalAdmins – a group to access internal RDS hosts via the RDGW;
- mun-rdsfarm — must include all RDS hosts and your RD Connection Broker that you want to allow connections to through the Remote Desktop Gateway
Configure Remote Desktop Gateway Authorization Policies
The RD Gateway Manager (tsgateway.msc) console is used to manage RDGW authorization policies and access rules, Configure two types of policies here:
- Connection Authorization Policies (RD CAP) – sets who is allowed to authenticate on the RDS Gateway;
- Resource Authorization Policies (RD RAP)– specify users and resources (computers) on the internal network that are allowed to connect via RDGW.
Create the RD CAP first:
- Expand Policies -> Connection Authorization Policies and select Create New Policy -> Wizard;
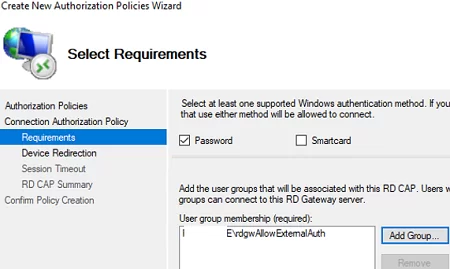
- Enter a policy name (rdgwExtUsers);
- Select an authentication type (a password and/or a smart card) and specify a group of users allowed to authenticate on the RDGW;

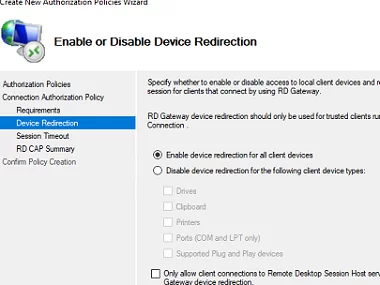
- In the Enable or Disable Device Redirection window, you may specify what devices are allowed to be redirected to an RDP session (a clipboard, printers, local drives, etc.);
- Then you can configure timeouts for RDP sessions;
- Confirm the creation of the policy.
You can also create an RDGW connection policy using PowerShell:
Import-Module -Name RemoteDesktopServices
 New-Item -Path 'RDS:\GatewayServer\CAP' -Name 'rdgwAllowAutht-CAP' -UserGroups rdgwExtUsers -AuthMethod '1'
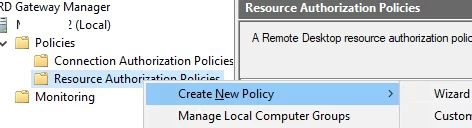
After that create the RD RAP policy:
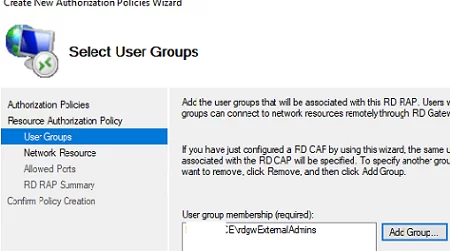
- In the RD Gateway Manager console, click Policies -> Resource Authorization Policies and select Create New Policy -> Wizard;
- Enter a policy name: rdgwExternalAdmins;
- Specify the name of the user group allowed to connect to internal RDS resources;
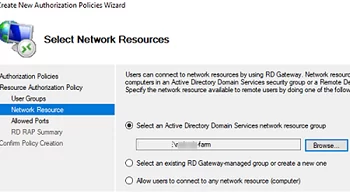
- On the Network Resources tab, specify what RDS servers your external users are allowed to connect to (mun-rdsfarm);
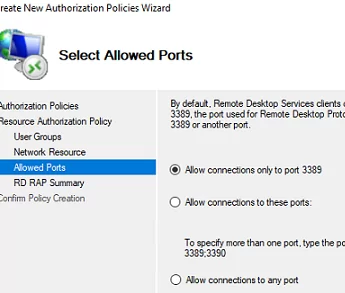
- Then specify the port numbers you want to allow connection to. By default, it is recommended to open only the default RDP port TCP/3389. But you can open additional ports as well;
- The policy is ready.
You can add this RAP rule using PowerShell:
New-Item -Path RDS:\GatewayServer\RAP -Name allowextAdminMunRDS -UserGroups rdgwExternalAdmins@woshub.com -ComputerGroupType 1 -ComputerGroup mun-rdsfarm@woshub.com
Install SSL Certificate for Remote Desktop Gateway
To secure the connection to the RDS gateway, you must install an SSL certificate on it. It is better to use a commercial certificate issued by an external certification authority (CA). You may also use a free Let’s Encrypt SSL certificate (Configure a Let’s Encrypt certificate on IIS for Remote Desktop Gateway) or a self-signed Windows SSL certificate, but note that external clients must trust it. If a client doesn’t trust a certificate on an RDGW server, it won’t be able to connect to the gateway (you can import self-signed SSL certificates to clients manually or using GPO).
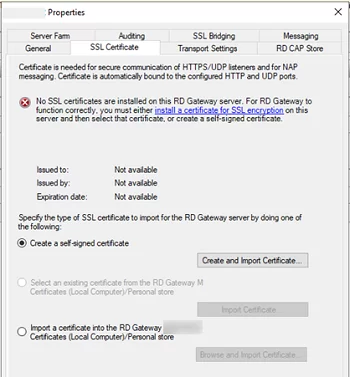
- Open the RDGW server properties in the RD Gateway console and go to the SSL Certificate tab;
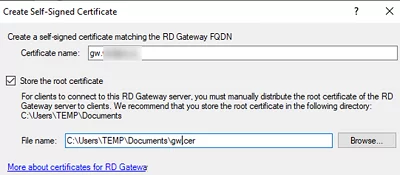
- In this example, we are using a self-signed certificate. Select Create a self-signed certificate -> Create and Import Certificate;
- Enter the certificate name (this name will be used by your clients to connect to RDGW) and select a directory you want to save the certificate to (distribute this certificate to your RD clients).
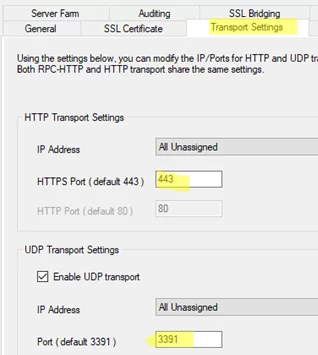
The following ports are used to connect to RDGateway on Windows Server 2019:
- HTTPPort (default) — 443 TCP
- UDPPort (default) — 3391 UDP (using UDP transport protocol is optional, however, it allows to significantly improve the tunnel performance and image quality in an RDP session).
Remember to open (forward) these ports from your public IP to your RDGW host on the network hardware.
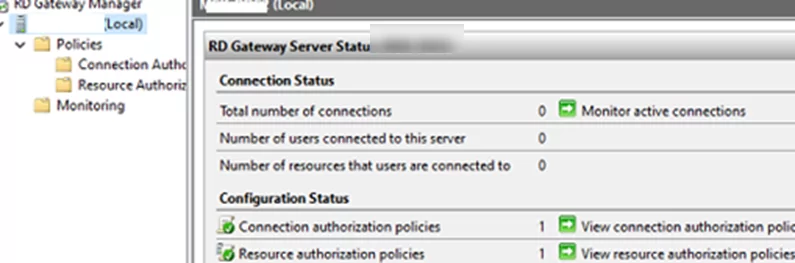
Open the RDGW Manager and make sure that there are no errors and that all items have green icons.
Configuring RDP Client to Use an RDS Gateway
Then you may configure a Remote Desktop Connection client to connect to your internal RDS hosts through the Remote Desktop Gateway.
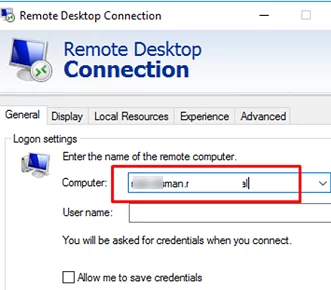
- Run the
mstsc.execlient; - In the General tab, enter the name of a standalone RDS Host, RDS farm, or a computer you want to connect to via RDP (you may also specify a user name and use saved credentials for the RDP connection);
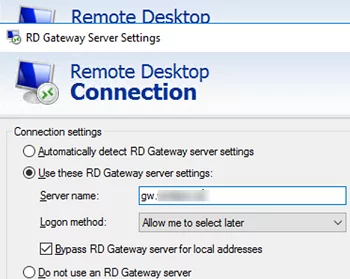
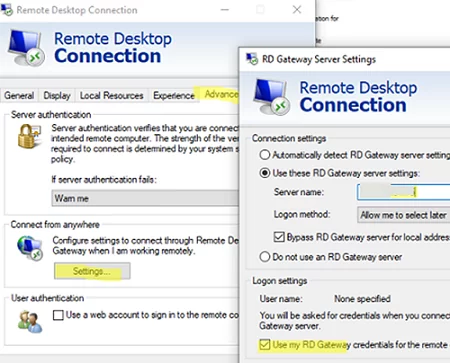
- Then go to the Advanced tab and click Settings under Connect from anywhere (Configure settings to connect through Remote Desktop Gateway when I am working remotely) section;
- Select Use these RD Gateway server settings and specify an external DNS name of your RDGW server (note that this name must be specified in the certificate). If you are using a different port for RDGW, enter it after the server name separated by a colon, for example,
gw.woshub.com:4443. - To prevent entering a password twice when connecting, check the option Use my RD Gateway credentials for the remote computer;
- Click Connect and enter user credentials to connect to the RD Gateway server;
- The client will establish a connection with an RDS/RDP host in your local network;
- Open the RD Gateway Manager, go to the Monitoring section, and make sure that the connection of your client is displayed in the list.

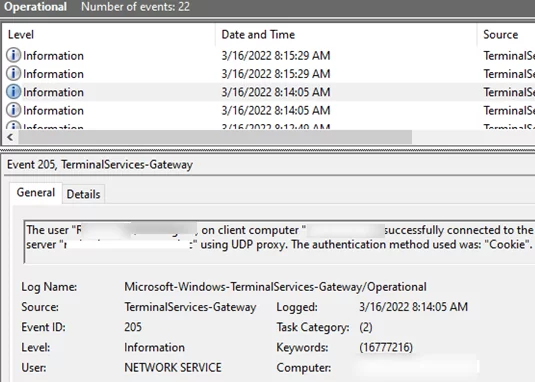
You can monitor successful or failed connections to RDGW in the Event Viewer (Applications and Services Logs -> Microsoft -> Microsoft-Windows-TerminalServices-Gateway -> Operational).
If the user has successfully connected to the RDGW, Event ID 205 will appear from the TerminalServices-Gateway source.
The user "woshub\maxadmin", on client computer "xx.xx.xx.xx", successfully connected to the remote server "mun-rdsgw.woshub.com" using UDP proxy. The authentication method used was: "Cookie".
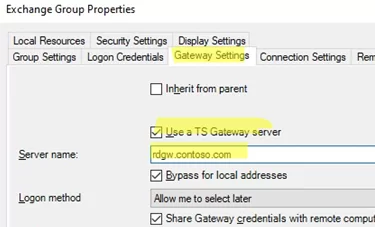
If you want to run RemoteApps through the RD Gateway, add the following lines to the RemoteApp *.rdp file:
gatewayhostname:s:gw.woshub.com
gatewayusagemethod:i:1
In this article, we showed how to configure the Remote Desktop Gateway role on Windows Server to implement secure remote access to your network using RDP over HTTPS.
Standalone RD Gateway in a Workgroup (without AD Domain)
If you are publishing a standalone RDSH server on the Internet, it is not safe to open the default RDP port 3389 to the outside world. In this case, you will constantly see RDP password brute-force attack attempts in the host security logs. You can use the RD Gateway to securely deploy the RDSH over the Internet and use an encrypted SSL/TLS connection on port TCP:443 to connect to the RDP service.
Contrary to popular belief, the RD Gateway can be deployed without an Active Directory domain (in a Workgroup environment). Suppose you have a standalone RDS host running Windows Server in a workgroup.
Install the RDGateway role with the command:
Install-WindowsFeature RDS-Gateway -IncludeAllSubFeature –IncludeManagementTools
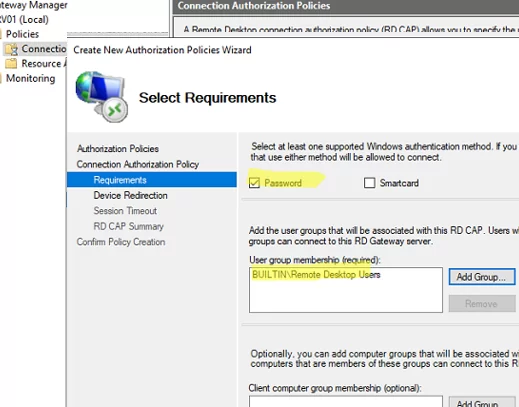
Open the RD Gateway Manager snap-in (tsgateway.msc) and create an Authorization Policy (CAP).
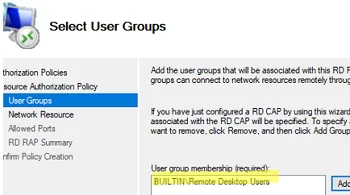
- In the policy settings, allow users from the BUILTIN\Remote Desktop Users local group to connect using password authentication;
- Select which devices can be redirected to the RDP session by clients (by default, all local devices can be redirected to RDP, including printers, local drives, and the clipboard);
- In the next step, you can configure RD session inactivity timeouts.
Now, create a new Resource Authorization Policy (RAP).
- Allow connections to members of the BUILTIN\Remote Desktop Users group;
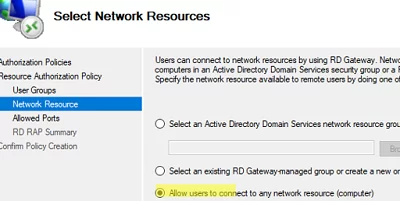
- Select the option Allow users to connect to any network resource (computer);
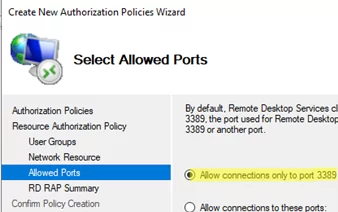
- Only permit connections to RDP port 3389.
The next step is to install an SSL/TLS certificate on the RDS gateway. You can use a free Let’s Encrypt SSL Certificate, a commercial certificate, or a Windows self-signed cert (we’ll use this option).
By default, RDGW generates a self-signed certificate that is valid for six months. You can use PowerShell to create a certificate with a long-term validity period. The external DNS name and/or public IP address of the RD Gateway host to which clients will connect must be included in the certificate subject CN or Subject Alternative Name (DNS). When you create a certificate, specify all the names and IPs you need, separated by commas:
$todaydate = Get-Date
 $addyear = $todaydate.AddYears(5)
 New-SelfSignedCertificate -dnsname gw1.woshub.com,10.11.12.13,rdgw.woshub.com -notafter $addyear -CertStoreLocation cert:\LocalMachine\My
Open the RDGW Properties, go to the SSL Certificate tab -> Select an existing certificate from the RD Gateway Certificates Local/Personal Store -> Import Certificate. Select the certificate you created.

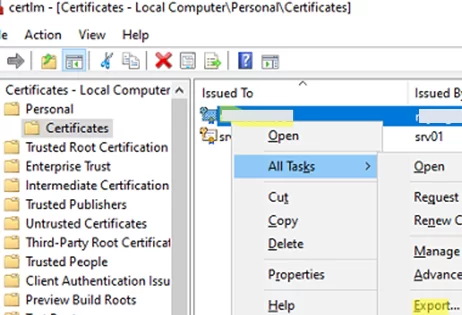
You can now configure the RDP connection on the client. First, you need to export the certificate from the RDGW host:
- Open the Computer Certificates console (
certlm.msc); - Expand the store Personal -> Certificates;
- Select your RDGW cert -> All tasks -> Export;
- Export the certificate to a *.CER file (without the private key);
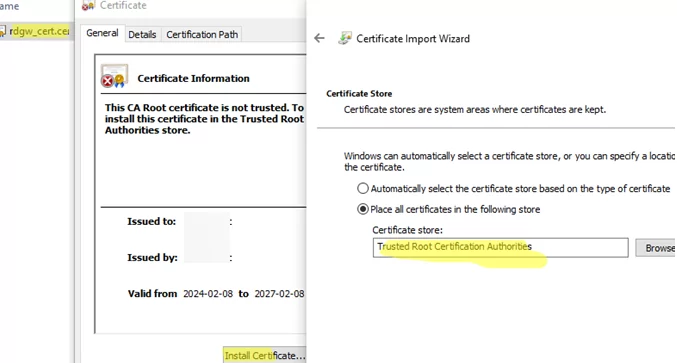
This certificate must be installed on the clients. If the client does not trust the certificate of the RD Gateway, it will not be able to establish a connection.
You can install the certificate either manually or by using the GPO. Place the cert in the Trusted Root Certification Authorities store.
Now open the mstsc.exe client and configure the connection through the Remote Desktop Gateway. Specify the FQDN or IP address of the RDGW host in Advanced -> Settings -> Use these RD Gateway settings.
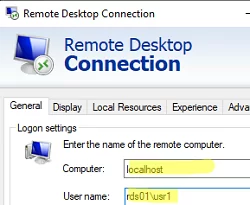
For the RDP hostname, specify localhost and the user name for the connection in the format rds01\user1, where rds01 is the local computer name (hostname) of Windows Server rung the RDS role.
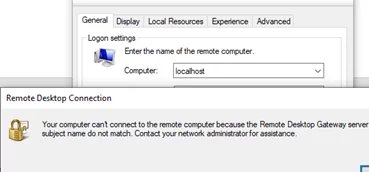
If any of the SAN names in the certificate don’t match the RD Gateway name, an error will be displayed.
Your computer cannot connect to the remote computer because the remote desktop gateway server address requested, and the certificate subject name do not match.
3 comments
great and super easy to follow RDS gateway guide, thnks!
Is it possible to say RDS Gateway to connect user to another machine different from localhost?
Without creating farm and joining to domain?
In step 4 of Configuring the Resource Authorization policy, select the target domain security group that contains the computer accounts (RDS hosts or workstations) to which you want to allow RDP connectivity.
The user will be able to connect to any of these hosts after performing RDGW authentication.