By default, the Windows login screen displays the account of the last user who logged on to this computer and a list of all local users. Windows allows you to hide or show the last signed-in user name, or even list all local or active domain users on the computer sign-in screen.
Hide Last Signed-in Username from Windows Login Screen
Users find it convenient to see the last logged account name on the Windows Logon Screen without having to type it in manually each time. For security reasons, you can prevent the last username from being displayed on the Windows logon screen on public computers (or other insecure locations) by using GPO:
- Open the domain (
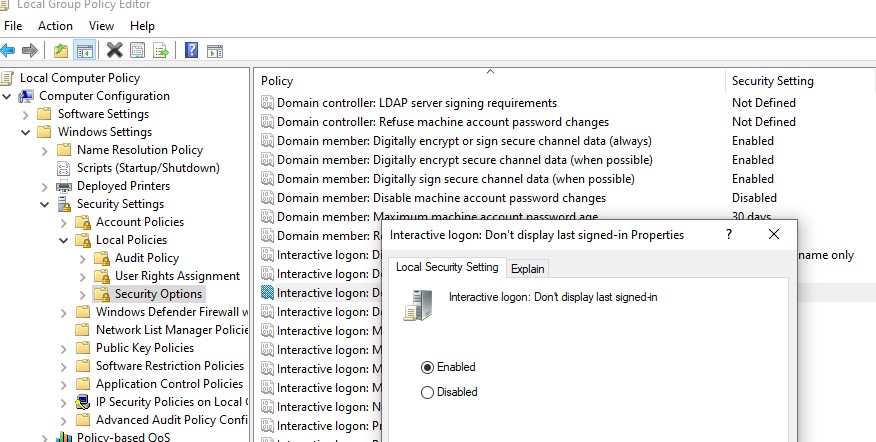
gpmc.msc) or local Group Policy editor (gpedit.msc) and go Computer Configuration -> Windows Settings -> Security Settings -> Local Policies -> Security Options; - Enable the policy Interactive logon: Don’t display last signed-in. This policy is disabled by default;
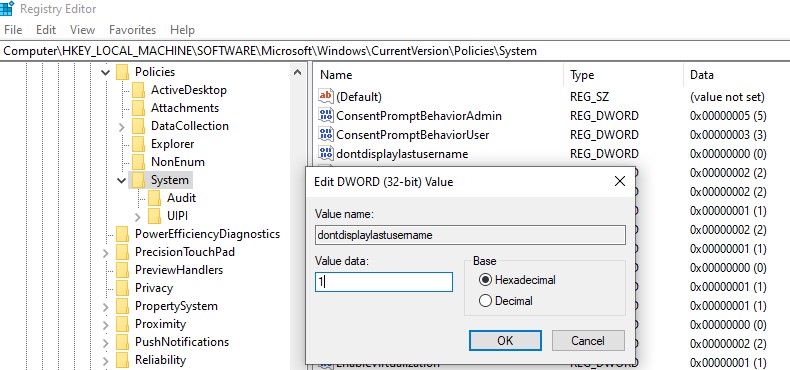
 You can hide the last logged username from the sign-in screen by changing the registry parameter. Go to reg key HKLM\SOFTWARE\Microsoft\Windows\CurrentVersion\Policies\System, create a new DWORD parameter named dontdisplaylastusername with the value 1.
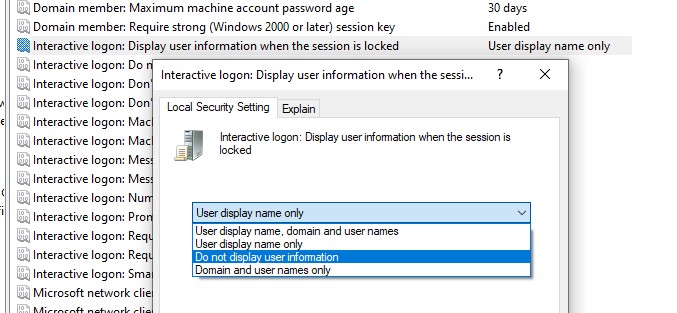
- To hide the logged-in username on the lock screen (when the computer is locked by pressing
Win+Lor through the lock screen GPO), enable the Group Policy option “Interactive logon: Display user information when the session is locked” and set the value “Do not display user information”. The registry parameter DontDisplayLockedUserId in the same registry key with a value of 3 matches this policy setting.
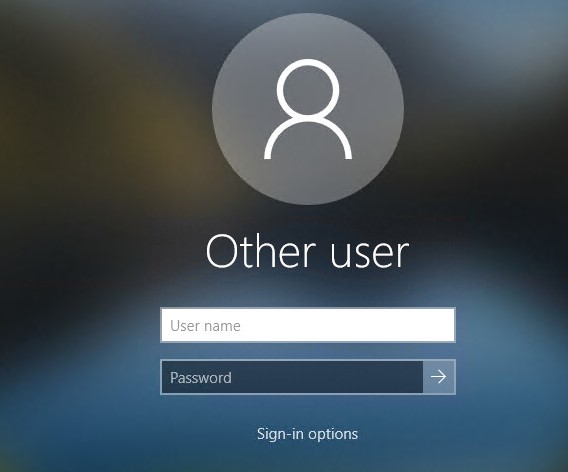
Blank username and password fields now appear on the Windows logon and lock screens instead of the previously signed-in username.
You can hide the list of users from the Windows lock screen by using the DisableBackButton registry parameter:
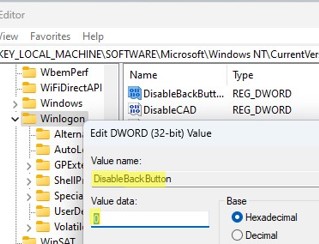
reg add "HKLM\SOFTWARE\Microsoft\Windows NT\CurrentVersion\Winlogon" /t REG_DWORD /f /d 0 /v DisableBackButton
To unlock the computer, the user must enter their password. To view a list of local user accounts, the user must first press the Switch User button on the lock screen.

Show All Local Users on the Windows Sign-in Screen
By default, modern Windows builds (tested on Windows 11 23H2 and Windows 10 22H2) always show a list of enabled local users in the bottom left corner of the login screen. This only works on computers that are not joined to the Active Directory domain. Hidden (see below) and disabled user accounts are not displayed on the sign-in screen.

To log on to the computer, the user simply clicks on the required user account and enters its password.

If the list of local users is not displayed on the Windows logon screen, check the following settings in the Local GPO editor (gpedit.msc):
- Interactive Logon: Do not display last signed-in =
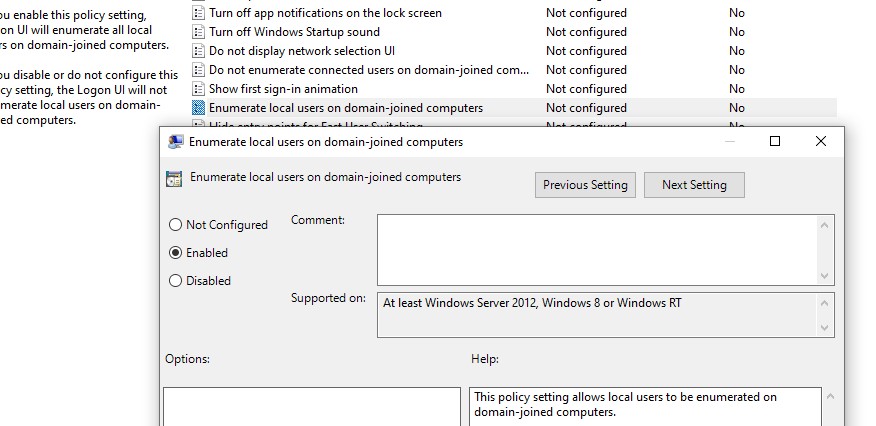
Disabled(Computer Configuration -> Windows Settings -> Security Settings -> Local Policies -> Security Options); - Enumerate local users on domain-joined computers =
Enabled(Computer Configuration -> Administrative Templates -> System -> Logon).
Restart your computer to apply the new Group Policy settings.
Show Logged In Domain Users on Windows Logon Screen
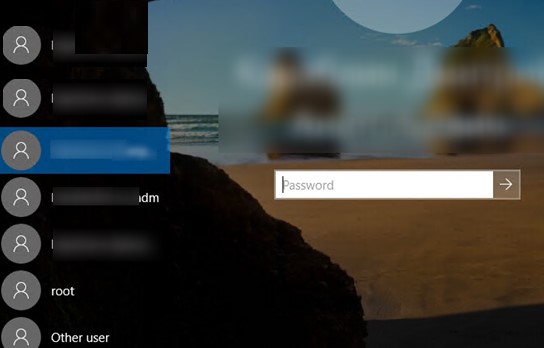
If more than one user is using the same computer, you can see a list of users with active sessions on the Windows sign-in screen. An active session means that the user is logged on to the computer. This can be a shared computer (used in user switching mode), a kiosk, Windows Server hosts running the RDS role, or Windows 11/10 devices that allow multiple RDP connections).
Check that the following policies are disabled in Computer Configuration -> Windows Settings -> Security Settings -> Local Policies -> Security Options:
- Interactive logon: Don’t display last signed-in: Disabled
- Interactive logon: Don’t display username at sign-in: Disabled
Then disable the GPO options in Computer Configuration -> Administrative Templates -> System -> Logon:
- Block user from showing account details on sign-in: Disabled
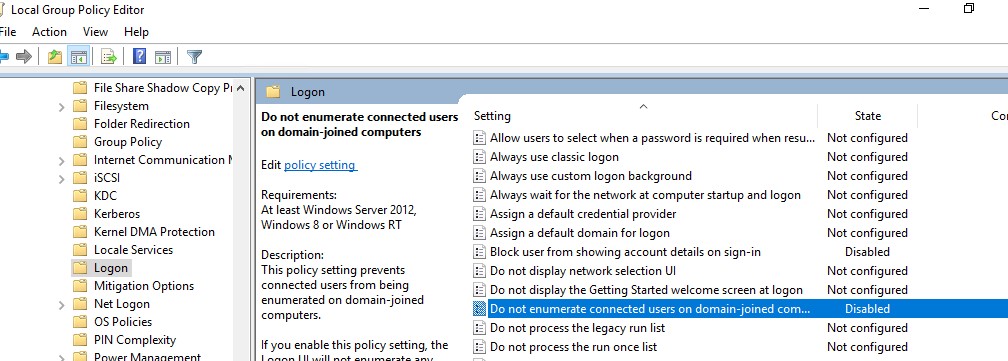
- Do not enumerate connected users on domain-joined computer: Disabled
rsop.msc or gpresult.A list of logged-in users will then appear on the Windows Welcome Screen. Both active and disconnected user sessions (for example, due to RDP timeout) are displayed.
Hide Specific User Accounts from the Windows Sign-in Screen
The Windows Welcome screen always displays users who are members of one of the following local groups: Administrators, Users, Power Users, and Guests (except the disabled user accounts).
You can hide specific users from the list on the Windows login screen through the registry. For each user you want to hide, create a DWORD parameter under the reg key HKLM\SOFTWARE\Microsoft\Windows NT\CurrentVersion\Winlogon\SpecialAccounts\UserList with the username and value 0.
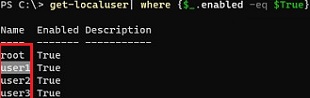
List all local user account names using PowerShell or cmd:
Get-LocalUser | where {$_.enabled –eq $true}
Or:
Net user
To hide a specific user account (for example, user123) from the Windows sign-in screen, run the command:
reg add "HKLM\SOFTWARE\Microsoft\Windows NT\CurrentVersion\Winlogon\SpecialAccounts\UserList" /t REG_DWORD /f /d 0 /v User123

If the built-in Windows Administrator account is enabled, and it is not the only account with local administrator permissions on the computer (!!!), you can also hide it:
reg add "HKLM\SOFTWARE\Microsoft\Windows NT\CurrentVersion\Winlogon\SpecialAccounts\UserList" /t REG_DWORD /f /d 0 /v administrator
To hide all users except the last logged-on user, set the following GPO settings in Computer Configuration -> Administrative Templates -> System -> Logon:
- Enumerate local users on domain-joined computers = Disabled
- Do not enumerate connected users on domain-joined computer = Enabled
23 comments
Mine displays all of the accounts by default. How come?
This is absurd. If this is actually the setting- which has taken an hour of googling to find- to show all the local users on the login screen, the fact that it has to be set and then a timed script created to keep it set is… nucking futs. What a hate joke of an OS.
I agree completely. It’s as if none of the developers considered the basics only the settings one would need to perform a hostile takeover of IBM. I’ve been chasing a way for days to login as any other user in Windows 10. There’s no way to switch users and no solution anywhere. Ask Microsoft? Their response is “There’s no way to switch users in Windows 10? Have you tried logging out?” (Almost took a hostage.)
and the funny part is, they probably get calls where that is the solution.
Arf! This is not about local account, but this tuto is about domain account. When you have severals doamain users on the same domain computer, its interresting to show all users account on the start menu.
By default, they have to choose “other user” and type both their ID and password. So with this method, they just have to click on appropriate username and type password.
For information, this doesn’t work. Scheduled task is working on all users, the reg value switch from 0 to 1 at startup for all users but on startup screen, only last user logged appear.
Not working. MS probably killed it in an update.
You have to change the permissions of the userswitch reg key : change the owner to Admin group and enable full control of the key for Admin and disable the write permission for SYSTEM. This is working since Windows 8.
@Roland – not an adminstrator but often end up having to do deskside support. How do I do what you suggested?
Try to run this powershell script as admin :
## Taken from P/Invoke.NET with minor adjustments.
$Definition = @’
using System;
using System.Runtime.InteropServices;
public class AdjPriv {
[DllImport(“advapi32.dll”, ExactSpelling = true, SetLastError = true)]
internal static extern bool AdjustTokenPrivileges(IntPtr htok, bool disall,
ref TokPriv1Luid newst, int len, IntPtr prev, IntPtr rele);
[DllImport(“advapi32.dll”, ExactSpelling = true, SetLastError = true)]
internal static extern bool OpenProcessToken(IntPtr h, int acc, ref IntPtr phtok);
[DllImport(“advapi32.dll”, SetLastError = true)]
internal static extern bool LookupPrivilegeValue(string host, string name,
ref long pluid);
[StructLayout(LayoutKind.Sequential, Pack = 1)]
internal struct TokPriv1Luid {
public int Count;
public long Luid;
public int Attr;
}
internal const int SE_PRIVILEGE_ENABLED = 0x00000002;
internal const int TOKEN_QUERY = 0x00000008;
internal const int TOKEN_ADJUST_PRIVILEGES = 0x00000020;
public static bool EnablePrivilege(long processHandle, string privilege) {
bool retVal;
TokPriv1Luid tp;
IntPtr hproc = new IntPtr(processHandle);
IntPtr htok = IntPtr.Zero;
retVal = OpenProcessToken(hproc, TOKEN_ADJUST_PRIVILEGES | TOKEN_QUERY,
ref htok);
tp.Count = 1;
tp.Luid = 0;
tp.Attr = SE_PRIVILEGE_ENABLED;
retVal = LookupPrivilegeValue(null, privilege, ref tp.Luid);
retVal = AdjustTokenPrivileges(htok, false, ref tp, 0, IntPtr.Zero,
IntPtr.Zero);
return retVal;
}
}
‘@
# Take ownership privilege
$ProcessHandle = (Get-Process -id $pid).Handle
$type = Add-Type $definition -PassThru
for ($i=1; $i -le 10;$i++){
$status=$type[0]::EnablePrivilege($processHandle, “SeTakeOwnershipPrivilege”)
if ($status){break}
if ($i -eq 10){read-host “Unable to take ownership privilege”;exit}
start-sleep 1|out-null
}
#
$keypath=”SOFTWARE\Microsoft\Windows\CurrentVersion\Authentication\LogonUI\UserSwitch”
#
# Get localized admin group name
$admin=(get-wmiobject win32_group| Where-Object {$_.sid -eq “s-1-5-32-544”}).name
# Change Owner to the local Administrators group
$regKey = [Microsoft.Win32.Registry]::LocalMachine.OpenSubKey(“$keypath”, “ReadWriteSubTree”, “TakeOwnership”)
$regACL = $regKey.GetAccessControl()
$regACL.SetOwner([System.Security.Principal.NTAccount]”$admin”)
$regKey.SetAccessControl($regACL)
# Change Permissions for the local Administrators group
$regKey = [Microsoft.Win32.Registry]::LocalMachine.OpenSubKey(“$keypath”, “ReadWriteSubTree”, “ChangePermissions”)
$regACL = $regKey.GetAccessControl()
$regRule = New-Object System.Security.AccessControl.RegistryAccessRule (“$admin”,”FullControl”,”ContainerInherit”,”None”,”Allow”)
$regACL.SetAccessRule($regRule)
# Change Permissions for System
$regRule = New-Object System.Security.AccessControl.RegistryAccessRule (“SYSTEM”,”SetValue”,”ContainerInherit”,”None”,”Deny”)
$regACL.SetAccessRule($regRule)
$regKey.SetAccessControl($regACL)
New-ItemProperty -Path “HKLM:\$keyPath” -Name “Enabled” -Value 1 -PropertyType DWORD -Force |out-null
You need to run this as admin since admin privilege is required to get ownership of the userswitch key owned by the system account.
Thank you, Roland! I may have it fixed, after making some changes to the group policy. If not, this topic is bookmarked. 🙂
is this working on domain users i did everything and still the users not showing at startup.
Hi Laura M, Can you explain what group policy changes you made to fix this?
Hi Nate. i actually followed the instructions I found on this site (first reply to the topic):
https://social.technet.microsoft.com/Forums/en-US/2ab569f5-ec46-4f54-a544-42504589d920/windows-10-logon-screen-retain-previously-logged-domain-users?forum=win10itprosetup
Please be aware that I am *not* a sysadmin. I am just a regular user who ends up having to try and play deskside support, so there may well be things I am making more diffiucult than they need to be. 🙁
Things I did notice-
1. The users I added didn’t actually show on the list on the list until after they logged in the first time.
2. When they did log in the first time, i found that it didn’t work if anyone else was currently logged in (it has to go through the set up for each user, and have them set a PIN). So, since their name wasn’t on the list, I had them select Other user. Then I had them click “Sign in options” and click the globe icon. Assuming that the ids were created using their email addresses, I had them enter that and followed prompts from there.
That’s what worked for me, but your experience may be different.
This (userswitch) was working for me until 1903 update. Now the reg values are correct, but some users (without passwords) are automatically logged in on start up.
Why should the user have to know ANYTHING that is going on behind the GUI? This is as bad as old MSDOS days!
I logged into my work computer cortana usuing my personal Microsoft account, which apparently created a new user profile (also started displaying my beach vacation photos as the background) so I deleted the user profile and restarted the computer now the only option to logon is usuing the same user profile I just deleted (my personal) but now asking for a password that I did not create nor is my existing Microsoft personal password. my original default login profile is not displayed as an option either.. Effectively I’m locked out of my brand new office computer.
None of the the above worked for me.
I have searched high and low on the web for a solution to get multiple users
to show on login screen in Windows 10. The best I could do is a workaround
based on info on a Tenforum thread. I provide this in case it helps
someone else. It is not elegant, but suffices until a real solution comes along.
My thanks to Shawn Brink.
0. Create new user [Admin] with password
1. type ‘run’ or {Win+R} to get the Run dialogue box
2. type ‘netplwiz’ and click on OK
3. Check [if not already checked] “Users must enter a user name and password to use this computer” checkbox
4. select user you are not signed on as [see #0 above]
5. Uncheck “Users must enter a user name and password to use this computer checkbox”
6. Click OK
7. Click OK [leave password boxes blank]
8. Reboot.
Login will fail, but available signons will show. Repeat 1-8 on New User.
I have not tried this for nonAdmin accounts nor for more than two User Accounts.
It helped me, i was looking for this login solution everywhere and only this one worked finally. I am so happy that i am connecred ro right peopke and solutions and so is my laptop.
https://answers.microsoft.com/en-us/windows/forum/all/all-local-user-accounts-missing-from-login-screen/9964e4c1-9aed-4fa0-b4c4-84180edf92f0
Thank you for this wonderful solution. It work for me perfectly. Godbless
Thank you
Thank you, worked for me.