SSH-server based on the OpenSSH package is part of the operating system in all modern versions of Windows. In this article, we’ll show you how to install and configure the OpenSSH server on Windows 10/11 and Windows Server 2022/2019 and connect to it remotely via a secure SSH connection (just like in Linux 🙂).
How to Install OpenSSH Server on Windows
The OpenSSH Server package is a part of all modern versions of Windows 10 (starting with 1803), Windows 11, and Windows Server 2022/2019 as a Feature on Demand (FoD). To install the OpenSSH server, open the elevated PowerShell prompt and run the command:
Get-WindowsCapability -Online | Where-Object Name -like ‘OpenSSH.Server*’ | Add-WindowsCapability –Online
Or using DISM:
dism /Online /Add-Capability /CapabilityName:OpenSSH.Server~~~~0.0.1.0
If your computer is directly connected to the Internet, the OpenSSH.Server package will be downloaded and installed on Windows.
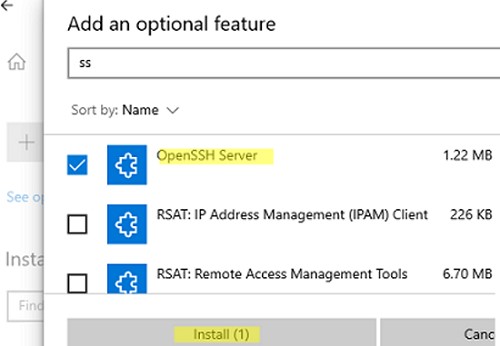
You can also install OpenSSH on Windows 10/11 through the modern Settings panel (Settings -> Apps and features -> Optional features -> Add a feature). Find Open SSH Server in the list and click Install.
On computers in disconnected (offline) environments, you can install the OpenSSH Server from the Feature on Demand ISO image (available in your account on the Microsoft websites: MSDN or my.visualstudio.com). Download the ISO and extract its contents to the E:\FOD folder (you can only extract the file OpenSSH-Server-Package~31bf3856ad364e35~amd64~~.cab) and install the Windows feature from the local repository:
Add-WindowsCapability -Name OpenSSH.Server~~~~0.0.1.0 -Online -Source E:\FOD
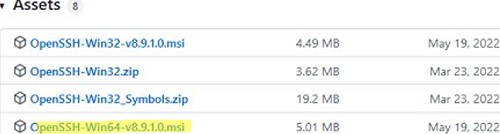
An MSI installer for OpenSSH for Windows is also available in the official Microsoft repository on GitHub (https://github.com/PowerShell/Win32-OpenSSH/releases/). For example, for Windows 10 x64, you need to download and install the OpenSSH-Win64-v8.9.1.0.msi package. The following PowerShell command will download the MSI file and install the OpenSSH client and server on your computer:
Invoke-WebRequest https://github.com/PowerShell/Win32-OpenSSH/releases/download/v8.9.1.0p1-Beta/OpenSSH-Win64-v8.9.1.0.msi -OutFile $HOME\Downloads\OpenSSH-Win64-v8.9.1.0.msi -UseBasicParsing
 msiexec /i $HOME\Downloads\OpenSSH-Win64-v8.9.1.0.msi
To make sure the OpenSSH server has been installed, run the command:
Get-WindowsCapability -Online | ? Name -like 'OpenSSH.Ser*'
State : Installed

Configuring SSH Server on Windows
After installing the OpenSSH server on Windows, two services are added:
- ssh-agent (OpenSSH Authentication Agent) – can be used to manage private keys if you have configured SSH key authentication;
- sshd (OpenSSH SSH Server).
You need to change the startup type of the sshd service to automatic and start the service using PowerShell:
Set-Service -Name sshd -StartupType 'Automatic'
 Start-Service sshd

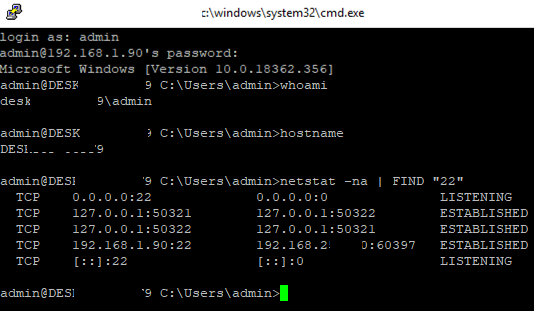
Use the netstat command to make sure that the SSH server is running and waiting for the connections on TCP port 22:
netstat -na| find ":22"

Make sure that Windows Defender Firewall allows inbound connections to Windows through TCP port 22:
Get-NetFirewallRule -Name *OpenSSH-Server* |select Name, DisplayName, Description, Enabled
Name DisplayName Description Enabled
---- ----------- ----------- -------
OpenSSH-Server-In-TCP OpenSSH SSH Server (sshd) Inbound rule for OpenSSH SSH Server (sshd) True

If the rule is disabled (Enabled=False) or missing, you can create a new inbound rule using the New-NetFirewallRule cmdlet:
New-NetFirewallRule -Name sshd -DisplayName 'OpenSSH Server (sshd)' -Enabled True -Direction Inbound -Protocol TCP -Action Allow -LocalPort 22
By default, key OpenSSH components are located in these folders:
- OpenSSH Server executables:
C:\Windows\System32\OpenSSH\(sshd.exe, ssh.exe, ssh-keygen.exe, sftp.exe, etc.) - The sshd_config file (created after the first service start of the service):
C:\ProgramData\ssh - The authorized_keys file and keys can be stored in the user profile folder:
%USERPROFILE%\.ssh\
Sshd_config: OpenSSH Server Configuration File
You can change your OpenSSH server settings in the config file: %programdata%\ssh\sshd_config. This is a plain text file with a set of directives. You can use any text editor for editing:
start-process notepad C:\Programdata\ssh\sshd_config
For example, to deny SSH connection for a specific domain user account (or all users in the specified domain), add these directives to the end of the file:
DenyUsers woshub\admin@192.168.1.10
DenyUsers corp\*
To allow SSH connection to the specific domain security group only:
AllowGroups woshub\sshadmins
You can allow access to a local user group:
AllowGroups sshadmins
By default, all Windows users can connect to OpenSSH. Directives in the sshd_config files are processed in the following order: DenyUsers, AllowUsers, DenyGroups, AllowGroups.
You can deny SSH login for the accounts with administrator privileges. In this case, if you need to perform any privileged actions in your SSH session, you will have to use runas.
DenyGroups Administrators
The following directives allow you to access Windows using SSH private keys or a password.
PubkeyAuthentication yes
PasswordAuthentication yes
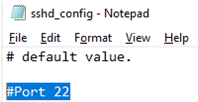
You can change the default TCP/22 port on which OpenSSH Server connections are accepted in the sshd_config configuration file using the Port directive.
restart-service sshd
How to Connect to a Remote Windows Computer via SSH?
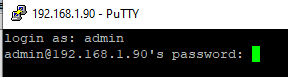
Now you can try to connect to your Windows 10 computer using the SSH client (I’m using putty in this example).
ssh max@192.168.13.12
In this example, max is the username on the remote Windows computer, and 192.168.13.12 is the IP address or DNS name of the computer.
Note that you can use the following username formats when connecting to Windows via SSH:
max@server1– local Windows usermax@woshub.com@server1– Active Directory user or Microsoft/Azure account (use the UserPrincipalName format)woshub\max@server1– NetBIOS name format
In an Active Directory domain, you can use Kerberos authentication in SSH. To do this, you need to enable the following directive in sshd_config:
GSSAPIAuthentication yes
You can now transparently connect to an SSH server from a domain-joined Windows machine with a domain user session. In this case, the user’s password will not be requested, and SSO authentication via Kerberos will be performed:
ssh -K server1
The first time you connect, you will be prompted to add the host to the list of known SSH hosts (C:\Users\your_user\.ssh\known_hosts).
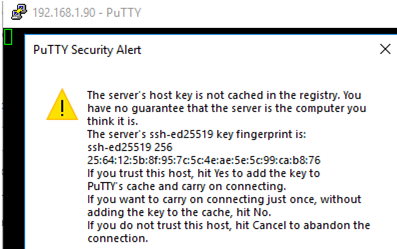
Click Yes, and login under your Windows user account.
If the SSH connection is successful, you will see the cmd.exe shell prompt.
admin@win10pc C:\Users\admin>

You can run different commands, scripts, and apps in the SSH command prompt.
I prefer working in the PowerShell console. To start it, run:
powershell.exe

In order to change the default cmd.exe shell in OpenSSH to PowerShell, make changes to the registry using the following PowerShell command:
New-ItemProperty -Path "HKLM:\SOFTWARE\OpenSSH" -Name DefaultShell -Value "C:\Windows\System32\WindowsPowerShell\v1.0\powershell.exe" -PropertyType String –Force

Restart your SSH connection and make sure that PowerShell is now used as a default SSH shell (this is indicated by the prompt PS C:\Users\admin>).

The PowerShell prompt has been started in my SSH session, where the usual functions work: tab autocomplete, PSReadLine syntax highlighting, command history, etc. If the current user is a member of the local administrators’ group, all session commands are executed elevated even if UAC is enabled.
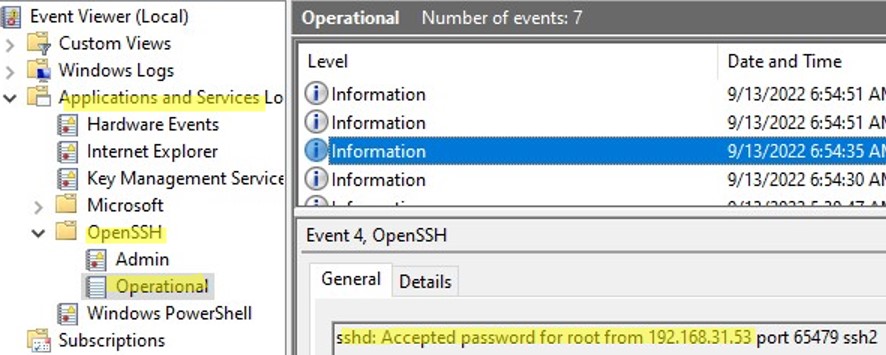
Checking SSH Connection Logs in Windows
By default in Windows SSH server connection logs are written not to text files, but to a separate event log via Event Tracing for Windows (ETW). Open the Event Viewer console (eventvwr.msc ) and navigate to Application and services logs -> OpenSSH -> Operational.
If you successfully connect to the SSH server using a password, an event will appear in the log:
EventID: 4
sshd: Accepted password for root from 192.168.1.53 port 65749 ssh2
If SSH key authentication was performed, you will see the following event:
sshd: Accepted publickey for locadm from 192.168.1.53 port 61426
ssh2: ED25519 SHA256:FEHDEC/G42FS23209C2KMb4335923pigN31s3qMK322lGibD
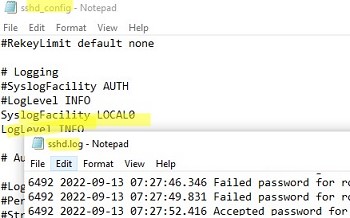
If you want the SSH connection logs to be written to a local text file, you need to enable the following parameters in the sshd_config file:
SyslogFacility LOCAL0
LogLevel INFO
Restart the sshd service and make sure that the SSH server logs are now written to a plain text file C:\ProgramData\ssh\logs\sshd.log
17 comments
Wow – didnt even know that was a thing!
Troubleshooting: Add-WindowsCapability (after PowerShell was run as administrator, not mentioned in the article) did response: Path: Online: True and no error is thrown. Then Get-WindowsCapability said Name: OpenSSH.Server~~~~0.0.1.0 Status: Not Present . This is the first step and I am already stuck. How to fix this?
It’s very confidental and interesting to be access with it.
Cannot delete the sshd.log file after enabling the logging as specified in the article. Error says the file is open in sshd.exe, even after I have disabled the logging (remove those 2 lines in sshd_config) and stopped the OpenSSH service.
create a task scheduler task that would run the following PowerShell script (edit as needed) at intervals. It empties contents of sshd.log into a backup file once sshd.log breaches 25MB
if ((Get-ChildItem .\logs\sshd.log).Length -gt 2510241024)
{
copy-item .\logs\sshd.log .\logs\sshd.log.prev
$null | Set-Content .\logs\sshd.log
}
Nice job – thanks for helping out others this way 😀
I’d like to add the crypto stuff:
Ciphers chacha20-poly1305@openssh.com,aes256-gcm@openssh.com,aes128-gcm@openssh.com,aes256-ctr,aes192-ctr,aes128-ctr
MACs hmac-sha2-512-etm@openssh.com,hmac-sha2-256-etm@openssh.com,umac-128-etm@openssh.com,hmac-sha2-512,hmac-sha2-256,umac-128
have fun 🙂
1. Settings->Apps->Optional Features does not appear in my Win 11.
2. The Get-WindowsCapability seems to work, except sshd is not installed.
Get-WindowsCapability -Online | Where-Object Name -like ‘OpenSSH.Server*’ | Add-WindowsCapability -Online
Path :
Online : True
RestartNeeded : False
Set-Service -Name sshd -StartupType ‘Automatic’
Set-Service: Service ‘sshd’ was not found on computer ‘.’.
Very, very good!
My goal is simple: to be able to ssh into a Windows computer, from WSL and then to run a WSL ‘bash’ shell.
I started with “ssh ” and got “ssh: connect to host 172.30.172.24 port 22: Connection timed out”, which I realised meant I had to start an ssh server on the remote computer.
I found this article, and it’s just taken me through the whole process, step by step. Thankyou!
Nicely done. Worked great to let me connect from parallels (macOS host) to the out-of-the-box Parallells Windows 11 Home VM.
Great instructions but it looks like the process is not accepting connections.
For me the command
netstat -na| find “:22”
comes up with
FIND: Parameter format not correct
However, running it without the pipe, the first line does show
Proto Local Address Foreign Address State
TCP 0.0.0.0:22 0.0.0.0:0 LISTENING
I have verified that the process is running and that the firewall rule is installed. I am wondering, whether there is something else that needs to be enabled.
ssh works on the machine, where I set up sshd:
PS C:\WINDOWS\system32> ssh localhost
The authenticity of host ‘localhost (::1)’ can’t be established.
ED25519 key fingerprint is SHA256:/Di072mY1hj85CGr1vE+EOW/8bNCzXKw6Dv89QHDmwk.
This host key is known by the following other names/addresses:
C:\Users\admin.PARALLELSM1MAX/.ssh/known_hosts:1: 192.168.1.34
Are you sure you want to continue connecting (yes/no/[fingerprint])? yes
Warning: Permanently added ‘localhost’ (ED25519) to the list of known hosts.
admin@localhost’s password:
Microsoft Windows [Version 10.0.22631.4169]
(c) Microsoft Corporation. All rights reserved.
admin@PARALLELSM1MAX2 C:\Users\admin.PARALLELSM1MAX>
However, the connection attempt times out, when trying from a different host on the LAN.
Make sure that the SSH-enabled host is not blocking connections to TCP port 22. Use PowerShell to remotely check for an open port:
TNC Your_Comp_Name1 -port 22Thanks, ADMIN! I did that:
PS C:\WINDOWS\system32> TNC ParallelsM1MAX23H2 -port 22
ComputerName : ParallelsM1MAX23H2
RemoteAddress : fe80::3d0e:a435:596a:1d83%14
RemotePort : 22
InterfaceAlias : Ethernet
SourceAddress : 2600:381:9005:5387:98c9:82d0:76be:a3b
TcpTestSucceeded : True
That must not have been the problem.
A lot of your quote marks in code blocks are ‘fancy’, you might want to replace them with ‘basic’ ones if they are intended to work in cmd or powershell.
This is a great article; it’s been very helpful. I encountered a roadblock when I was unable to SSH to the server. After reviewing the firewall rules, I found that the profile was set to ‘Private.’ Changing it to ‘Any’ resolved the issue. I used the following command: Get-NetFirewallRule -Name *ssh* | Set-NetFirewallRule -Profile Any
Superb article !
Great stuff, works like a charm. I’m using it to watch stuff from my PC in an ipad and was having some trouble with Samba and whatnot, this is very stable and fast 😀