This is a step-by-step tutorial for creating a bootable USB flash drive for a UEFI computer with Windows 10/11, Windows Server 2022/2019/2016, or Windows 7 installation images.
You need:
- USB flash drive (USB v2 or v3) with a minimum capacity of 4 GB for Windows 7 or 8 GB for Windows 10/11;
- 64-bit Windows installation image (Windows x86 editions won’t boot on the UEFI computer).
Using Media Creation Tool to Create a Windows Bootable USB Drive
Microsoft’s official tool for creating installation media and downloading ISO images with Windows 10/11 is the Media Creation Tool.
There are several versions of the Media Creation Tool:
- For Windows 10 — you can download the latest version of MCT here (https://www.microsoft.com/en-us/software-download/windows10);
- For Windows 11 — https://www.microsoft.com/software-download/windows11

- Download and run the file MediaCreationTool22H2.exe;
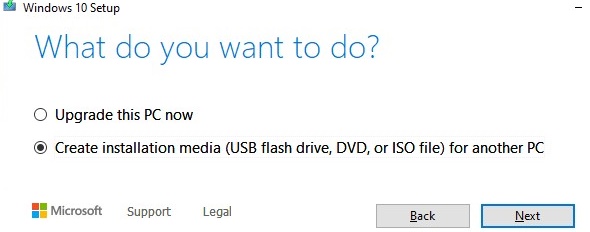
- Select Create installation media (USB flash drive, DVD, or ISO file) for another PC);

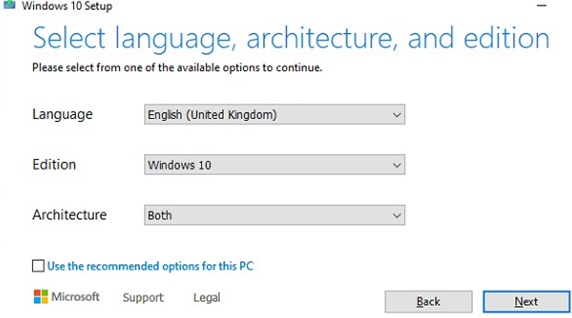
- Select the language, edition, and architecture (x86, x64, or both) of the Windows 10 image that you want to write to the USB drive;

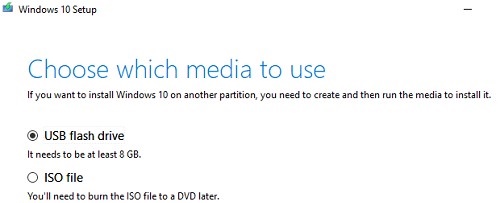
- Then select to write the Windows image to a USB flash drive;

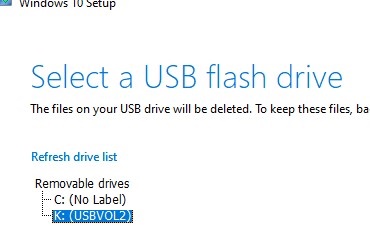
- Select your flash drive in the list of removable devices and USB drives.
 All data on the selected USB stick is erased.
Click Next -> Next -> Finish and wait for the installation Windows image to be written to the USB drive.
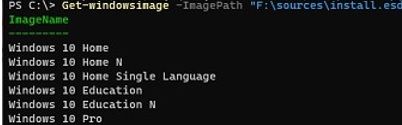
To find the Windows version in the installation WIM/ESD file or ISO image, open a command prompt and run the command:
Get-windowsimage -ImagePath "F:\sources\install.esd"|select imagename
The installation image on the flash drive only contains Home, Education, and Professional editions of Windows.
If you need to write Windows Enterprise edition to your USB flash drive, you must use the Media Creation Tool command line parameters. Use the following command:
MediaCreationTool22H2.exe /Eula Accept /Retail /MediaArch x64 /MediaLangCode en-US /MediaEdition Enterprise
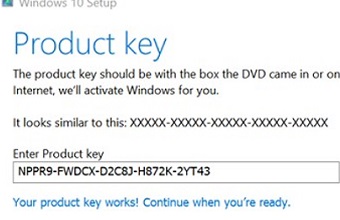
This should open up the Media Creation Tool window, where you’ll need to enter your Windows 10 Enterprise product key. You can specify the public KMS (GVLK) key for Windows 10 here. (check the KMS activation FAQ article).
Select the USB drive you want to burn the Windows 10 Enterprise installation image.
This USB flash drive can be used to boot and install Windows on both UEFI and BIOS-based computers.
It is very easy and accessible for any user to create a bootable USB flash drive with Windows using the Media Creation Tool. However, it only writes the latest Windows build and doesn’t allow you to select your own ISO file containing the Windows image.
Rufus: Best Windows UEFI USB flash Drive Creation Tool
It is much easier for novice users to create their own bootable UEFI USB stick for installing Windows using the graphical interface of the popular Rufus utility. Rufus 4.12 is currently available from the developer’s website at https://rufus.ie. The tool is quite compact (about 1 MB), doesn’t require installation, and is completely free. It also works noticeably faster than analogs.
Download Rufus from the official website and run it as an administrator. Burn existing ISO image to flash drive:
- Device: select your USB flash drive;
- Boot selection: specify the ISO file that contains the Windows installation image (you can create an ISO image with the latest Windows 10 build using the Media Creation Tool, see the example);
- Partition scheme: GPT;
- Image option: Standard Windows Installation
- Target system: UEFI (non-CSM);
- File system: FAT32.
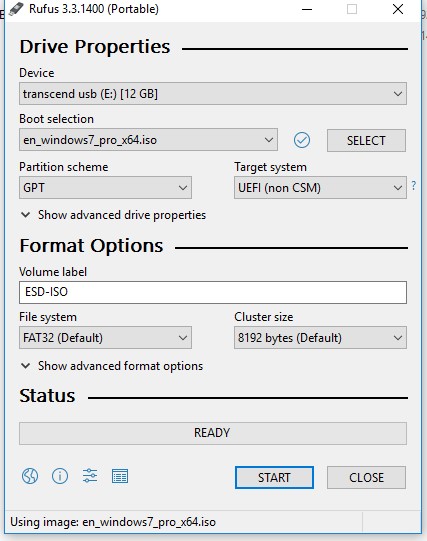
Click START to write a Windows image to a USB flash drive. Your bootable USB with a Windows image for installation on a UEFI computer will be ready in 10-15 minutes.
From version 3.5, Rufus supports the download of Windows installation images. To do this, you need to enable the daily update check when you start Rufus. When you have done this, a Download button will appear in the Rufus interface.
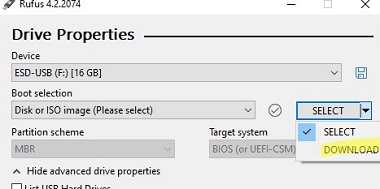
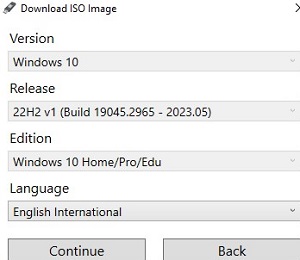
You will be able to choose which version of Windows you would like to download. You can download ISO images with the latest builds of Windows 8.1, Windows 10, and Windows 11.
Using Diskpart to Create UEFI Boot-Stick in Windows
You can manually create a bootable UEFI flash drive with the Windows installation image you want. The following procedure is for advanced users and is performed from the command line. It gives you complete control (and understanding) of all bootable USB flash drive creation stages.
- Insert the USB flash drive into the appropriate PC port;
- Run the command prompt as an administrator;
- Run the DISKPART tool:
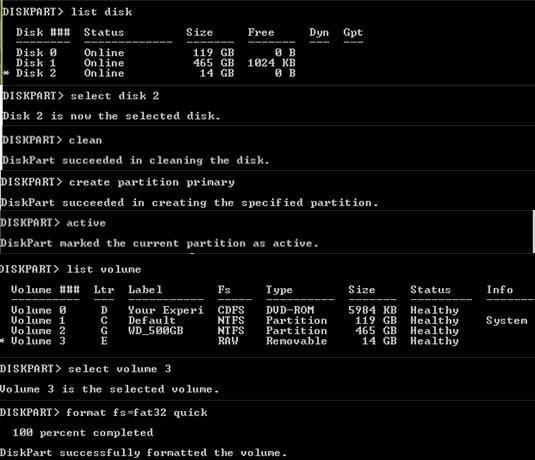
Diskpart - List the available drives connected to the computer:
list disk - Find the disk that corresponds to your USB flash drive (in our example it is Disk 2) and select it:
Select Disk 2 - Warning. The next command will completely remove all information and partitions from the USB flash drive. It is therefore advisable to check again that you have selected your removable USB device in the previous step, and not one of your computer’s hard drives. So, it is better to make sure that you have selected your removable USB device in the previous step, and not one of the computer’s hard drives.Clean up your USB stick:
clean - Create a primary partition:
create partition primary - Make this partition active:
active - List the volumes with this command:
list volume - Select the partition you have created (in our example, it is Volume 3):
select volume 3 - FFormat the selected partition with FAT32:
format fs=fat32 quickNote. Unlike legacy computers with BIOS firmware, which only allows you to boot partitions with FAT, FAT32, exFAT or NTFS file systems, UEFI only allows you to boot from the bootloader on the FAT32 formatted drive. - Assign a drive letter to the formatted partition ( if Windows doesn’t automatically assign a drive letter to a USB flash drive – see this article for details):
assign
- Exit DISKPART:
exit
Now you need to copy the files from the mounted Windows x64 installation ISO image to the USB flash drive you have prepared. This can be done using the Windows Explorer, a file manager, or from the command line, for example, as follows:
xcopy d:\* f:\ /s /e
- D:\ is an installation DVD or mounted ISO image containing a Windows distro;
- F:\ is a drive letter assigned to the USB flash drive.
Dism /Split-Image /ImageFile:D:\sources\install.wim /SWMFile:c:\tmp\install.swm /FileSize:3000
Or use the imagex tool:
imagex /split D:\sources\install.wim c:\tmp\install.swm 3000
The resulting files (install.swm, install2.swm, install3.swm …) must be copied to the F:\sources directory on the USB flash drive. During the installation process of the operating system, the Windows installer itself will collect the SWM files and apply the full WIM image to the hard drive.
Create a Windows 7 Installation USB Drive for UEFI
If you are creating an installation USB flash drive with Windows 7 / Windows Server 2008 R2 for a UEFI computer, you need to take additional steps:
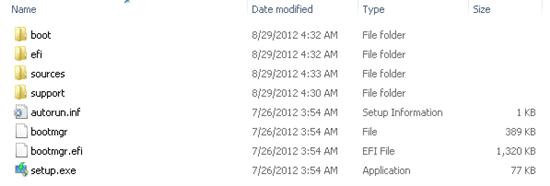
- Go to f:\efi\microsoft\boot folder on the USB flash drive;
- Copy the entire content up one level (to the F:\efi\boot directory);
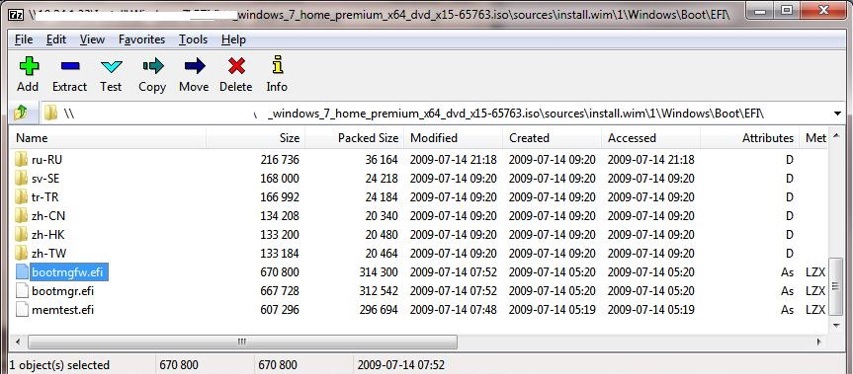
- Copy the bootmgfw.efi file to the f:\efi\boot folder and rename it to bootx64.efi.Note. The UEFI environment should call the bootx64.efi file. You can copy bootmgfw.efi from an existing Windows 7 x64 computer (located in the %windir%\Boot\EFI folder). It can also be extracted from the install.wim file in the in the distribution’s ISO image using the 7ZIP archiver (check the path sources\install.wim\1\Windows\Boot\EFI\bootmgfw.efi).

Create Windows Bootable USB Stick for UEFI with PowerShell
You can also use the PowerShell cmdlets to create a bootable UEFI flash drive.
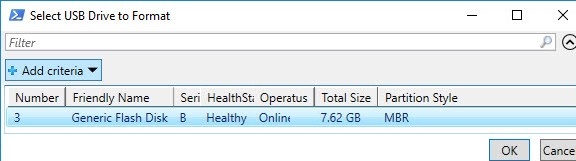
The following PowerShell one-liner will list the connected USB media devices. Once you have selected the drive you want, it will be erased, a primary partition will be created and it will be formatted with the Fat32 file system (Disk Management module cmdlets are used):
$Results = Get-Disk |Where-Object BusType -eq USB |Out-GridView -Title 'Select USB Drive to Create UEFI bootable device' -OutputMode Single |Clear-Disk -RemoveData -RemoveOEM -Confirm:$false -PassThru |New-Partition -UseMaximumSize -IsActive -AssignDriveLetter |Format-Volume -FileSystem FAT32
Mount the Windows 10 installation ISO image:
$Volumes = (Get-Volume).Where({$_.DriveLetter}).DriveLetter
 Mount-DiskImage -ImagePath C:\ISO\Windows10-2004x64.iso
 $ISO = (Compare-Object -ReferenceObject $Volumes -DifferenceObject (Get-Volume).Where({$_.DriveLetter}).DriveLetter).InputObject
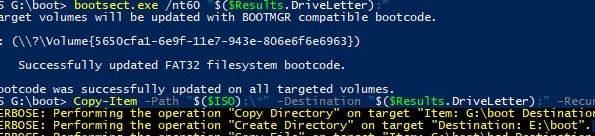
Go to the Boot directory and copy the contents to the USB flash drive using the Copy-Item command:
Set-Location -Path "$($ISO):\boot"
 bootsect.exe /nt60 "$($Results.DriveLetter):"
 Copy-Item -Path "$($ISO):\*" -Destination "$($Results.DriveLetter):" -Recurse -Verbose
You can now boot your computer from this bootable USB flash drive. To do this, restart your device, open the UEFI settings, and check that your USB stick is selected as the primary boot device. After that, you can start a clean installation of Windows on your computer, or you can run the Windows Recovery Environment (WinRE) to fix any problems with the installed OS.
23 comments
Thank you so much for providing this guide!
Using cmd for making bootable usb is advanced methos and so easy also. I always prefer cmd program to make bootable usb. No software is required now only cmd can make usb bootable.
Hi
could you please put more details Go to f:\efi\microsoft\boot on the USB flash drive and Copy its contents to a higher level (to the F:\efi\boot directory). There is not such directory efi\boot. Should I create this? My structure is like that F: \boot\efi\source\support\upgrade etc.
Thank you.
Thank you so much….
Hello there I have a installer disc it installs 32 and 64 bit windows all versions but i don’t have an efi foler in sources\install.wim\1\Windows\Boot
How do I make a uefi usb or disc?
Hi,
Try to download original installation images from Microsoft site.
Or use the freeware ISO2Disc. It allows to create a UEFI bootable USB from ISO file.
I agree 100%, after screwing around with partitions, different format schemes and wasting 4 hours of my life I stumbled on ISO2Disc
Holy cow that made life soooooo much easier! Get it, you can’t go wrong its free and it works flawless. I needed it for Server 2016 and UEFI boot
Hi,thanks!
I am able to make USB bootable in UEFI mode but once setup of windows 7 starts copying files then
I get error that a file is missing \windows\system32\boot\winload.efi anyone faced this ? Please help to resolve this.
Did you use the original Windows 7 ISO image? At what stage of the installation does the error appear? Already after you choose a partition to install?
USB boot starts and windows setup starts copying files then this error appears. Windows iso seems fine as I used a CD setup to install windows to another machine. From same setup I created ISO file using imgburn software. Please advice further. Thanks
hi, i have a notebook acer A315, the bios has only UEFI, how can i start windows 7 installation from usb stick? thank you so much.
Good evening! My name is george. I have a vision problem and I want your children to help you as much as possible. I use a voice reader in Windows 10 but the voice reader is not compatible with the specific operating system. I try to get back through the bios uefi to legacy so I can install Windows 7. When I start installing it does Windows loading file. Then he asks me the language and when I click on install now he displays the following message:
It says there is a missing cd dvd driver installed via a USB stick.
Settings within the bios are done correctly. Also bios has been upgraded to its latest version and the security boot is disabled.
The computer has been purchased 3 days ago and unfortunately I can not use it.
Its processor is the eighth generation Intel i7.
And the computer model is the following:
hp probook 450 g6
Thanks in advance for your answers!
Windows 7 doesn’t have native USB 3.0 support. You should add USB drivers to the install image manually. See the article: https://woshub.com/adding-usb-3-0-controller-drivers-to-windows-7-install-media/
Thank you for providing this helpful guide, while rufus is the easier way to go i had to use diskpart because i was dealing with fake usb drive with fake capacity. There was no way to specify partition size in rufus. Cheers.
Note, i used the following to create 10GB partition :
create partition primary size=10240
I can only build a working x64 UEFI Boot stick.
But i want install a x86 UEFI Windows 8.1
This seems to be very difficulty.
This doesn’t work , for UEFI MODE , copying files in boot section (Efi) and renaming didn’t work .
I got the message in the Bios : CANNOT FIND BOOT …….. press a key .
My System is in UEFI , and my usb stick is GPT …so GPT /UEFI . it should work …
For usb use efi folder contents alone.
For cd/dvd use dvd folder files
Thank you for this information you saved me.
last i year i make a usb boot able from rufus software that works good and all types of win 10 in gpt auromatic install origenal from pen drive to laptop.but still now i make usb drive to gpt that not works as automatic origenal installation from pen drive
last i year i make a usb boot able from rufus software that works good and all types of win 10 in gpt auromatic install origenal from pen drive to laptop.but still now i make usb drive to gpt that not works as automatic origenal installation from pen drive
plz send solution for making all win 10 boot able pen drive from one iso
This worked GREAT for me! I had 4 new Dell Optiplex 5060 computers to set up, and we wanted to use our own Windows 10 software (without the forced Office 365), and this worked perfectly! I did have to rest SATA to ACHI instead of RAID, but that’s minor. Thanks for a great tutorial.
If you create a bootable USB flash drive UEFI for 64-bit Windows Vista SP1, Windows 7 or Windows Server 2008 R2 flash drive you should create EFI directory on a flash drive and copy boot folder in it.
I have a locally burned copy of the original Win 10 installation CD. It too does not support USB 3.0 or GPT filesystem. It wants me to change all my drives to MBR style. A recent, up-to-date download is O.K.