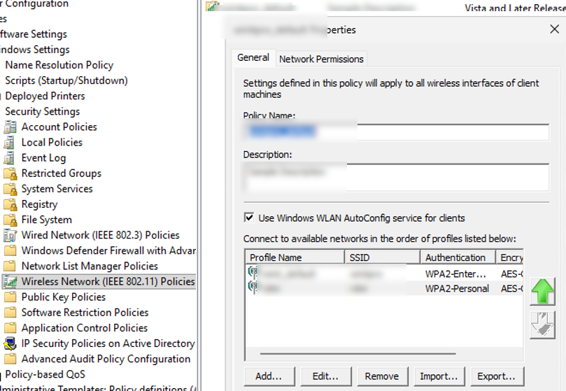
In Windows, you can deploy pre-configured wireless (WLAN) profiles to client computers before they first connect to target Wi-Fi networks. Once a device discovers a matching Wi‑Fi network, it automatically connects using the predefined settings in the WLAN profile. This allows administrators to deploy WLAN connection settings to computers in advance, eliminating the need for manual Wi-Fi configuration on each computer. This is especially useful if the target wireless network is not currently available. In this post, I’ll cover how to export a configured Wi-Fi profile from one computer and import it to another, as well as how to use Group Policy to deploy Wi-Fi profiles to devices joined to an Active Directory domain.
Export and Import Wi-Fi (WLAN) Profiles in Windows with Netsh
After configuring a wireless connection on one Windows computer, you can export the configured Wi-Fi profile to an XML file and deploy it to other computers. This can be done using the built-in netsh command-line tool.
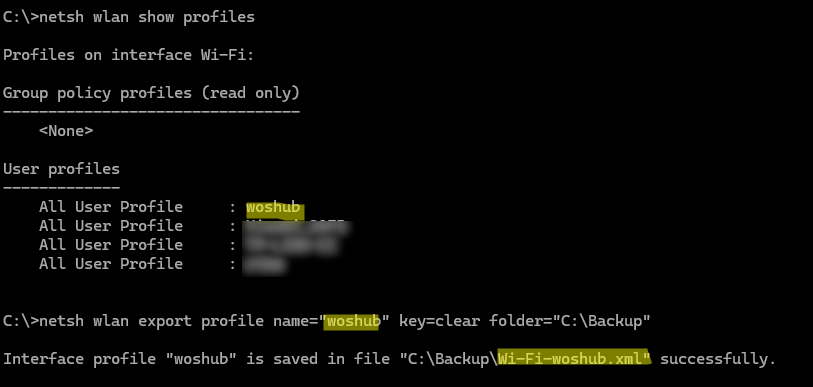
To list all saved WLAN profiles on a computer, run:
netsh wlan show profiles
To export a specific Wi-Fi profile (by its name) to a folder, use:
netsh wlan export profile name="woshub" key=clear folder="C:\Backup"
Thekey=clear option used to export the Wi-Fi security key (password) as plain text. Skipping this option exports the Wi-Fi key in an encrypted form that is protected by the local computer’s encryption keys, which means the key cannot be decrypted or imported for use on another computer.
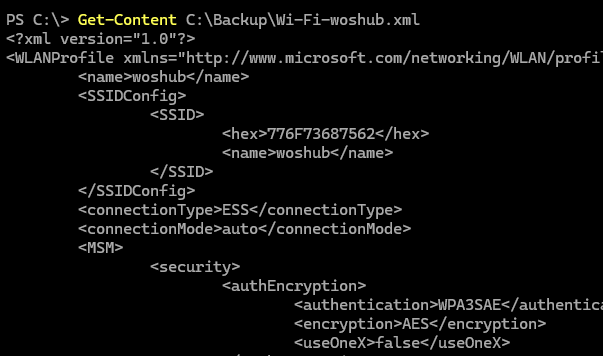
The WLAN profile is exported as an XML file containing all the wireless network’s connection settings, including the SSID and Wi-Fi password (in plain text when key=clear is used).
You can copy this XML file to another computer and import the Wi-Fi profile using the following command:
netsh wlan add profile filename="C:\Backup\Wi-Fi-woshub.xml"
Verify that the profile has been imported successfully and appears in the list of available WLAN profiles:
netsh wlan show profiles
By default, an imported WLAN profile is available to all users of the computer. To import the profile for the current user only, add the user=current option:
netsh wlan add profile filename="C:\Backup\Wi-Fi-woshub.xml" user=current
To assign the highest priority to the imported WLAN profile, run:
netsh wlan set profileorder name="woshub" interface="Wi-Fi" priority=1
netsh wlan set profileorder name="woshub" interface="Wi-Fi" priority=1
To connect to the wireless network using the imported profile from the command prompt (instead of the GUI), run:
netsh wlan connect name="woshub"
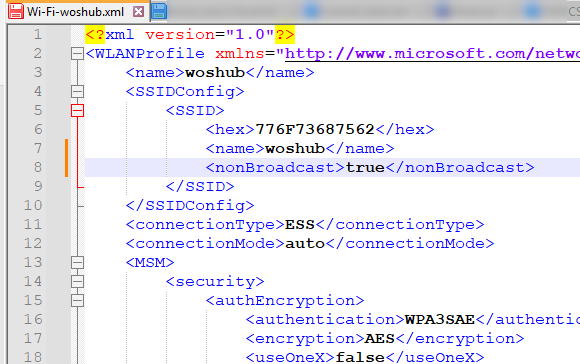
Since the WLAN profile is stored as a plain XML file, it can be edited manually before deployment. For example, you can change the network SSID, update the security key, or modify other connection settings.
Some commonly used XML options include:
<enableRandomization>true</enableRandomization>– enable MAC address randomization for Wi-Fi connections<nonBroadcast>true</nonBroadcast>– set that the wireless network uses a hidden (non-broadcast) SSID<connectionMode>auto</connectionMode>– enableWindows to automatically connect to the network whenever it is within range.
You can also use PowerShell to automate the export of all saved Wi-Fi profiles from one computer and import them on another.
Export all saved WLAN profiles to a folder:
 $FolderPath = "$env:USERPROFILE\Desktop\WiFi"
 if (!(Test-Path $FolderPath)) {
 New-Item -Path $FolderPath -ItemType Directory
 }
 netsh wlan export profile folder="$FolderPath" key=clear
Copy the exported folder to the target computer and import all WLAN profiles with the following PowerShell script:
$WLANs = Get-ChildItem "$env:USERPROFILE\Desktop\WiFi" | Select-Object Name
 foreach ($network in $WLANs) {
 netsh wlan add profile filename=$($network.Name) user=all
 }
Deploying Wi-Fi Profiles to Windows Computers with Group Policy
Group Policy provides an efficient way to automatically deploy Wi-Fi profiles to domain-joined computers. There are two common approaches:
- Configure a logon/startup script in GPO that runs once on each computer and imports a Wi-Fi profile from an XML file.
- Use native Wireless Network (IEEE 802.11) Policies. This approach is intended for enterprise wireless networks that use certificate-based authentication or a RADIUS server. However, it cannot be used to distribute a pre-shared key (PSK) for WPA/WPA2/WPA3-Personal wireless networks.
The simplest deployment method is to use a Group Policy script that imports the WLAN profile during computer startup or user logon.
- Prepare an XML file containing the configured WLAN profiles. You can either create it manually or export it from a reference computer using the
netsh wlan exportprofile command. - Create a batch file named add_wifi_profile.bat containing the following commands:
REM If the file C:\wlanprofileflag.txt exists, then the profile has already been imported, go to _END
 IF EXIST C:\wlanprofileflag.txt GOTO _END
 netsh wlan add profile filename="\\woshub.com\netlogon\Wi-Fi-profile.xml" user=all >> C:\wlanprofileflag.txt
 netsh wlan set profileorder name="woshub" interface="Wi-Fi" priority=1
 GOTO :EOF
:_END - This GPO startup script is designed to run only once on each computer. It checks for the presence of a flag file (wlanprofileflag.txt) before importing the WLAN profile, preventing the script from running again on subsequent startups.
- Copy both the XML profile and the
add_wifi_profile.batfile to the NETLOGON share on a domain controller. - Create a new domain GPO and configure the batch file as a Startup script under Computer Configuration -> Policies -> Windows Settings -> Scripts (Startup/Shutdown)

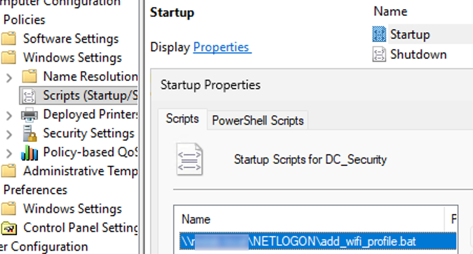
If the enterprise Wi-Fi authentication (for example, NPS and RADIUS) is used in your environment, you can deploy wireless network settings using the built-in Wireless Network (IEEE 802.11) Policies instead of a startup script. The policy is located at Computer Configuration -> Policies -> Windows Settings -> Security Settings -> Wireless Network (IEEE 802.11) Policies.
Unlike the XML import method, Wireless Network (IEEE 802.11) Policies cannot be used to deploy pre-shared keys (PSKs) used by WPA/WPA2/WPA3-Personal networks. Instead, they are designed for enterprise authentication methods such as 802.1X with client certificates or RADIUS authentication using user or computer credentials.
If you import a WLAN profile XML file that contains a saved Wi-Fi password into a Wireless Network (IEEE 802.11) Policy, the pre-shared key is automatically removed. This behavior is by design, ensuring that Group Policy is used only for enterprise-class wireless authentication methods rather than deploying shared Wi-Fi passwords.