CrowdSec is an open-source security engine written in Go. It is often referred to as a modern alternative to Fail2Ban. CrowdSec can analyze server logs, running services, and web applications to detect suspicious activity, such as password brute-forcing and port scanning. It can automatically block suspicious IP addresses in the firewall. Although CrowdSec was originally developed for a Linux environment, it is now available for Windows. Out of the box, CrowdSec Security Engine for Windows can detect and block brute-force attacks via SMB and RDP. With additional configuration, it can be used to block network port scanning and attacks against SQL Server, Exchange, and IIS web apps.
In this article, we will look at a basic step-by-step CrowdSec deployment scenario on a Windows Server 2025 standalone host, where all components (log collector, API server, and firewall bouncer) are run on a single local machine. Then, we will demonstrate how to use CrowdSec to detect and protect against RDP password brute force attacks.
How to Install CrowdSec Security Engine on Windows
These are the prerequisites for installing CrowdSec on Windows:
- Install .NET 6.0 Desktop Runtime:
winget install Microsoft.DotNet.DesktopRuntime.6In this post, we will use the WinGet package manager to install additional software on Windows. If WinGet is not installed on a machine, the specified packages can be downloaded manually from the Microsoft website or the CrowdSec GitHub repository. - TCP port 8080 is the default port used by the CrowdSec Local API (LAPI). Make sure this port is not being used by other services:
Get-Process -Id (Get-NetTCPConnection -LocalPort 8080).OwningProcess - If you want CrowdSec to block IP addresses from which brute-force attempts against accounts are detected, including RDP logons, you need to enable Windows logon audit policy, which is disabled by default. Open the
secpol.mscand navigate to Advanced Audit Policy Configuration -> Audit Policies -> Logon/Logoff. Open the Audit Logon policy and check the Failure option. Now, if a remote user fails to authenticate on a machine, a corresponding event will be added to the Security log in Event Viewer.
 Now, if a remote user fails to authenticate on a machine, a corresponding event will be added to the Security log in Event Viewer.
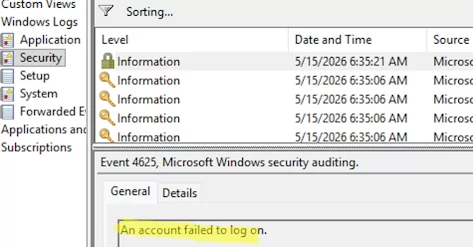
- The
localhostaddress is used by default in the CrowdSec configuration file, which can resolve to the IPv6 address[::1]in Windows (this is because, by default, IPv6 has a higher priority than IPv4). This can cause problems when interacting with local LAPI, CLI components, and bouncers. Therefore, you may need to replace “localhost” with127.0.0.1in the YAML configuration files.
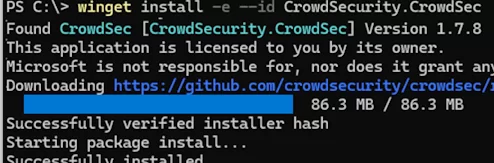
You can now install the CrowdSec Security Engine, which includes the agent/log parser and the server-side Local API with a database):
winget install -e --id CrowdSecurity.CrowdSec
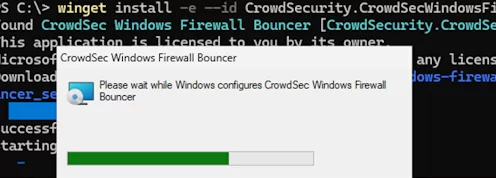
Next, install the crowdsec-firewall-bouncer component (https://github.com/crowdsecurity/cs-windows-firewall-bouncer/releases).
CrowdSec itself only detects attacks but does not block them. The Windows Firewall Bouncer is used to automatically block attackers’ addresses. It will retrieve IP addresses to block from the local CrowdSec API and then add them to the Windows Firewall rules.
winget install -e --id CrowdSecurity.CrowdSecWindowsFirewallBouncer
After installation, check and start two services:
Get-Service Crowdsec, cs-windows-firewall-bouncer| Start-service -verbose
Restart the PowerShell console and check that firewall-bouncer has been added and registered successfully in the list of CrowdSec bouncers.
cscli bouncers list
 When installing CrowdSec on Windows, it checks the installed services and enables the corresponding software bundles (collections) for them. In CrowdSec, a collection is a set of scenarios for securing and protecting a specific service. It includes parsers and attack detection scripts that contain detection logic.
List installed collections:
cscli collections list
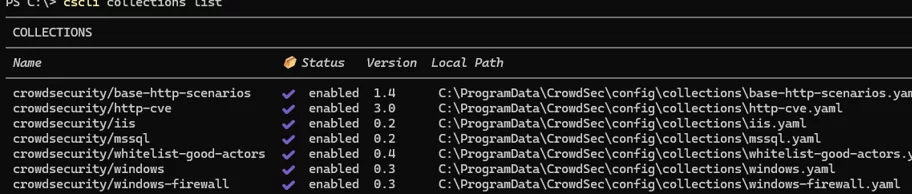
The list displays the name of each collection, its status, and the location of its YAML configuration file. The crowdsecurity/windows collection, for example, contains a basic IDS analysis package for Windows. This collection can also be used to detect and block brute-force attacks via RDP and SMB.
If this collection is missing, install it:
cscli collections install crowdsecurity/windows
Then, list the installed attack detection scenarios:
cscli scenarios list
Verify that the crowdsecurity/windows-bf password brute force detection scenario is present and enabled in the lists. If you need to install this scenario, run the following command:
cscli scenarios install crowdsecurity/windows-bf

You need to restart the agent service after adding or removing collections/scenarios or changing CrowdSec settings via configuration files:
Restart-Service crowdsec
Use the following command to check the current status of the CrowdSec agent:
cscli metrics
Using CrowdSec to Detect and Block Brute Force Attack Attempts on Windows
With the default installation of the CrowdSec engine on Windows, password brute-force detection scenarios are already active and rely on audit events in the Security log. Check the config file C:\ProgramData\CrowdSec\config\acquis.yaml to see the current detection settings.
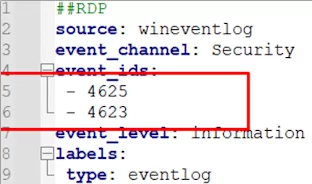
As you can see here, the CrowdSec rule is active. It monitors the Event Viewer event log for authentication error events (4625 and 4623).
Try to connect to this host via RDP several times, entering the wrong account credentials each time. The IP address of the remote computer will be blocked in the firewall after several failed authentication attempts.
List the anomalies detected and the decisions made based on log parsing (active bans):
cscli decisions list
In this example, the client IP address was blocked for 4 hours, based on the attack patterns defined in the crowdsecurity/windows-bf scenario.

The ban history can be displayed with the command:
cscli alerts list
The CrowdSec Windows Firewall Bouncer service creates a firewall rule called crowdsec-blocklistID that blocks access for the client IP address from which an attack is suspected.
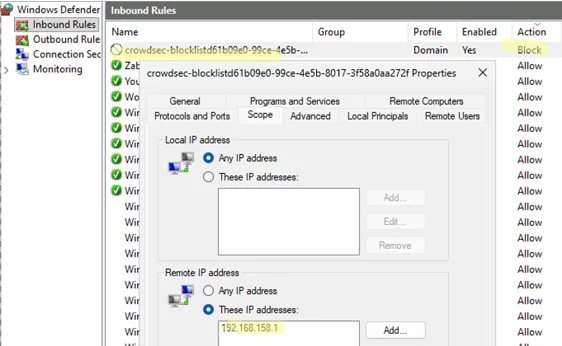
The IP address of an attacker will be automatically removed from the firewall blocklist rule after the ban time expires (4 hours by default). Or you can unblock the specific IP address manually.
cscli decisions delete --ip 192.168.123.4
To reset all active bans:
cscli decisions delete --all
To block a specific IP address in CrowdSec, use the following command:
cscli decisions add --ip 192.168.123.4 --reason "manually BAN IP"

Get-Content C:\ProgramData\CrowdSec\log\crowdsec.log -Wait -Tail 30

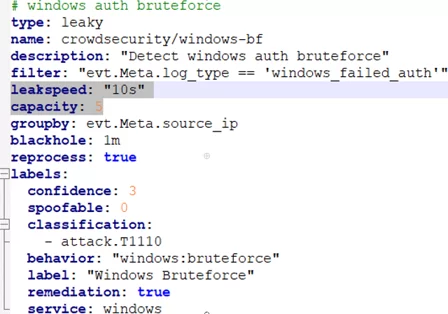
The scenario file is where the settings for detecting brute force attempts and the trigger conditions (number of unsuccessful logon attempts) are configured.
The settings for detecting brute force attempts and the trigger conditions (number of unsuccessful logon attempts) are configured in the scenario file. In this case, it is C:\ProgramData\CrowdSec\config\scenarios\windows-bf.yaml
Here, you can change some detection settings. For example:
- The number of failed login attempts that activate a security scenario is exceeded:
capacity: 5 - Set the number of seconds it takes for unsuccessful attempts to reset (forgotten):
leakspeed: 10s
The time for which an IP address should be blacklisted in the firewall is specified in the file C:\ProgramData\CrowdSec\config\profiles.yaml:
Duration: 4h
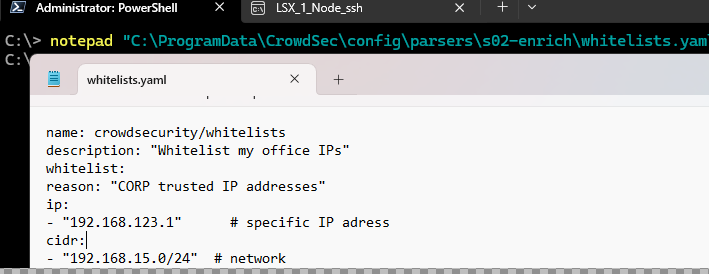
To whitelist specific IP addresses or networks that will never be blocked by CrowdSec rules, create a whitelists.yaml file and add the following configuration to it:
notepad "C:\ProgramData\CrowdSec\config\parsers\s02-enrich\whitelists.yaml"
name: crowdsecurity/whitelists
description: "Whitelist my office IPs"
whitelist:
reason: "CORP trusted IP addresses"
ip:
- "192.168.123.1"      # specific IP adress
cidr:
- "192.168.15.0/24"  # network
Restart the service:
Restart-Service crowdsec
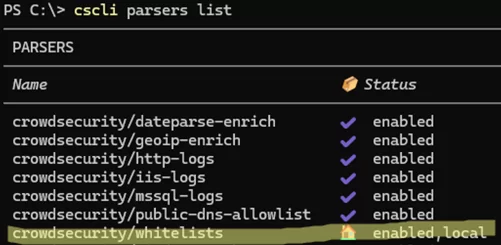
Check that the whitelists module is enabled:
cscli parsers list
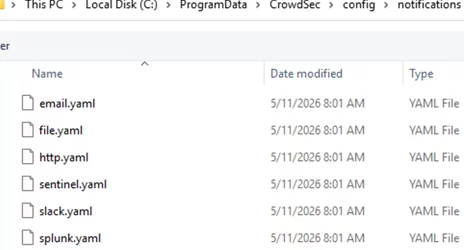
crowdsecurity/geoip-enrich parser, you can block or allow access to a protected host only from specific countries or locations (free registration and a MaxMind GeoIP database key are required). You can configure CrowdSec to send notifications about rule triggers via email, Slack, Splunk, or HTTP (can be used to send notifications to a messenger; for example, you can send a message to Telegram via HTTP API). To achieve this, enable the necessary notification methods in the C:\ProgramData\CrowdSec\config\profiles.yaml file and configure the connection parameters for the services in their respective YAML files located in the directory C:\ProgramData\CrowdSec\config\notification.
 +
+
In addition to brute-force detection scenarios, the default crowdsecurity/windows collection includes the crowdsecurity/iptables-scan-multi_ports scenario that can detect and prevent host port scans (requires enabling Windows Firewall text logs, which will be used to analyze network activity).
The crowdsecurity/iis-logs and crowdsecurity/http-logs collections can be used to analyze IIS web server logs and block suspicious activity.
The community edition of the CrowdSec engine offers free access to the CrowdSec Cloud Console, which is a public web interface. In order to use it, you must register on the https://app.crowdsec.net/ website. Then, you can connect your agent to receive global statistics, use global block lists, and manage blocking through the web interface.
It can be implemented as a simple IPS/IDS solution for a single Windows host or a group of servers, with centralized log processing and blacklist management across multiple machines.