Windows Sandbox is a built-in feature in Windows 10 and 11 that provides a temporary, lightweight, fully isolated environment for safely testing untrusted applications or opening suspicious files. When the Windows Sandbox is closed, all changes made within the environment are discarded. The next time it is launched, it starts from a clean, pristine state. Windows Sandbox is based on Windows virtualization and container-based isolation features. In this article, we’ll show how to enable, configure, and use Windows Sandbox in Windows 11.
Unlike a traditional virtual machine, Windows Sandbox does not require you to install, configure, license, or activate a Windows image. The Sandbox container uses less disk space and fewer system resources by leveraging the host Windows image as its base layer. Changes made in such an isolated environment will not affect your main operating system. Once the Sandbox has been closed, all of its contents are cleared. A sandboxed container is useful for more than just running potentially risky apps; it can also be used for testing scripts and debugging app deployments.
How to Enable Sandbox in Windows 11
To use Windows Sandbox, your computer must meet the following minimum requirements:
- A 64-bit CPU with a minimum of two cores
- Enabled hardware virtualization support in the computer’s BIOS/UEFI firmware settings. When running Windows 11 OS in a virtual machine, support for nested virtualization must be enabled in the VM settings.
- Windows 11 with Pro or Enterprise edition
- At least 4 GB of memory (8 GB recommended) and 1 GB of free disk space (SSD preferred)
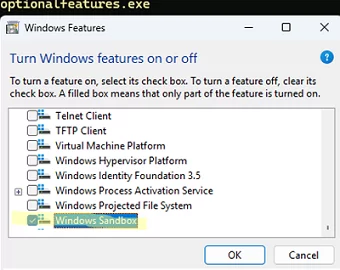
The Sandbox can be enabled using the classic ‘Turn Windows features on or off’ applet. Open it with the command:
optionalfeatures.exe
Check the Windows Sandbox feature for installation.
Or install the Sandbox feature using PowerShell:
Enable-WindowsOptionalFeature -FeatureName "Containers-DisposableClientVM" -All -Online
A reboot will be required after installation.

The Windows Sandbox base container image and virtual disks are stored in the C:\ProgramData\Microsoft\Windows\Containers\Sandboxes folder. Note that over time, the Sandbox container layer files (similar to those used by Docker) can accumulate in the C:\ProgramData\Microsoft\Windows\Containers\Layers directory and consume a significant amount of disk space. There is no straightforward method available for cleaning up or consolidating Sandbox layer files. So, to significantly reduce disk usage, the most effective approach is to disable the Windows Sandbox feature, clear the associated directories, and then re-enable it.
Using the Windows Sandbox Feature in Windows 11
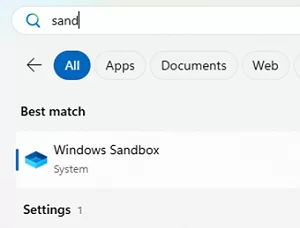
To open the Windows Sandbox, either find the item in the Start menu or run the WindowsSandbox.exe command.
A new window will open displaying a clean Windows desktop. This is a clean Windows 11 image with the default settings. It is dynamically generated based on the component files and libraries of your host operating system. The Windows version and build will remain the same.
Only one sandbox instance can be launched at a time. The following resources are assigned to the container:
- The number of CPU cores is the same as that on the host
- 4 GB of RAM
- 80 GB hard drive
Inside the Sandbox, a network is enabled, configured, and connected to the Internet via a Hyper-V virtual switch with NAT through the host’s primary network adapter.

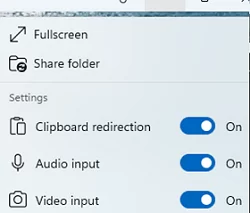
You can adjust certain settings by clicking the three-dot menu in the Windows Sandbox title bar. From here, you can enable audio/video redirection and clipboard sharing, expand the Sandbox window to full screen, or mount a local host folder into the Sandbox container.
The sandbox console window can be used similarly to an RDP session. You can resize the Windows Sandbox window, and the Sandbox desktop resolution will automatically adjust to fit it.
The clipboard between the host and the Sandbox container is enabled by default, allowing you to transfer any file from your computer via drag-and-drop or the copy-and-paste (Ctrl+C and Ctrl+V).
If you close the Sandbox window, all changes made inside the container are discarded. A warning appears when you close the Sandbox console:
Are you sure you want to close Windows Sandbox? Once Windows Sandbox is closed all of its content will be discarded and permanently lost.

Customizing Windows Sandbox Using Configuration Files
The settings for Windows Sandbox can be managed using configuration files. The Windows Sandbox configuration file is an XML-formatted file with the .WSB extension (Windows Sandbox Configuration). The following options (tags) can be set in the WSB file:
- vGPU – access to the host video card (GPU)
- Networking – network access from the Sandbox
- MappedFolders – share a folder from the host operating system with the sandbox (can be made available for either read or write access)
- LogonCommand — a command or script to run when the Sandbox starts
- AudioInput
- VideoInput
- ProtectedClient – enhanced security mode features for host workstation protection (using AppContainer isolation execution environment)
- PrinterRedirection – enabling printer redirection from the host OS
- ClipboardRedirection – clipboard redirection
- MemoryInMB – the amount of available RAM (in MB) in the Sandbox environment
Most of these options are set to Enable, Disable, or Default.
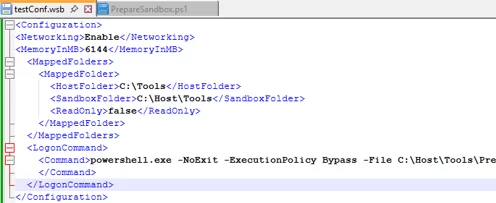
Below is a sample Windows Sandbox configuration file, which is used for:
- Enable access to the network.
- The amount of RAM available in the container has increased to 6 GB.
- Mount the local folder
C:\WSBfrom the host OS toC:\HostShare\in the Sandbox container. The target path in the sandbox will be created automatically. - When the Sandbox environment boots up, the logon script runs automatically (in our case, this is a PowerShell script).
<Configuration>
<Networking>Enable</Networking>
<MemoryInMB>6144</MemoryInMB>
<MappedFolders>
<MappedFolder>
<HostFolder>C:\WSB</HostFolder>
<SandboxFolder>C:\HostShare\Tools</SandboxFolder>
<ReadOnly>false</ReadOnly>
</MappedFolder>
</MappedFolders>
<LogonCommand>
<Command> powershell.exe -NoExit -ExecutionPolicy Bypass -File C:\HostShare\Tools\PrepareSandbox.ps1
</Command>
</LogonCommand>
</Configuration>
To run the Sandbox with a custom configuration, simply double-click the WSB file.
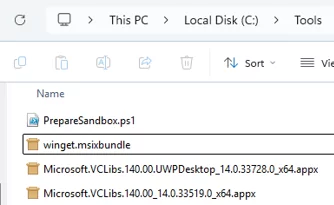
Using WSB configuration files, you can create multiple sandbox configurations with different environments. For example, the following PowerShell script can be executed automatically when the sandbox starts. It installs the WinGet package manager, which is missing from the Sandbox container, as well as the specific apps that I need within my test Sandbox environment.
$SRCDir="C:\HostShare\Tools\WinGet"
 Add-AppxPackage -Path $SRCDir\Microsoft.VCLibs.140.00.UWPDesktop_14.0.33728.0_x64.appx
 Add-AppxPackage -Path $SRCDir\Microsoft.VCLibs.140.00_14.0.33519.0_x64.appx
 Add-AppxPackage -Path $SRCDir\Microsoft.WindowsAppRuntime.1.8_8000.616.304.0_x64.appx
 Add-AppxPackage -Path $SRCDir\winget.msixbundle -ForceApplicationShutdown
 Start-Sleep -Seconds 5
 '7zip.7zip', 'Telerik.Fiddler', 'PuTTY.PuTTY', 'Notepad++.Notepad++', 'FileZilla.FileZilla'| % {
 winget install $_ --source winget --force --silent --accept-source-agreements --accept-package-agreements
 }
You can also use winget configuration files to deploy a pre-configured Windows Sandbox environment. This can be achieved using the built-in WinGet DSC provider:
Microsoft.WindowsSandbox.DSC/WindowsSandbox
You can create multiple WSB configuration files to quickly provision required Sandbox environments with their own distinct settings and tool sets.
Managing Windows Sandbox via Command Line Interface
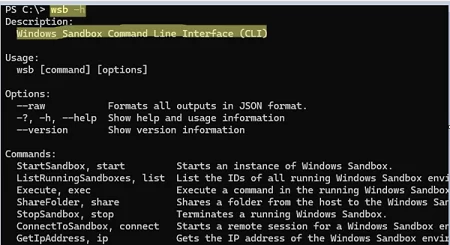
The wsb.exe (Windows Sandbox CLI) console command is available for managing the Sandbox starting with Windows 11 24H2. This command-line tool can be used in automation scripts and various other scenarios to start, stop, connect to, and configure a sandbox instance.
The following options are available:
start– start the Sandboxlist– get the ID of a running Windows Sandbox instanceexec– execute a command (script) within the running Sandbox environmentshare– share a local folder between the host and the Windows Sandboxstop– power off a running Sandbox instanceconnect– connect to the Windows Sandbox environment by opening a console window

To run a Windows Sandbox instance in the background with a custom configuration, specify the environment settings using the --c ( --config ) option. For example, in order to start the Sandbox container with 8 GB of RAM, run the command:
wsb start --config "<Configuration><MemoryInMB>8192</MemoryInMB></Configuration>"
You can connect to the Sandbox instance running in the background by its ID:
wsb list
wsb connect --id 6f446955-fba4-455f-af60-4da1c64f8b3b

Run a command with SYSTEM privileges in the Sandbox environment:
wsb exec --id 6f446955-fba4-455f-af60-4da1c64f8b3b --run-as System --command 'sc stop wuauclt'
Exit code 0 means that the command has been successfully executed.

Map a local folder to the Sandbox environment with read-write access:
wsb share --id 6f446955-fba4-455f-af60-4da1c64f8b3b --host-path C:\Docs --sandbox-path C:\HOST\Docs --allow-write
This command transparently mounts a folder from the host Windows system into a directory inside the Sandbox.
Find out what IP address has been assigned to the SandboxL
wsb ip --id 6f446955-fba4-455f-af60-4da1c64f8b3b
How to Enable Sandbox in Windows 11 Home Edition
Although Windows Sandbox is not officially supported in Windows Home editions, you can enable this feature by running the following script:
dir /b %SystemRoot%\servicing\Packages\*Containers*.mum >sandbox_cont.txt
 for /f %%i in ('findstr /i . sandbox_cont.txt 2^>nul') do dism /online /norestart /add-package:"%SystemRoot%\servicing\Packages\%%i"
 del sandbox_cont.txt
 DISM /online /enable-feature /featurename:Containers-DisposableClientVM /LimitAccess /ALL
 pause
However, it is not guaranteed that the Windows Sandbox feature will work when installed on the Home edition of Windows 11.
To remove the Sandbox, use the following PowerShell command:
Disable-WindowsOptionalFeature –FeatureName "Containers-DisposableClientVM" -Onlin
Thus, a configured Windows Sandbox environment can be used to safely test third-party software in an isolated context, rapidly deploy test configurations, and debug scripts and scenarios without impacting the host OS. In many scenarios, the Windows 11 Sandbox can be more convenient than deploying a separate virtual machine.
1 comment
Just a question o try to install weired apps 😈
And Windows security app is bloking installation.
anybody have found a solution for this problem