Storage Spaces Direct (S2D) is Microsoft’s software-defined storage (SDS) technology, first introduced in Windows Server 2016. S2D allows you to join locally attached physical disks from multiple servers into a single, resilient, and scalable storage pool that can tolerate the failure of individual disks and entire servers. The cost of a software-defined storage solution can be significantly lower than that of a traditional hardware disk array (SAN or NAS). In addition, its straightforward scalability, allowing you to join up to 16 servers and more than 400 local disks, and support for different storage media, including HDDs, SSDs, and NVMe drives, make it possible to achieve significant performance.
In this guide, we will walk through the deployment of a 3-node S2D cluster on Windows Server 2025.
- What Is Storage Spaces Direct (S2D) in Windows Server?
- Storage Spaces Direct Requirements
- Preparing the Hosts for a Storage Spaces Direct Cluster
- Deploy a Windows Server Failover Cluster for Storage Spaces Direct
- How to Enable Storage Spaces Direct (S2D) on Windows Failover Cluster
- Monitoring Storage Spaces Direct Cluster Health
- How to Replace a Failed Physical Disk in Storage Spaces Direct
What Is Storage Spaces Direct (S2D) in Windows Server?
S2D is a further development of Storage Spaces technology and allows combining local disks from multiple nodes (servers) into storage pools. You can create virtual volumes on these storage pools and use them as Cluster Shared Volumes (CSVs) to store Hyper-V virtual machine files, or as Scale-Out File Shares (SOFSs). To increase the S2D cluster’s storage capacity, you can either add a server or install a physical drive in an existing node. In general, Storage Spaces Direct is Microsoft’s answer to VMware vSAN.
S2D supports several storage resiliency configurations:
- Mirror (3-way or 2-way) – data is synchronously replicated across three+ nodes (or two nodes in a minimal configuration). A high read speed is achieved by distributing the read operation across all servers.
- Parity (2) – the data with parity information is distributed among different disks (a minimum of four nodes is required). This provides better storage efficiency than mirroring because it does not require multiple copies of the same data.
- Tiered storage (Mirror-Accelerated Parity) – combines both of the above approaches. Initially, data is written to the mirror tier, and then copied to the parity tier in the background.
Storage Spaces Direct Requirements
S2D supports the following storage device types:
- Common HDDs (SAS/SATA);
- SATA / SAS SSDs
- NVMe (Non-Volatile Memory Express) – ultra-fast SSDs connected via the high-speed PCI Express bus.
Different drive types can be combined into storage tiers optimized for performance or capacity. High-performance NVMe SSDs, for example, are ideal for caching and storing application transaction logs. In contrast, slower, less expensive HDD drives are better suited to storing archive files that do not require high-speed access.
The basic hardware requirements:
- Memory: 4 GB of RAM per 1 TB of storage capacity.
- Consistent server hardware: Using servers from the same manufacturer, preferably with identical models and configurations, is recommended.
- Network adapters: At least two NICs per node.
- High-speed networking: A high-bandwidth network connecting the S2D cluster nodes is required, with speeds of 10 GbE or higher.
- RDMA support: NICs supporting Remote Direct Memory Access (RDMA) are recommended to reduce latency. Supported technologies include iWARP and RoCE.
- Physical disks: In addition to the operating system disk, each node must have at least one physical drive available for the storage pool. All drives intended for use with Storage Spaces Direct must not contain existing partition tables.
- Storage controllers: RAID controllers are not supported. Drives must be connected through a simple HBA adapter operating in pass-through mode.
To deploy S2D, you must first configure a failover cluster that meets the following requirements for its nodes.
- Windows Server edition: Datacenter edition only.
- Installation option: Server Core (recommended) or the full GUI installation.
- Active Directory: All nodes must be joined to an Active Directory domain (starting with Windows Server 2016, some types of failover clusters can also be deployed in a workgroup without a domain).
- Required roles and features: File Services and Failover Clustering roles on the nodes.
- Cluster size: At least two servers are required. For higher resiliency, four or more nodes are preferable.
Preparing the Hosts for a Storage Spaces Direct Cluster
In our test lab, we will deploy a 3-node S2D cluster running Windows Server 2025.
I have three servers: Node01, Node02, and Node03. Each server has four SSD drives connected in addition to the system drive. Set a unique computer name (hostname) on each of the servers.
A three-node S2D cluster configuration supports only three-way mirroring (each data copy is stored on a separate physical server). This provides approximately 33.3% storage efficiency. The cluster can tolerate the loss of up to two physical drives on different nodes or the complete failure of one host. However, it cannot use the more storage-efficient Parity (RAID-5) or Mirror-Accelerated Parity resiliency options, both of which require at least four nodes.
Each host has two network adapters. If Switch Embedded Teaming (SET) is supported on these NICs, the recommended approach is to combine the physical network adapters into a Hyper-V virtual switch and create virtual network adapters for different types of traffic on it. The legacy NIC teaming mode (also known as LBFO) is not supported.
To keep things simple in this guide, we will use the physical NICs directly. The first adapter handles management and client access traffic, while the second is exclusively for storage traffic.
Let’s rename network adapters on each server and set the basic network settings using PowerShell:
# on Node01
 Rename-NetAdapter -Name "Ethernet0" -NewName "Management"
 Rename-NetAdapter -Name "Ethernet1" -NewName "S2DNetwork"
 # Assign an IP address to the management network
 New-NetIPAddress -InterfaceAlias "Management" -IPAddress 192.168.100.10 -PrefixLength 24 -DefaultGateway 192.168.100.1
 # Your Domain Controllers IPs
 Set-DnsClientServerAddress -InterfaceAlias "Management" -ServerAddresses 192.168.100.5,192.168.105.5
 # Assigning an IP address to an isolated storage network (without a gateway or DNS)
 New-NetIPAddress -InterfaceAlias "S2DNetwork" -IPAddress 10.10.0.10 -PrefixLength 24
Then join each server to the Active Directory domain.
Install-WindowsFeature -Name File-Services, Failover-Clustering, RSAT-Clustering-PowerShell, Storage-Replica -IncludeManagementTools -Restart

Deploy a Windows Server Failover Cluster for Storage Spaces Direct
The next step is to create a Windows Server Failover Cluster (WSFC) with the three nodes.
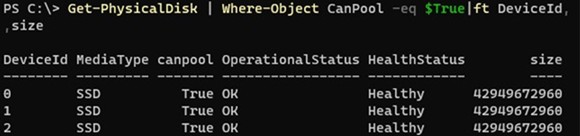
On each cluster host, verify that Windows Server detects the disks that are eligible for Storage Spaces Direct. These disks must be unpartitioned and have a status of CanPool = True.
# Check disks available for pooling (on each node)
Get-PhysicalDisk | Where-Object CanPool -eq $True|ft DeviceId, MediaType, canpool,OperationalStatus,HealthStatus,size
Run the cluster validation from any host. A set of tests is run to verify that everything is ready to join the nodes into an S2D cluster.
Test-Cluster -Node Node01, Node02, Node03 -Include "Storage Spaces Direct", "Inventory", "Network", "System Configuration"
If the validation is successful, create a cluster named S2D-Cl using the command:
New-Cluster -Name S2D-Cl -Node Node01, Node02, Node03 -NoStorage -StaticAddress 192.168.100.9
Set-ClusterQuorum -FileShareWitness \\UNCpath\S2DwitnessShare
An odd-numbered cluster does not require a witness.
How to Enable Storage Spaces Direct (S2D) on Windows Failover Cluster
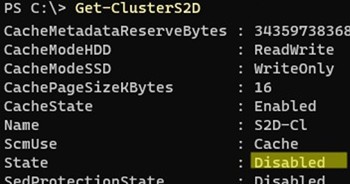
Check if the S2D cluster is enabled:
Get-ClusterS2D
Use the following cmdlet to automatically enable and configure the S2D cluster:
Enable-ClusterStorageSpacesDirect
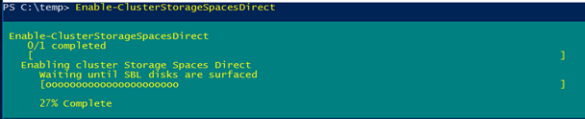
This command:
- Scans the available local disks on the cluster hosts.
- Creates a single storage pool from all available disks.
- If there are different types of disks present, some of the faster disks (NVMe or SSD) are automatically allocated for read and write caching.
- Automatically creates two storage tiers, Performance and Capacity (if both SSDs and HDDs are available). These tiers use three-way mirroring for resiliency. In clusters with four or more nodes, parity and mirror tiers are created instead.
- Enables the S2D system services.
To bypass the automatic creation of the storage pool and cache configuration, use this command to enable S2D.
Enable-ClusterStorageSpacesDirect -CacheState Disabled -AutoConfig:0 -SkipEligibilityChecks
Let’s check that a large storage pool named S2D on ClusterName has been created automatically.
Get-StoragePool | Where-Object { $_.FriendlyName -like "S2D*" }

Check that the disks are marked for S2D:
Get-PhysicalDisk | Select-Object FriendlyName, MediaType, OperationalStatus, HealthStatus, Size
no disks with supported bus types found to be used for S2D appears when running the Enable-ClusterS2D command, it is likely that the BusType of your disks is RAID (it is an unsupported configuration for S2D). Check the bus type:Get-Disk | select Number, FriendlyName, OperationalStatus, Size, PartitionStyle, BusType | sort Number | ft -AutoSize
If it is RAID, the solution is to update the drivers or firmware of the storage controllers (if you have HP servers, install the latest HPE Support Pack). Check the BusType again (now it’s changed to SAS).

There is a little trick that allows you to change the bus type to SATA for the specific type of controller:
HKEY_LOCAL_MACHINE\SYSTEM\CurrentControlSet\Services\arcsas\Parameters
 "BusType"=dword:0000000b (instead of 00000008)
Within the created storage pool of physical disks, you can create multiple volumes, each with a different resiliency and redundancy level.
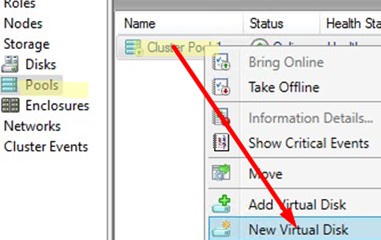
In Windows Server 2025, the graphical Failover Cluster Manager console (cluadmin.exe) can be used to create new volumes in an S2D storage pool.
- Open the Failover Cluster Manager snap-in.
- Expand your cluster -> navigate to Storage -> select Pools
- Right-click your storage pool and select New Virtual Disk

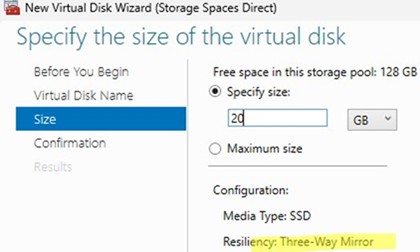
- Specify the volume name and its size
- A three-way mirror is the only resilient type that will be offered for a volume on a 3-node cluster.

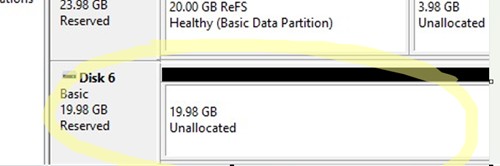
- After creating the volume, you will need to manually initialize it, create a partition, and format it in the ReFS file system.

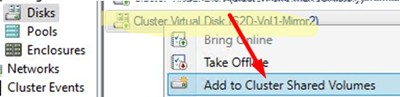
- The new volume will appear under Storage -> Disks with the Available Storage status.
- This volume can be used to host either Hyper-V virtual machines or Scale-Out File Server storage.
- To make the volume available for virtual machines, select the Add to Cluster Shared Volumes option.

However, it is more efficient and convenient to create and manage the S2D volumes using the Windows Admin Center (WAC) web interface or PowerShell.
For example, to create a new volume, format it in ReFS, and add it to CSV with just one command:
New-Volume -FriendlyName "Volume01" -StoragePoolFriendlyName S2D-Cl -FileSystem ReFS -Size 2TB
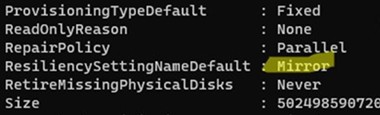
By default, new volumes use the resiliency type specified for the pool in the ResiliencySettingNameDefault parameter. In our case, this is Mirror.
Get-StoragePool s2d* | FL
You can change the resiliency type when creating a volume. For example, to create a two-way mirror:
New-Volume -FriendlyName S2D-Vol2-Mirror2 -StoragePoolFriendlyName S2D-Cl -PhysicalDiskRedundancy 1 -ResiliencySettingName "Mirror" -FileSystem CSVFS_ReFS -Size 10GB

Create a Three-way mirror volume:
New-Volume -FriendlyName S2D-Vol2-Mirror3 -StoragePoolFriendlyName S2D-Cl -PhysicalDiskRedundancy 2 -ResiliencySettingName "Mirror" -FileSystem CSVFS_ReFS -Size 1GB
To create a volume with parity:
New-Volume -FriendlyName "S2D-Vol1-Parity" -StoragePoolFriendlyName S2D-Cl -FileSystem CSVFS_ReFS -Size 1GB -ResiliencySettingName Parity
By default, this command attempts to create a volume with Dual Parity resiliency (similar to RAID-6), which strictly requires a minimum of 4 nodes in S2D.
To create a Parity volume across three nodes, you must manually set the number of physical copies of the data to one (PhysicalDiskRedundancy = 1):
New-VirtualDisk -FriendlyName "S2D-Vol1-Parity" -StoragePoolFriendlyName S2D-Cl -Size 1GB -ResiliencySettingName Parity -PhysicalDiskRedundancy 1 -ProvisioningType Fixed
Use the following command to list the S2D volumes with their resiliency type and physical disk redundancy level:
Get-VirtualDisk | ft FriendlyName, ResiliencySettingName, PhysicalDiskRedundancy
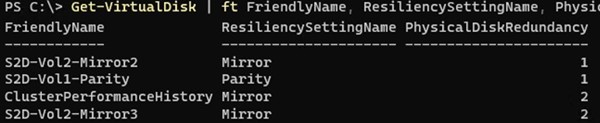
To view information about a storage volume, including storage efficiency and total space used:
Get-VirtualDisk "S2D-Vol1-Parity"
Add a new physical disk to the storage pool:
$HDDs = Get-PhysicalDisk | ? PhysicalLocation -like "*LUN 4"
Add-PhysicalDisk -PhysicalDisks $HDDs -StoragePoolFriendlyName S2D
Disks marked as S2D are not displayed in the Disk Management console anymore, and that is OK.

Monitoring Storage Spaces Direct Cluster Health
You can use the built-in PowerShell commands to check the health of your S2D cluster.
Overall storage pool status:
Get-StoragePool -FriendlyName S2D-Cl| Select-Object FriendlyName, HealthStatus, OperationalStatus, Size, AllocatedSize, IsReadOnly

View the status of the S2D volumes:
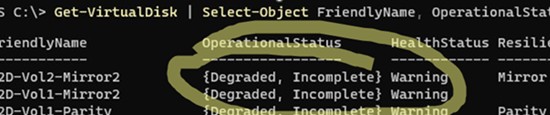
Get-VirtualDisk | Select-Object FriendlyName, OperationalStatus, HealthStatus, ResiliencySettingName, OperationalDetails

If everything is ok, HealthStatus will be equal to Healthy. If not (for example, one of the nodes or disks is unavailable, but without loss of data integrity), then the Operating Status: Degraded, Incomplete, and HealtStatus=Warning.
How to Replace a Failed Physical Disk in Storage Spaces Direct
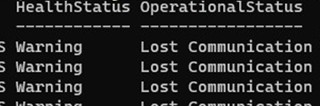
View the failed physical disks:
Get-PhysicalDisk | Where-Object { $_.HealthStatus -ne "Healthy" } | Select-Object FriendlyName, HealthStatus, OperationalStatus, Model
Mark the disk as retired and prevent further write attempts to it:
Get-PhysicalDisk | Where-Object {$_.HealthStatus -ne "Healthy" -or $_.OperationalStatus -eq "Retired"}
The following commands will mark the disk as retired and start the background evacuation of problematic disk data to other drives:
$FailedDisk = Get-PhysicalDisk | Where-Object {$_.HealthStatus -ne "Healthy"}
Set-PhysicalDisk -InputObject $FailedDisk -Usage Retired
To make it easier to identify a disk inside a multi-drive chassis or storage enclosure (JBOD), turn on the LED light on the disk:
$FailedDisk | Enable-PhysicalDiskIdentification
Remove the failed disk from the storage pool:
Remove-PhysicalDisk -StoragePoolFriendlyName S2D-Cl -PhysicalDisks $FailedDisk
Replace a failed disk with a new one. S2D will automatically detect and add a newly inserted disk to the existing storage pool. The data will then be redistributed automatically between the disks in the cluster.
If the AutoPool option has been disabled for a cluster, ensure that the operating system has detected the new disk.
$Disk = Get-PhysicalDisk | ? CanPool –eq True
Then add the new disk to the storage pool:
Get-StoragePool S2D-Cl | Add-PhysicalDisk –PhysicalDisks $Disk –Verbos
You can check the status of resiliency repair and pool rebalancing using the command:
Get-StorageJob
In summary, Storage Spaces Direct makes it easy to build software-defined shared storage using local disks across multiple physical servers. S2D protects against the simultaneous failure of any two disks or, in clusters with four or more nodes, two servers. If a disk or server failure is detected, the S2D cluster automatically starts redistributing data across the remaining devices to restore resiliency. In a test environment, you can verify that the storage remains accessible and the virtual machines running on it continue to operate normally even after any two disks are disconnected.
13 comments
Hi,
I am trying to setup S2D on Virtual environment. I am using 3 node cluster with node majority.
Each node have 4 disks. Every time I tried to enable S2D, it fails after 1 hour 1 min with error.
Enable-ClusterS2D : Operation did not complete in time while ‘Waiting until SBL disks are surfaced’. Run cluster
validation, including the Storage Spaces Direct tests, to verify the configuration
Enable-ClusterS2D : Failed to run CIM method EnableStorageSpacesDirect on the
root/MSCLUSTER/MSCluster_StorageSpacesDirect CIM object. The CIM method returned the following error code: 1460
Have a come across such situation? any fix available for this.
Yes, we have the same problem on 2-node cluster with FileSharing Witness. Installed on 2x HPE DL360 Gen10, running Windows 2016 Datacenter with all Security Fixes. Cluster verification OK (no errors). But Enable-ClusterS2D script timeout after 1 hour, 1 minute with error id 1460. I could not find any fix too.
Have you tried to update the firmware on the drives?
In my case, the s2d cluster is no initializated due to the fact that WindowsServer2016 was installed in the Legacy mode. After reinstalling the OS in the native UEFI mode, the problem disappeared.
Hello,
OS was installed directly in the UEFI mode. Last Service Pack for Proliants was installed too (firmware, drivers etc.). Still no luck. Now I am waiting for the second HBA controller. Disk drives for S2D will be connected to H240 in HBA mode instead the SmartArray P816i-a. Then I’ll try a clean install on this hardware config as last chance. 🙂
It seems that S2D isn’t available for us. 🙁 Even with disks connected to HBA240 in HBA mode we don’t succeed. We have to spend huge money to 2x HPE Nimble Storage (we need HA SAN storage).
Windows 2016/2019 S2D to ESXi 6.7.0
Assume I have 4 servers with Windows clusters(s2d enabled).
Can we present the storage from Windows s2d through ISCSI to ESXi 6.7.0 servers?
Is this possible and recommended one ?
Yes, you can do that.
I had that error too when trying to enable S2D using HPE DL380’s, 2 x Gen8, 1 x Gen9 and 1 x Gen10. In the end, I had wipe them and use Server 2019 then I was able to enable it. Seems Server 2022 didn’t like the hardware.
In the end I was able to get this working with Server 2022
I’ve followed your guide to successfully setup many clusters with S2D, so THANK YOU! After all these years I finally have a failed disk, though. The disk was automatically set to “retired” by the cluster manager (apparently). The new disk I added to a spare slot was also /automatically/ picked up by S2D and added to the pool. I’m not confident in MS’s automation enough to trust that I can safely pull the failed disk. Are there any other commands or tools to verify the storage pool is safely rebuilt and using the new drive so I can eject the retired one?
To replace a physical drive:
Get the serial number of the disk you want to remove by running Get-PhysicalDisk or looking in Windows Admin Centre.
Retire the disk.
$HDD = Get-PhysicalDisk |? SerialNumber -EQ serialnumber
Repair-VirtualDisk -FriendlyName “Mirror”
Get-StorageJob (Wait for it to finish)
Remove-PhysicalDisk -PhysicalDisks $HDD -StoragePoolFriendlyName S2D-Pool
Additionally, once you have done this, you can take the retired drive offline:
Get-Disk | ? { $_.UniqueId -in ($HDD).UniqueId } | Set-Disk -IsOffline $false;can I replace three retired disks at once?