Windows OS Hub
  • Windows
    • Windows 11
    • Windows 10
    • Windows Server 2025
    • Windows Server 2022
    • Windows Server 2019
    • Windows Server 2016
  • Microsoft
    • Active Directory (AD DS)
    • Group Policies (GPOs)
    • Exchange Server
    • Azure and Microsoft 365
    • Microsoft Office
  • Virtualization
    • VMware
    • Hyper-V
    • Proxmox
  • PowerShell
  • Linux
  • Home
  • About

Windows OS Hub

  • Windows
    • Windows 11
    • Windows 10
    • Windows Server 2025
    • Windows Server 2022
    • Windows Server 2019
    • Windows Server 2016
  • Microsoft
    • Active Directory (AD DS)
    • Group Policies (GPOs)
    • Exchange Server
    • Azure and Microsoft 365
    • Microsoft Office
  • Virtualization
    • VMware
    • Hyper-V
    • Proxmox
  • PowerShell
  • Linux

 Windows OS Hub / Windows 11 / How to Hide Wi-Fi Network in Windows with WLAN Filters (Blacklist and Whitelist)

August 14, 2026

How to Hide Wi-Fi Network in Windows with WLAN Filters (Blacklist and Whitelist)

By default, Windows displays the names (SSIDs) of all available Wi-Fi networks within range of the wireless adapter. Windows administrators can hide specific SSIDs from the list of available wireless networks or, conversely, allow connections only to approved Wi‑Fi networks while blocking all others. In this article, we’ll show you how to configure Wi-Fi allowlists and blocklists in Windows using the built-in WLAN filtering feature.

The built-in netsh console command is used to manage wireless network filters. Open a command prompt or PowerShell as an administrator (elevated permissions are required to modify WLAN filters).

To view the Wi-Fi networks currently discovered by the wireless adapter, run:

netsh wlan show networks
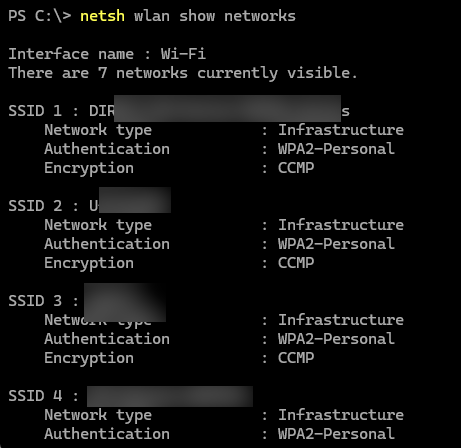
netsh wlan show networks - command to list all the available Wi-Fi networks nearby

Querying the network list using the netsh command in Windows 11 requires permission to access the location services. If access to location services is not allowed, running the netsh wlan show networks command will result in the following error:

Interface name: Wi-Fi
Network shell commands need location permission to access WLAN information. Turn on Location services on the Location page in Privacy & security settings.
Here is the URI for the Location page in the Settings app:ms-settings:privacy-location
To open the Location page in the Settings app, hold down the Ctrl key and select the link, or run the following command:start ms-settings:privacy-location
Or, to open the Location page from the Run dialog box, press Windows logo key + R, and then copy and paste the URI above.
Access is denied.

To enable location access, run the following URI command: start ms-settings:privacy-location This will take you to the specific configuration page in the Settings app. Then, enable Location Services there. Or grant access to geolocation using the command:

SystemSettingsAdminFlows.exe SetCamSystemGlobal location 1
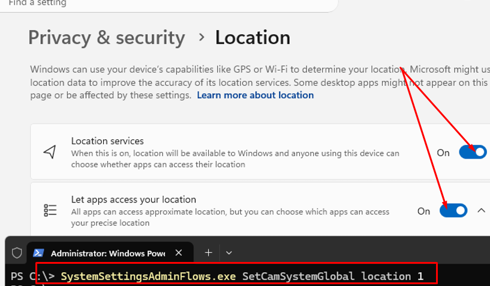
Enable location service access in Windows 11

To show additional information about available Wi-Fi networks, such as signal strength, supported protocols, authentication type, and encryption, run the command:

netsh wlan show networks mode=bssid

The WLAN AutoConfig service (wlansvc) is responsible for discovering and listing the available wireless networks in Windows. This service also allows filtering which wireless networks are available for users to connect to.

Windows supports two WLAN filtering modes:

  • Blocklist (blacklist) – the administrator defines which Wi-Fi network SSIDs should be hidden from the list of available networks. All other WLANs remain available.
  • Allowlist (whitelist) – the administrator explicitly specifies the Wi-Fi networks that users are allowed to connect to. Access to all other wireless networks is denied.

To hide a single wireless network from the list of available networks, add its SSID to the blocklist using the following command:

netsh wlan add filter permission=block ssid="Netgear_7259" networktype=infrastructure

netsh wlan add filter permission=block ssid

The wireless network with this SSID will not be visible in the list of available networks in Windows.

To allow connections only to certain Wi‑Fi network SSIDs, add them to a whitelist and deny connections to all other wireless networks

netsh wlan add filter permission=allow ssid="Xiaomi1234" networktype=infrastructure
netsh wlan add filter permission=denyall networktype=infrastructure

The list of available Wi-Fi networks will now contain only the networks that have been explicitly allowed.
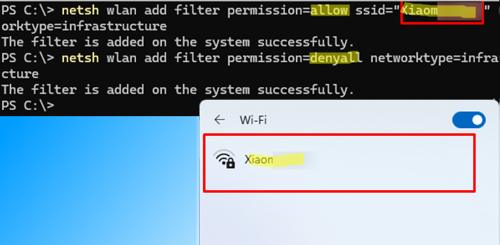
Apply WLAN filter to allow connections only to specific Wi-Fi networks

By default, Windows users cannot see hidden Wi-Fi networks. You can change this behavior using the following command:
netsh wlan set blockednetworks display=show

Showing blocked networks in visible network list has been set to: show.

Windows will now display all detected Wi-Fi networks. Blocked networks will be marked with a cross (X) to indicate that connections to them are not permitted.

To hide blocked networks, change the value of the display option to hide (this is the default behavior).
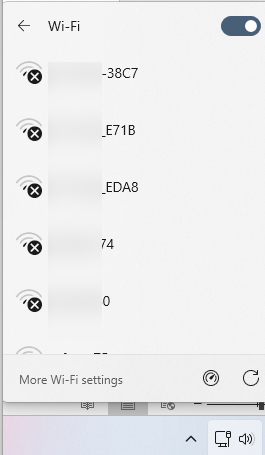
A black cross on a network SSID in the Wi-Fi list means it is blocked by WLAN filters.

Windows stores the configuration of saved Wi-Fi networks in WLAN profiles. Administrators can centrally deploy preconfigured Wi-Fi profiles to computers, allowing wireless connection settings to be distributed without the need for manual configuration on each device.

List applied WLAN filters:

netsh wlan show filters
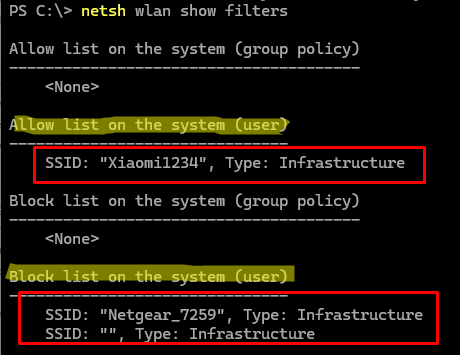
netsh wlan show filters

Remove a specific rule from the WLAN filters:

netsh wlan delete filter permission=allow ssid="Netgear_7259" networktype=infrastructure

To remove a blocking rule from the WLAN filters:

netsh wlan delete filter permission=denyall networktype=infrastructure
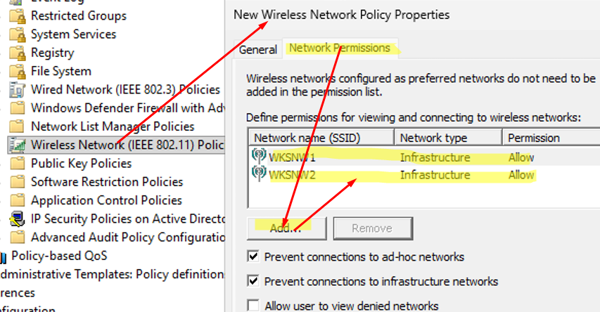
Lists of allowed and blocked Wi-Fi networks can be centrally deployed to client computers via Group Policy. To do this, configure the wireless network policy using the domain GPO editor under Computer Configuration -> Policies -> Windows Settings -> Security Settings -> Wireless Network (IEEE 802.11) Policies.

Whitelist Wi-Fi networks using wireless network policies in GPO

The built-in WLAN filtering feature in Windows should not be considered a reliable security mechanism for preventing users from connecting to untrusted wireless networks. The filter is based on the network’s SSID, so it can be easily bypassed if a user (or an attacker) renames an access point’s SSID to match an allowed network.

As an additional security measure, administrators can hide the Wi-Fi icon from the Windows sign-in screen.
0 comment
1
Facebook Twitter Google + Pinterest
Windows 10Windows 11
previous post
Invalid Signature Detected: Check Secure Boot Policy [Fix]

Related Reading

How to Move (Migrate) Windows Shares to a...

February 26, 2026

SMB over QUIC: Mount File Share over Internet...

December 24, 2025

Security Warnings When Opening RDP Files in Windows...

April 20, 2026

Monitor Windows Log Files in Real Time with...

March 26, 2026

Automate Software and Settings Deployment with WinGet Configure...

November 20, 2025

Remove the Max Path Length Limit (260-Characters) on...

November 19, 2025

Updating UEFI Secure Boot Certificates on Windows Devices...

April 27, 2026

Windows Stucks at ‘Getting Windows Ready, Don’t Turn...

September 24, 2025

Leave a Comment Cancel Reply

join us telegram channel https://t.me/woshub
Join WindowsHub Telegram channel to get the latest updates!

Recent Posts

  • How to Hide Wi-Fi Network in Windows with WLAN Filters (Blacklist and Whitelist)

    August 14, 2026
  • Invalid Signature Detected: Check Secure Boot Policy [Fix]

    August 5, 2026
  • Windows Installer Service Could Not Be Accessed? How to Fix It

    July 28, 2026
  • Why Windows Reports No Internet Access: How Connectivity Detection Works

    July 26, 2026
  • Inactive TS Ports in Windows: Causes and Fixes

    July 20, 2026
  • Add Wireless Wi-Fi Profiles on Windows Devices via Export/Import or GPO

    July 13, 2026
  • CrowdSec on Windows: From Installation to Threat Blocking

    July 3, 2026
  • Manage Microsoft Store Apps with Store CLI in Windows 11 from Terminal

    July 2, 2026
  • Windows Sandbox on Windows 11: Enable, Configure, and Use

    June 10, 2026
  • How to Monitor Windows Machines with Zabbix

    May 26, 2026

Follow us

  • Facebook
  • Twitter
  • Youtube
  • Telegram
Popular Posts
  • Converting Windows 10 to Enterprise LTSC Without Losing Data
  • Configuring RemoteApps Hosted on Windows 10/11 (without Windows Server)
  • Security Warnings When Opening RDP Files in Windows 11
  • How to Remove ‘Some Settings are Managed by Your Organization’ on Windows 11 or 10
  • Remove the Max Path Length Limit (260-Characters) on Windows
  • Unable to Select Edition During Windows 10/11 Installation
  • Change BIOS from Legacy to UEFI without Reinstalling Windows
Footer Logo

@2014 - 2026 - Windows OS Hub. All about operating systems for sysadmins


Back To Top