When running tasks through Task Scheduler in Windows, there is a relatively obscure and often overlooked behavior to be aware of. If a user runs the same resource-intensive task (command or script) once manually from the command prompt (interactively) and once through Task Scheduler, they may notice that the task launched via Task Scheduler takes significantly longer to complete. The reason is that Task Scheduler runs tasks with a low process priority by default. As a result, on high-load computers, such tasks receive less CPU time, execute more slowly, and therefore take longer to complete.
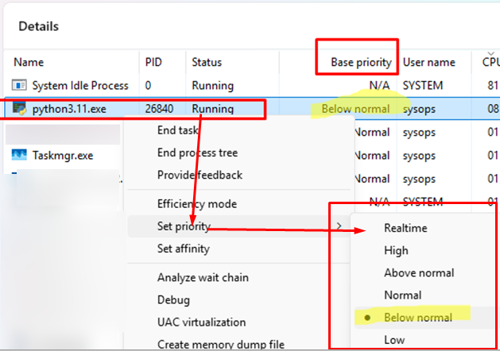
To check the priority of a running process, open Task Manager, switch to the Details tab, find the executable process, right-click it, and select Set priority from the context menu.
From here, you can change the current process priority and see which priority is currently assigned to the process. Alternatively, you can add the Base priority column directly to the process list in Task Manager.
The first screenshot shows the python.exe process running a Python script, which was launched via a Task Scheduler task. As you can see, the process is running at a low priority (Below normal).
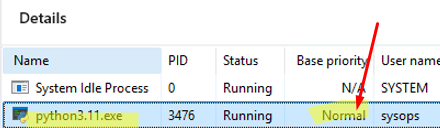
If the same Python script is run interactively, it will run with the Normal process priority.
The low priority assigned to Windows Task Scheduler tasks not only reduces the amount of CPU time available to them, but also lowers the priority of disk I/O operations and memory pages. As a result, processes started via Task Scheduler may run noticeably slower than interactive programs started manually.
It is not possible to change the process priority for a task using the Task Scheduler GUI interface. This option simply does not exist. In previous versions of Windows, it was possible to change the task priority by manually editing the task’s XML configuration file. Let’s look at how to do it.
- Open the Task Scheduler MMC snap-in by running
taskschd.msc - Right-click the target task and export it to an XML file.

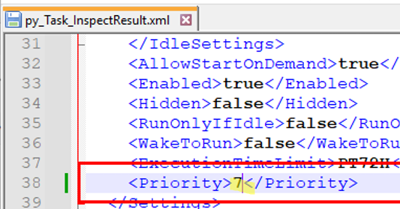
- Open the XML file using any text editor. The Priority option shows the current task priority as a numeric value. The default value is
7, which corresponds to Below Normal priority.
- To increase the process priority for this task, change the value to
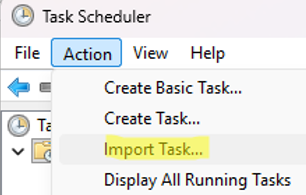
5, which corresponds to Above Normal priority.Note. Task Scheduler priority values range from 0 to 10, where0is the highest priority (Realtime) and10is the lowest (Idle / Background). - Save the changes to the XML file, delete the original (source) task from Task Scheduler, and import the modified task from the XML file using Action -> Import Task.

- This task will now run with the higher NORMAL_PRIORITY_CLASS process priority when launched through Task Scheduler.

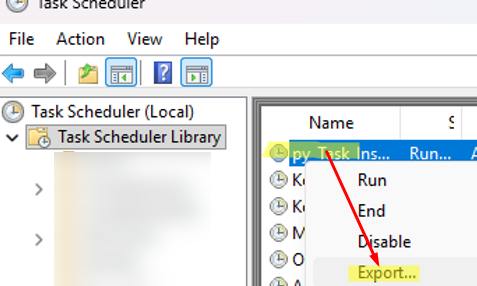

However, if you edit any of the task’s settings via the Task Scheduler GUI, its priority will be reset to the default low priority (7). Therefore, you will need to export the task to an XML file again, modify its priority, and then re-import it.
Starting with PowerShell 3.0, Windows includes the built-in ScheduledTasks module for managing Task Scheduler tasks. This module contains cmdlets that can be used to manage the priorities of scheduled tasks.
To change the priority of a specific task, specify its name in the following PowerShell script:
$mTaskName= "py_TaskInspect"
$mPriority = New-ScheduledTaskSettingsSet -Priority 5
Set-ScheduledTask -TaskName $mTaskName -Settings $mPriority

To get a task’s current priority:
$mTaskName= Get-ScheduledTask -TaskName "py_TaskInspect"
$mTaskName.Settings.Priority

If you use the New-ScheduledTaskSettingsSet and Set-ScheduledTask cmdlets to change the task priority, the priority will not be reset if you later edit the task settings manually via the Task Scheduler.
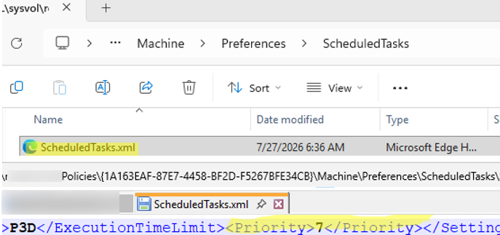
If you deploy a scheduled task to user computers via domain GPOs, you can also change the priority directly in the policy’s XML configuration file, which is stored in the SYSVOL folder. Locate the GPO folder by its ID in SYSVOL and navigate to the Machine or User\Preferences\ScheduledTasks folder.
Open the ScheduledTasks.xml file and edit the Priority parameter value under the <Settings> section.