This article explains how to centrally enable and configure the Windows Remote Management (WinRM) service on domain-joined computers in an AD domain using Group Policy. WinRM is an implementation of the WS-Management protocol that enables the remote management of Windows workstations and servers through PowerShell Remoting (PSRemoting).
With PowerShell Remoting, you can connect to Windows hosts remotely to run scripts or individual PowerShell commands, including full interactive shell sessions. It is an essential tool for remote Windows administration that is widely used by sysadmins and various system management software.
How to Manually Enable WinRM and PowerShell Remoting in Windows
The WinRM service is available in all versions of Windows. However, by default, it is enabled only in server editions (Windows Server) and disabled in desktop editions (Windows 10 and 11). In addition, client operating systems do not have a configured WinRM listener, and the Windows Firewall rules required to allow access to the service are disabled.
You can use one of the following commands to check whether WinRM is enabled on your machine:
Test-WSMan
or
WinRM enumerate winrm/config/listener
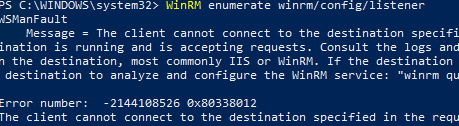
You will see an error saying that WinRM is not configured:
WSManFault Message = The client cannot connect to the destination specified in the request. Verify that the service on the destination is running and is accepting requests. Consult the logs and documentation for the WS-Management service running on the destination, most commonly IIS or WinRM. If the destination is the WinRM service, run the following command on the destination to analyze and configure the WinRM service: "winrm quickconfig".
Error number: -2144108526 0x80338012
To enable and configure the WinRM service on Windows, it is enough to run the command:
winrm quickconfig
or
Enable-PSRemoting –Force
WinRM has been updated to receive requests.
WinRM service type changed successfully.
WinRM service started.

This command will perform the following actions:
- Starts the WinRM service and sets its startup type to Automatic.
- Creates a WinRM HTTP listener
- Allows incoming connections via WinRM (TCP ports 5985 and 5986) in Windows Firewall
After this, remote users can connect to this computer using WinRM tools and leverage remote management capabilities via PowerShell Remoting.
Enable WinRM and PSRemoting on Windows Machines via Group Policy
You can use Group Policy to automatically enable and configure the WinRM service on domain workstations and servers. This makes it far more convenient to enable PSRemoting remote access to managed computers centrally via GPO than to run WinRM configuration commands manually on each computer.
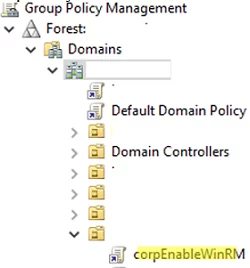
- Open the Group Policy Management Console (gpmc.msc), select an Active Directory container (Organizational Unit) with the computers you want to enable WinRM on, and create a new GPO: corpEnableWinRM.

- Edit the policy settings;
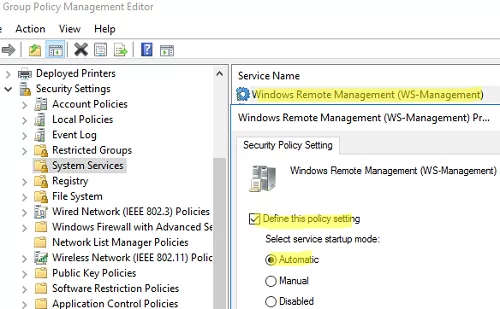
- Go to Computer Configuration -> Policies -> Windows Settings -> Security Settings -> System Services. Find the Windows Remote Service (WS-Management) service and enable automatic startup for it;
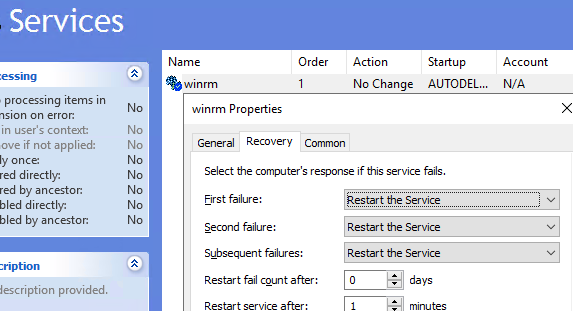
- Then go to Computer Policies -> Preferences -> Control Panel Settings -> Services. Select New -> Service. Enter the service name WinRM. Configure the following service options: Startup: No change
Service action: Start service
In the Recovery tab, set the service to automatically restart in the event of a crash:
First failure: Restart
Second failure: Restart
Subsequent failures: Restart
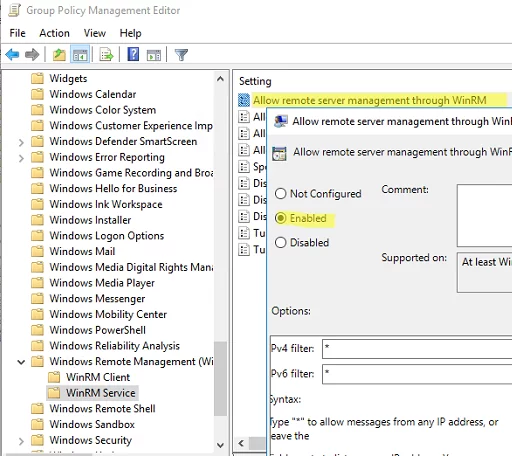
Restart service after: 1 minute - Go to Computer Configuration -> Policies -> Administrative Templates -> Windows Components -> Windows Remote Management (WinRM) -> WinRM Service. Enable the policy Allow remote server management through WinRM. You can use the IPv4 and IPv6 filter fields to specify the local subnets for the WinRM listener. These fields define the permitted IP ranges where the listeners will actually be created on the machines. If you want to allow WinRM connections on any IP addresses (interfaces), set
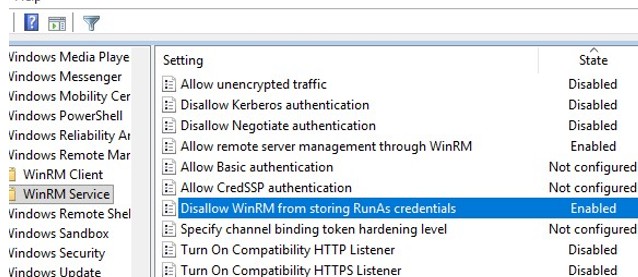
*here. Leaving the IPv6 field blank will prevent WinRM connections through IPv6 interfaces. - To enhance WinRM security, configure the following security options under this GPO section.Allow unencrypted traffic: Disabled
Disallow Kerberos authentication: Disabled
Disallow Negotiate authentication: Disabled
Disallow WinRM from storing RunAs credentials: Enabled
Turn On Compatibility HTTP Listener: Disabled
Turn On Compatibility HTTPS Listener: Disabled
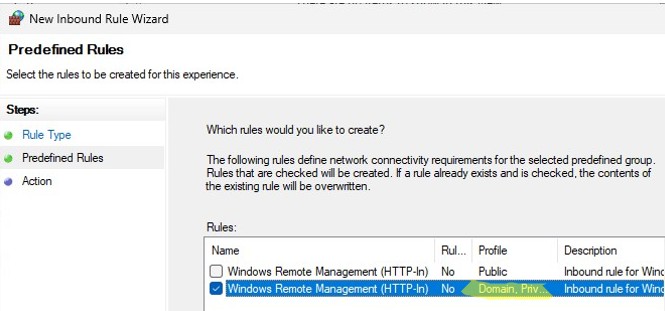
- Then enable the Windows Firewall rules that allow inbound WinRM connections on the default ports
TCP/5985andTCP/5986. Go to Computer Configuration -> Policies -> Windows Settings -> Security Settings -> Windows Firewall with Advanced Security -> Windows Firewall with Advanced Security -> Inbound Rules. Select the Windows Remote Management predefined rule. Only allow incoming connections via WinRM for Domain and Private network profiles, but not for Public (Learn more about network profile types in Windows). Learn more about how to configure Windows Defender rules and open ports using GPO.
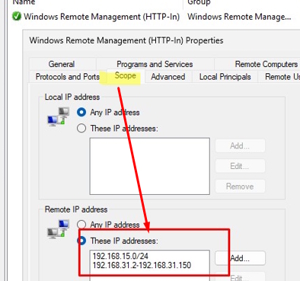
 - For additional security, you can restrict the range of IP addresses that client devices can accept WinRM connections from, for example, to the local subnet or administrators’ IP addresses. To do this, open the firewall rule properties and add allowed remote IPs and/or subnets on the Scope tab.

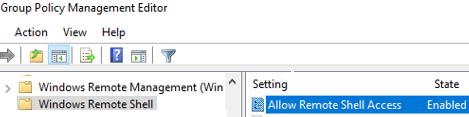
- Go to Computer Configuration -> Policies -> Administrative Templates -> Windows Components -> Windows Remote Shell and enable Allow Remote Shell Access.https://woshub.com/wp-content/uploads/2022/09/winrm-group-policy-allow-remote-shell-access.png
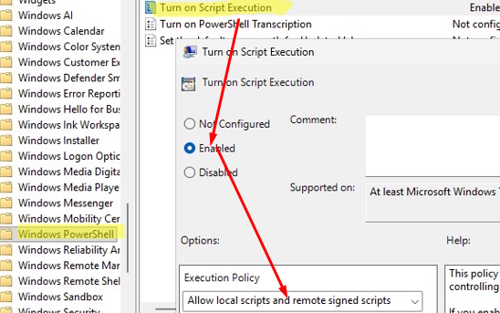
- To run PowerShell scripts on remote computers via WinRM, you need to adjust the PowerShell script execution policy settings: Computer Configuration -> Policies -> Administrative Templates -> Windows Components -> Windows PowerShell. Enable the Turn on Script Execution policy and select the Allow local scripts and remote signed scripts option. This will allow you to remotely run PS1 scripts on client computers (the default execution policy configuration prevents scripts from running).

Update the GPO settings on client machines and confirm that WinRM has been configured automatically. If you encounter issues applying Group Policy settings to clients, use the gpresult command.
Checking WinRM Settings on Client Computers
To verify that the WinRM settings on a client computer have been configured via Group Policy, run the command:
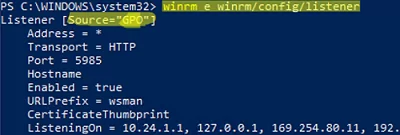
winrm e winrm/config/listener
The command displays the current WinRM listener settings. Note the Listener [Source="GPO"] line. This means that the current WinRM settings are configured through the GPO.
This command can be used to list the complete configuration of the WinRM service on a client computer:
winrm get winrm/config
Then try to connect to a remote computer via WinRM. Open the PowerShell console and run the command below:
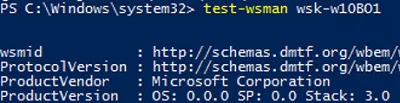
Test-WsMan wsk-w10b01
If WinRM is enabled, the following response will appear:
wsmid : http://schemas.dmtf.org/wbem/wsman/identity/1/wsmanidentity.xsd
ProtocolVersion : http://schemas.dmtf.org/wbem/wsman/1/wsman.xsd
ProductVendor : Microsoft Corporation
ProductVersion : OS: 0.0.0 SP: 0.0 Stack: 3.0
Test-NetConnection -ComputerName wsk-w10b01 -Port 5985
You can then connect to a remote computer interactively via PowerShell Remoting by using the Enter-PSSession cmdlet.
Enter-PSSession wsk-w10b01

In this case, the connection has been successfully established, and the PS console shell of the remote host has appeared.
Another PSRemoting cmdlet that can be used to execute commands and scripts on a remote computer is Invoke-Command.
Invoke-Command -ComputerName wsk-w10b01 -ScriptBlock {ipconfig /all}
If the PSRemoting connection is established, you will see the ipconfig output on the screen.
You can also run a command on a remote host as follows:
winrs -r: wsk-w10b01 dir
In some cases, an error may appear when connecting via PSSession:
Enter-PSSession : Connecting to remote server wsk-w10BO1 failed with the following error message : Access is denied.
CategoryInfo : InvalidArgument: (wsk-w10b01:String) [Enter-PSSession], PSRemotingTransportException FullyQualifiedErrorId : CreateRemoteRunspaceFailed
In this case, check the WinRM connection permissions on the remote computer:
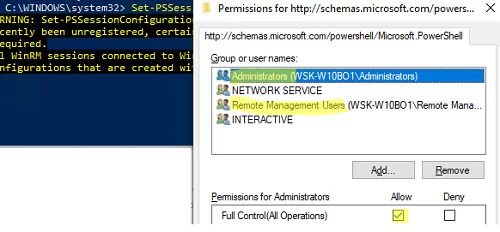
Set-PSSessionConfiguration -ShowSecurityDescriptorUI -Name Microsoft.PowerShell
Make sure that your account is a member of the Administrators or Remote Management Users group and that it has FullControl permissions (See how to allow WinRM connections for non-admin users). Also, make sure that there are no Deny rules.
3 comments
7. Configuration -> Policies -> Windows Components -> Windows Remote Shell
Should be Configuration -> Policies -> Administrative Templates -> Windows Components -> Windows Remote Shell thank you for the help.
Fixed, thanks!
Good Article, Keep it up!..