By default, Windows displays a network status icon on both the Sign-in and Lock screens. This icon indicates whether the computer is connected to a network, whether the current connection has Internet access, and lets users connect to a Wi-Fi network or switch to a different wireless network before signing in.
In some cases, however, the network icon may be missing from the Windows Sign-in screen. In this article, we’ll examine the most common reasons why the network icon doesn’t appear and the methods you can use to restore it.

The most obvious reason for there being no network connection icon on the Windows sign-in screen is that no network adapter is detected on a computer, or the correct driver for the adapter is not installed
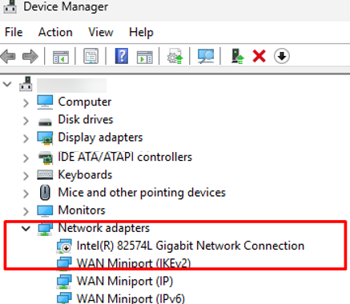
Sign in to Windows using a local account, open Device Manager, and verify the following:
- A physical Ethernet or wireless adapter appears under Network adapters.
- The network adapter is enabled.
- There are no devices listed under Other devices or Unknown devices that indicate a missing network driver.
If necessary, download the latest network adapter driver from the hardware manufacturer’s website and install the driver manually.
Many laptops have an integrated wireless adapter that can be enabled or disabled using a keyboard shortcut. Depending on the manufacturer, these shortcuts can include Fn + F2 through Fn + F12 or another function key.
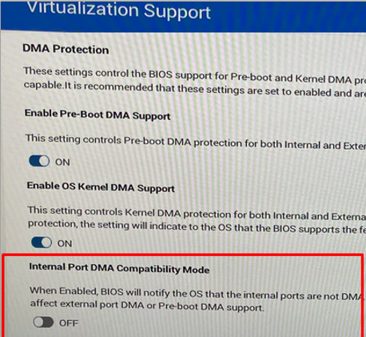
On some Dell laptops (and possibly other systems with integrated PCIe Wi-Fi adapters), you may also need to enable the Internal Port DMA Compatibility Mode option in the BIOS/UEFI settings (typically located under Virtualization Support). This setting provides compatibility for wireless adapters whose drivers do not fully comply with the DMA (Direct Memory Addressing) specification. If the option is disabled, the wireless adapter may remain unavailable until after a user signs in, causing the network icon to be missing from the Windows login screen.
Show or Hide the Network Icon on the Windows Sign-in Screen
By default, Windows is configured to always display the network status icon on the Windows sign-in and lock screens. Group Policy can be configured so that this icon is either hidden from users or always shown.
- Open the local Group Policy Editor (
gpedit.msc) - Go to Computer Configuration -> Administrative Templates -> System -> Logon
- Enabling the Do not display network selection UI option will hide the network connection icon from the Sign-in screen.

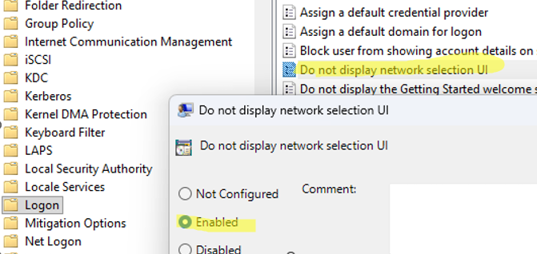
This policy corresponds to the DontDisplayNetworkSelectionUI registry setting under HKLM\SOFTWARE\Policies\Microsoft\Windows\System . If its value is 1, the network icon on the login screen will be hidden. This registry option can be set using the command:
reg add HKLM\SOFTWARE\Policies\Microsoft\Windows\System /v DontDisplayNetworkSelectionUI /t REG_DWORD /d 1 /f
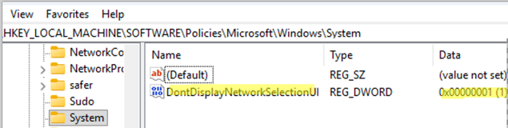
To display the network icon on the Windows sign-in screen, set the registry value to 0 (Disabled).
Administrators can also use this policy to prevent users from switching between Wi-Fi networks. This is especially effective when paired with a wireless network allow list because it ensures that client devices can only connect to approved Wi-Fi networks.
Missing Wi-Fi Icon on the Windows Sign-in Screen After Sleep
Another common cause of a missing Wi-Fi network icon on the Windows sign-in screen is an incompatibility between the network adapter driver and the system’s sleep mode. After resuming from sleep, Windows may not properly initialize the wireless network adapter, leaving it unusable and preventing the network connection from working until the computer is restarted.
This issue is most common on modern Windows laptops that use Modern Standby (S0 Low Power Idle), which is enabled by default. The wireless adapter may remain in a low-power state after resuming from sleep due to driver bugs or conflicts with the adapter’s power management settings.
To determine which sleep states are supported by your device, run
powercfg /a
If the output includes S0 Low Power Idle, the device is using Modern Standby (S0). This power model is known to cause Wi-Fi connectivity issues with certain hardware after the device wakes from sleep. It is better to use the traditional S3 Sleep mode because it typically causes fewer issues with network adapter disconnection when the computer resumes from sleep or hibernation.
To disable Modern Standby (S0) and enable the legacy S3 Sleep mode, run:
Windows 11, Windows 10 20H2 (or newer): reg add HKLM\System\CurrentControlSet\Control\Power /v PlatformAoAcOverride /t REG_DWORD /d 0 /f
Previous Windows versions: reg add HKLM\System\CurrentControlSet\Control\Power /v CsEnabled /t REG_DWORD /d 0 /f
Next, disable the power-saving feature in the network adapter settings using Device Manager.
- Open Device Manager (
devmgmt.msc) - Expand Network adapters and open the properties of the affected WLAN adapter.
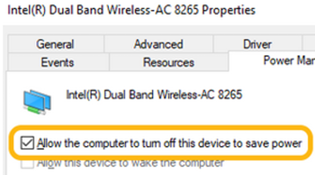
- On the Power Management tab, clear the Allow the computer to turn off this device to save power checkbox.
Disabling this option prevents Windows from powering down the network adapter when the computer goes into sleep or resumes from a sleep state, which can help resolve intermittent Wi-Fi initialization issues.
If your device doesn’t support disabling Modern Standby (S0), consider using hibernation instead of sleep:
powercfg /hibernate on
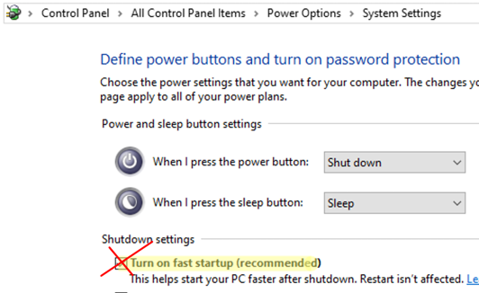
In some cases, disabling Fast Startup can also resolve WLAN initialization problems after startup or resume. You can disable the Fast Startup option via the Control Panel -> Power Options (powercfg.cpl) by unchecking the Turn on fast startup option under Shutdown settings or by running the following command:
reg add "HKLM\SYSTEM\CurrentControlSet\Control\Session Manager\Power" /v HiberbootEnabled /t REG_DWORD /d 0 /f
Disabling Fast Startup forces Windows to perform a full system initialization at startup instead of using a hybrid boot, which can help eliminate driver initialization issues affecting wireless network adapters.