This article covers typical printer driver management tasks that Windows system administrators need to know, including installing, uninstalling, and updating printer drivers. I prefer to use the graphical Print Management MMC snap-in (printmanagement.msc) for managing printer drivers and printers in Windows. If it is not already installed on your computer, you can add it as part of the RSAT administration tools using the command:
DISM /Online /Add-Capability /CapabilityName:Print.Management.Console~~~~0.0.1.0
Manually Install a Printer Driver in Windows
Download the printer driver package from the vendor’s official (!!!) website. Although the process of searching for a driver for a specific printer model and the way driver packages are distributed can vary significantly between vendors, the overall workflow remains essentially the same.
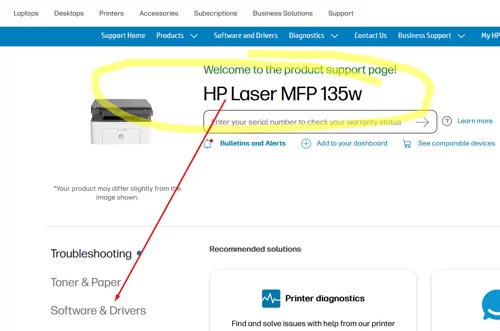
As an example, I will demonstrate how to find and install a driver for an HP Laser MFP 135 printer.
Visit the HP Support website and search for your printer model. Find the section Software&Drivers containing the printer’s drivers and additional software.
Some vendors recommend using universal drivers, which support multiple printer models. A universal driver is also a good option if the original model-specific driver is no longer available because the printer has reached end of support.
Below is a list of universal printer driver names for the most popular print vendors:
- OKI: Universal Print Driver (UPD)
- Xerox: Global Print Driver (X-GPD) and Mobile Express Driver
- HP: Universal Print Driver
- Ricoh: PCL6 Universal Driver
- Kyocera: KX Universal Driver
- Canon: Generic Plus UFR II
- Brother: BR-Script Universal
- Epson: Universal Print Driver
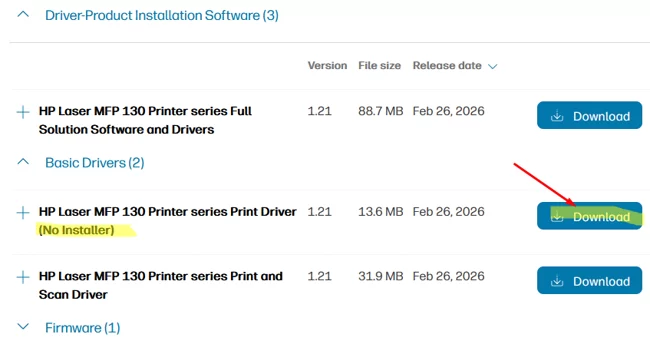
- In our case, the vendor offers two packages: one containing only drivers (without an installer), and another containing an automatic driver installer and additional software (which is not always necessary). I prefer to download the driver-only package without any unnecessary extras.

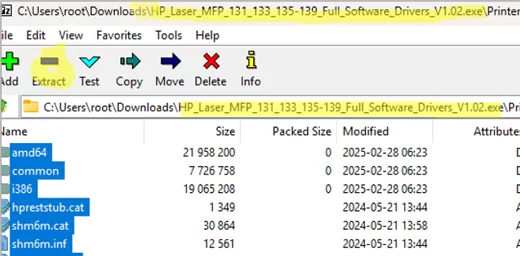
- Printer drivers are usually provided as either a ZIP archive, a self-extracting EXE file or a full MSI installation package. In most cases, you can extract the contents of an EXE installer manually, without running or installing the executable, using an archive utility such as 7-Zip. Run the 7-Zip app and open the driver package you have downloaded. If the package contains multiple directories, look for the directory containing an INF file. The INF file defines the rules and configuration required to install the driver. Extract the contents of the package into a local directory.
Now that you have a directory containing the driver’s INF file, you can install the driver. There are several ways to install a printer driver to Windows:
- Via the Print Server properties dialog: run the command
printui /s-> go to the Drivers tab-> click Add -> x64 -> Have a disk and specify the path to the directory containing the driver. - Use the Printer Management console to install the driver. Open the MMC snap-in by running the command
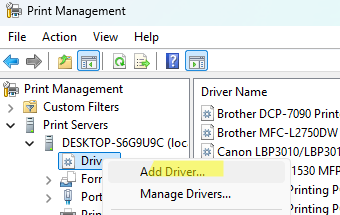
printmanagement.msc. Expand Print Servers -> Host -> Drivers -> Add driver. Specify the path to the directory with the driver INF file. - You can also automate the process of installing a printer driver using PowerShell :
pnputil.exe -i -a "C:\Downloads\HP135\shm6m.inf"
Add-PrinterDriver -Name "HP Laser MFP 131 133 135-139"
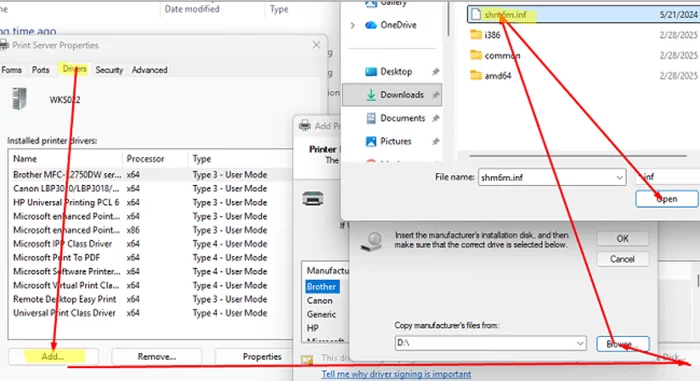
pnputul command adds the driver to the Windows Driver Store, and the second command makes the print driver available for use by the Print Spooler. When using the Add-PrinterDriver cmdelt, you need to specify the printer’s full name from the [MODEL] section of the INF file.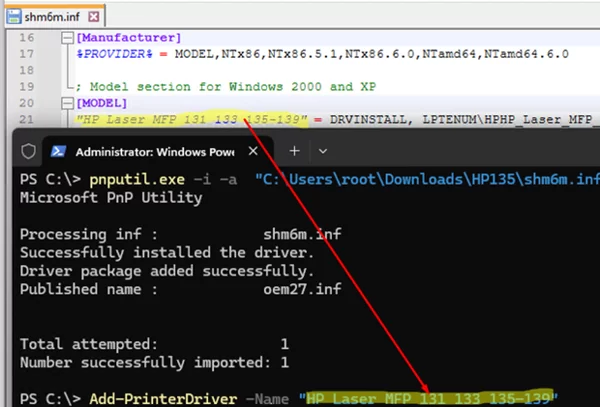
Remember to specify the path to the directory that contains the INF file, or to the INF file itself, rather than to the driver’s EXE installer.
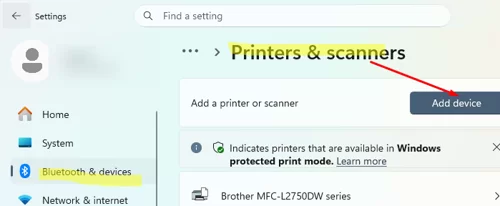
Installing a printer driver in Windows does not automatically create a new printer. If you want to add the printer, go to Settings -> Bluetooth & devices -> Printers & scanners, connect the printer to the computer, and click Add device. The printer can be detected automatically by Windows, or its IP address or hostname can be specified manually (if it is a shared network printer). Since the required driver is already installed, Windows should be able to identify and configure the connected printer.
How to Manually Remove a Printer Driver in Windows
If a printer driver is malfunctioning, corrupted, or simply no longer required, you can remove it. The process of uninstalling printer drivers differs from that of removing drivers for other types of devices.
Open the Print Management console (printmanagement.msc) and navigate to Print Servers -> computer_name -> Drivers. Right-click on the driver in the list of installed drivers and select Remove driver package -> Delete.
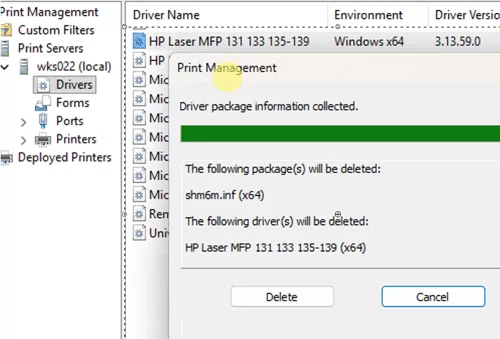
You can also remove the installed printer driver through the Print Server properties: run the printui /s /t2 command, go to the Drivers tab, select the printer driver, click the Remove button, and then select Remove driver and driver package. 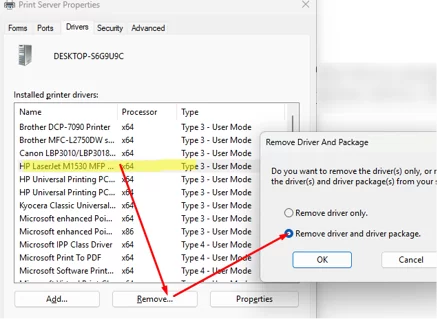
Or remove the driver package using PowerShell:
Remove-PrinterDriver -Name "HP Laser MFP 131 133 135-139"
Updating a Printer Driver in Windows
In the Print Management console (printmanagement.msc), you can check the version and release date of the printer drivers currently installed on the host. Go to Print Servers -> Computer -> Drivers. This information is displayed in the Driver Version and Driver Date columns. For security and compatibility reasons, it is recommended to keep printer drivers up to date.
If you find that outdated printer drivers are installed on a computer, update them to the latest available versions. Updating a printer driver usually means downloading and installing a newer version from the manufacturer’s website, or installing a universal print driver and switching to it.
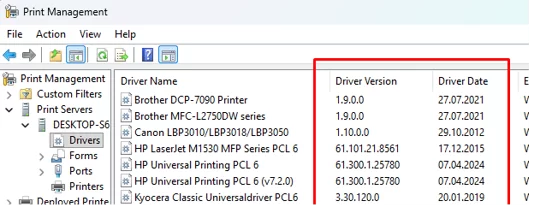
It is possible to have multiple versions of the same printer driver installed on a computer. In this case, it is good practice to add the driver version to the driver name when installing a new driver (for example, using PowerShell).
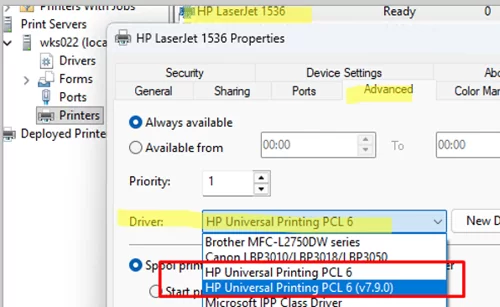
For example, rather than replacing the existing driver, I installed an updated version of the HP Universal Printing PCL 6 driver (v7.9.0). This allows different printers to use different driver versions on a single computer when required.

After installing the new driver, you can switch between the available driver versions in the printer properties. Open the Advanced tab and select the required driver from the drop-down list.