When Windows Subsystem for Linux (WSL2) is used extensively to run Linux distros or Docker Desktop containers on Windows, users may notice that the ext4.vhdx virtual disk files grow continuously. In some cases, this can consume all available free space on the host system drive.
By default, WSL2 uses VHDX virtual disk files, which expand dynamically when new data is written to them. However, these virtual disk files are not automatically compacted when data is deleted from them. In this guide, we’ll look at how to properly reduce the size of WSL virtual disk files, including Docker Desktop virtual disks, by shrinking them to optimize disk space usage.
How to Compact a WSL VHDX Virtual Disk File in Windows
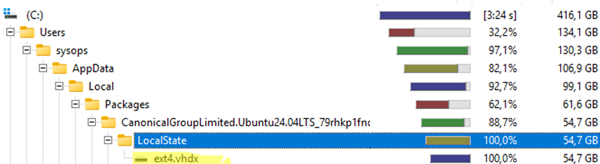
After unexpectedly running out of space on the Windows system drive, I ran the WinDirStat tool to analyze the storage usage and found a large ext4.vhdx virtual disk file in the user profile. The size of this WSL virtual machine VHDX file has increased to almost 55 GB (compared to an initial size of around 3 GB for a clean WSL2 Ubuntu image).
To check the amount of disk space being used by files inside the WSL image, run the following command in the Linux distro terminal:
df -h /

Let’s find out the exact location of the VHDX file for the specific WSL Linux distro. A Windows computer may have multiple WSL Linux images installed. List them:
wsl.exe --list --verbose
Copy the name of the Linux image (Ubuntu-24.04, for example), and extract information about its virtual disks from the system registry using PowerShell:
$wsl2distro='Ubuntu-24.04'
 $VHDX=(Get-ChildItem -Path HKCU:\Software\Microsoft\Windows\CurrentVersion\Lxss | Where-Object { $_.GetValue("DistributionName") -eq $wsl2distro}).GetValue("BasePath") + "\ext4.vhdx"
%USERPROFILE%\AppData\Local\Packages\CanonicalGroupLimited.Ubuntu24.04LTS_79rhkp1fndgsc\LocalState\ext4.vhdxLet’s use PowerShell to find out the actual size of a VHDX file on the system drive.
"{0:N2} GB" -f ((Get-Item $VHDX).Length / 1GB)
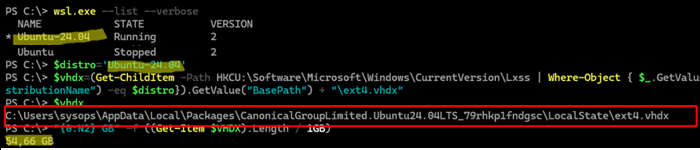
As you can see, the VHDX virtual disk file is several dozen GB in size, even though only 3 GB of space is actually used within the Linux image. Clearly, the user has deleted files within the WSL distribution, but the storage space has not been reclaimed. Therefore, the VHDX disk needs to be compacted.
$ sudo apt-get install ncdu
 $ sudo ncdu --exclude /mnt
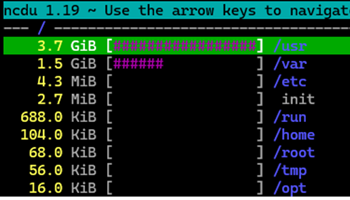
Delete any unnecessary files, images, logs, and other junk data.
For example, I will also clean up obsolete package dependencies and cached installation files on Ubuntu/Debian:
$ sudo apt-get update && sudo apt-get autoremove -y && sudo apt-get clean
In order to compact the VHDX virtual disk, you first need to shut down the running WSL image:
wsl --shutdown
To compact the VHDX virtual disk, you first need to shut down the running WSL image:
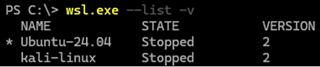
Check that all WSL distributions are stopped:
wsl.exe --list -v
To compact the VHDX disk, you can use the built-in PowerShell Optimize-VHD cmdlet. For example:
Optimize-VHD -Path C:\Users\woshub\AppData\Local\Packages\CanonicalGroupLimited.Ubuntu24.04LTS_79rhkp1fndgsc\LocalState\ext4.vhdx -Mode full
If this PowerShell cmdlet is missing, you can use the diskpart command to shrink a virtual VHDX disk.
diskpart
Specify the path to the VHDX disk:
select vdisk file="C:\Users\woshub\AppData\Local\Packages\CanonicalGroupLimited.Ubuntu24.04LTS_79rhkp1fndgsc\LocalState\ext4.vhdx"
Mount the VHDX file in read-only mode:
attach vdisk readonly
Shrink the file
compact vdisk
Unmount the VHDX file:
detach vdisk
 exit
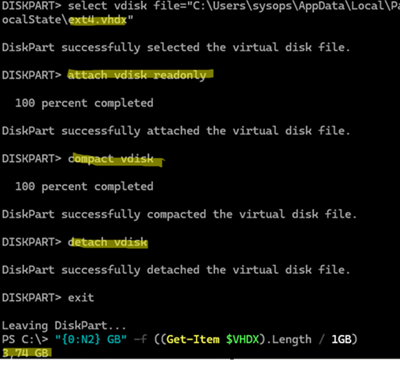
Verify that, after compacting the VHDX file, its actual size on the physical disk has been significantly reduced and is now close to the amount of data actually stored in WSL
Reclaim Docker Desktop Disk Space in WSL2
If you have Docker Desktop for Windows installed on a computer, it also uses WSL2 to run containers and stores its data in a VHDX virtual hard disk. This VHDX file grows continuously when images, containers, and volumes are added. However, it does not shrink the virtual disk automatically when this data is removed.
To display the amount of disk space actually being used by Docker Desktop:
docker system df
The free space inside the Docker Desktop VHDX file can also be reclaimed using the Optimize-VHD cmdlet or the diskpart tool. However, first remove any unused Docker images and containers to clean up the disk from inside the WSL guest:
docker system prune -a
By default, Docker’s WSL data is stored in the file %LOCALAPPDATA%\Docker\wsl\disk\docker_data.vhdx .
Close Docker Desktop and shut down WSL:
wsl --shutdown
You can then compact the docker_data.vhdx file as described above. For example:
Optimize-VHD -Path "$env:LOCALAPPDATA\Docker\wsl\disk\docker_data.vhdx" -Mode Full
Claiming WSL2 Disk Space with Sparse Mode
WSL2 offers an experimental feature that can automatically return unused disk space within a VHDX file to the host system. A sparse VHDX feature leverages NTFS and Hyper-V virtualization features to enable TRIM/UNMAP operations against VHDX files (there is an increased risk of file fragmentation when using this feature on HDDs). Essentially, the sparse mode can automatically compact the WSL2 virtual VHDX disk on the fly.
You can enable sparse mode to automatically reduce the VHDX size for a specific WSL2 distro using the command:
wsl --manage Ubuntu-24.04 --set-sparse true
A warning will be displayed when you run the command:
Sparse VHD support is currently disabled due to potential data corruption.
To force a distribution to use a sparse VHD, please run:
wsl.exe --manage <DistributionName> --set-sparse true --allow-unsafe
Error code: Wsl/Service/E_INVALIDARG

To ignore the warning and force-enable experimental sparse mode, run:
wsl --manage Ubuntu-24.04 --set-sparse true --allow-unsafe
You can also enable sparse mode by editing the configuration file (%UserProfile%\.wslconfig).
[experimental]
sparseVhd=true
Once this option is enabled, the VHDX file will be automatically shrunk after data within it is deleted, without the need to stop the WSL virtual machine.
Before enabling sparse mode, optimize the VHDX file size using diskpart or Optimize-VHD. After sparse mode is enabled, you will no longer be able to compact the file using these commands.