Windows OS Hub
  • Windows
    • Windows 11
    • Windows 10
    • Windows Server 2025
    • Windows Server 2022
    • Windows Server 2019
    • Windows Server 2016
  • Microsoft
    • Active Directory (AD DS)
    • Group Policies (GPOs)
    • Exchange Server
    • Azure and Microsoft 365
    • Microsoft Office
  • Virtualization
    • VMware
    • Hyper-V
    • Proxmox
  • PowerShell
  • Linux
  • Home
  • About

Windows OS Hub

  • Windows
    • Windows 11
    • Windows 10
    • Windows Server 2025
    • Windows Server 2022
    • Windows Server 2019
    • Windows Server 2016
  • Microsoft
    • Active Directory (AD DS)
    • Group Policies (GPOs)
    • Exchange Server
    • Azure and Microsoft 365
    • Microsoft Office
  • Virtualization
    • VMware
    • Hyper-V
    • Proxmox
  • PowerShell
  • Linux

 Windows OS Hub / Windows 11 / How to Remove Unwanted Entries from Installed Apps in Windows 11/10

August 25, 2026

How to Remove Unwanted Entries from Installed Apps in Windows 11/10

In Windows 10 or 11, certain applications may remain listed in the Installed apps section of the Settings app even after they have been uninstalled. This usually happens when the software was uninstalled incompletely or incorrectly: the uninstaller removed the program files from disk but failed to clean up all of the application’s registry entries. In this article, we demonstrate how to manually remove unwanted (ghost or stuck) entries for uninstalled software from the list of installed apps in Windows.

In my case, an automation script was used to remove the 7-Zip archiver from a Windows 11 machine, but its entry was still displayed under Settings -> Apps -> Installed apps ( ms-settings:appsfeatures). Note that the generic app icon is displayed instead of the custom 7-Zip icon in the software list. If you attempt to remove the app by clicking Uninstall, Windows displays a message indicating that the program cannot be found.
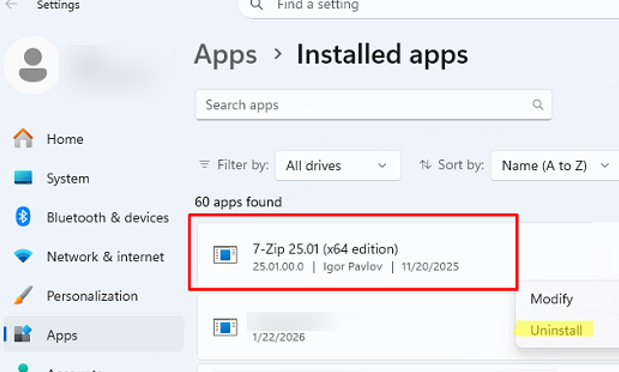
Non-existent app showed in the installed apps list

In such cases, the first step is to try removing the software entry using the classic Programs and Features -> Uninstall or Change a program applet. To open this dialog, run appwiz.cpl

Find the program you want to remove from the list and click Uninstall. Windows will attempt to automatically remove the stale application entry from the system.
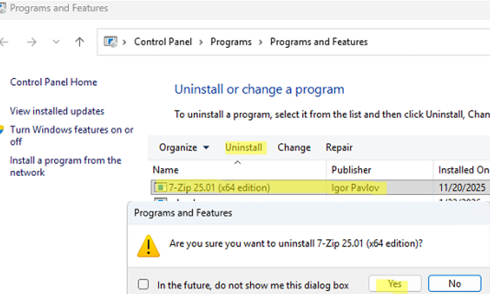
Use the Uninstall option in the Programs and Features applet to remove bad entries

If this doesn’t help, you will need to manually remove the application’s entry from the registry. When building the list of installed apps displayed in the Settings app or the Programs and Features applet, Windows reads application entries from several registry keys (listed below). If a program entry is found in the registry, it will be displayed in the list of installed apps, even if its files are no longer present on disk.

If the program is actually installed in Windows and its files on the disk are not deleted, but you cannot remove it correctly using standard tools, proceed to the next article, which explains how to forcefully uninstall a program in Windows.

When an application is installed on Windows, either the installer itself or the Windows Installer service must create an app uninstall entry under one of the following registry keys:

  • For applications installed for all users (system-wide), the registry location depends on whether the application is 32-bit (x86) or 64-bit (x64):

HKLM\SOFTWARE\Microsoft\Windows\CurrentVersion\Uninstall

HKLM\SOFTWARE\Wow6432node\Microsoft\Windows\CurrentVersion\Uninstall

  • For per-user applications (such apps are installed by users into their own profile and typically do not require administrator privileges):

HKEY_CURRENT_USER\SOFTWARE\Microsoft\Windows\CurrentVersion\Uninstall

HKEY_CURRENT_USER\SOFTWARE\Wow6432node\Microsoft\Windows\CurrentVersion\Uninstall

Your task is to find the application’s registry entry in one of the locations listed above. Every installed application has a corresponding subkey, identified either by a long GUID (for applications installed using MSI Installer) or by the application’s name. Open the subkeys one by one and look for the entry where the DisplayName value, shown in the right-hand pane of Registry Editor, matches the name of the application you want to remove. Once you have found the correct entry, delete the entire application subkey from the Uninstall registry key.
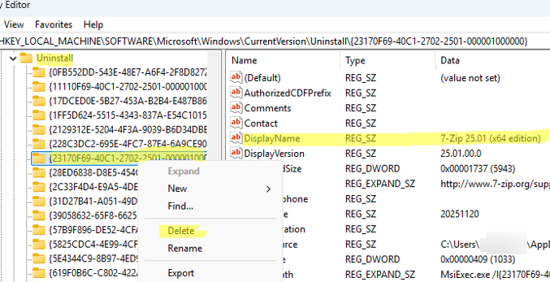
Remove leftover entries for uninstalled apps from the registry key Uninstall

As a result, the program entry will be removed from the list of installed programs.
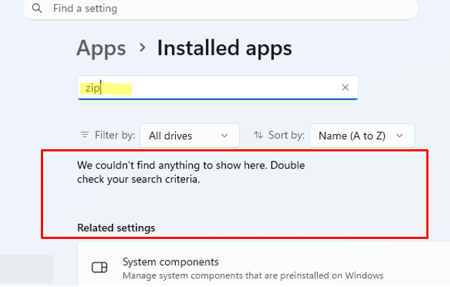
remove certain entries from all apps list

In this article, we covered how to manually remove a stale entry for a non-existent application from the list of installed programs displayed in the Settings app and the Control Panel in Windows 11.

Administrators can also hide an application entry from the list of installed apps in Windows. To do this, you need to either rename the DisplayName parameter to QuietDisplayName in the application’s section under the Uninstall registry key, or create a SystemComponent parameter with a value of 1 .
0 comment
0
Facebook Twitter Google + Pinterest
Questions and AnswersWindows 10Windows 11
previous post
Fix: Your PIN Isn’t Available When Signing in Windows 11

Related Reading

How to Move (Migrate) Windows Shares to a...

February 26, 2026

SMB over QUIC: Mount File Share over Internet...

December 24, 2025

Monitor Windows Log Files in Real Time with...

March 26, 2026

Security Warnings When Opening RDP Files in Windows...

April 20, 2026

Automate Software and Settings Deployment with WinGet Configure...

August 24, 2026

Remove the Max Path Length Limit (260-Characters) on...

November 19, 2025

Windows Stucks at ‘Getting Windows Ready, Don’t Turn...

September 24, 2025

Updating UEFI Secure Boot Certificates on Windows Devices...

April 27, 2026

Leave a Comment Cancel Reply

join us telegram channel https://t.me/woshub
Join WindowsHub Telegram channel to get the latest updates!

Recent Posts

  • Enable or Disable Fast User Switching in Windows 11

    August 18, 2026
  • How to Hide Wi-Fi Network in Windows with WLAN Filters (Blacklist and Whitelist)

    August 14, 2026
  • Invalid Signature Detected: Check Secure Boot Policy [Fix]

    August 5, 2026
  • Windows Installer Service Could Not Be Accessed? How to Fix It

    July 28, 2026
  • Why Windows Reports No Internet Access: How Connectivity Detection Works

    July 26, 2026
  • Inactive TS Ports in Windows: Causes and Fixes

    July 20, 2026
  • Add Wireless Wi-Fi Profiles on Windows Devices via Export/Import or GPO

    July 13, 2026
  • CrowdSec on Windows: From Installation to Threat Blocking

    July 3, 2026
  • Manage Microsoft Store Apps with Store CLI in Windows 11 from Terminal

    July 2, 2026
  • Windows Sandbox on Windows 11: Enable, Configure, and Use

    June 10, 2026

Follow us

  • Facebook
  • Twitter
  • Youtube
  • Telegram
Popular Posts
  • Converting Windows 10 to Enterprise LTSC Without Losing Data
  • How to Remove ‘Some Settings are Managed by Your Organization’ on Windows 11 or 10
  • Remove the Max Path Length Limit (260-Characters) on Windows
  • Installing Windows without USB/DVD or Other External Drives
  • How to Pause (Delay) Update Installation on Windows 11 and 10
  • How to Restore a Missing or Disappeared Taskbar in Windows 11
  • Organization Policies Prevent Opening Hyperlinks in MS Office
Footer Logo

@2014 - 2026 - Windows OS Hub. All about operating systems for sysadmins


Back To Top